Tuesday, December 2, 2008

Slavia ZVP, Fabricating the Front Sight

Having measured the dovetail and drawn up the sight based on pictures I found on several sites, I got to work making a replacement front sight for the ZVP.

1/2" steel chucked in a collet block and faced with an end mill.

Cutting to depth on the first side.

Flipped 180 and the other side is cut. You'll notice it's sticking out less...well I actually had to start all over again at this point due to a dial revolution counting attention deficit problem. I could really use a DRO.

Turned 90 degrees and more milling.

And 180 to finish the process.

Tilted at 30 degrees to mill the dovetail. I didn't mill all the way as I wanted some wiggle room for final fitting.

Milling the chamfer on the blade.

Just a little more to go.

I filed the radius for the blade. I was going to do some fancy rotary table work, but figured it would be faster to file it.

Sawing off the sight.

Now to deburr...

I did several test fittings, filing the dovetail until it was a firm fit when drifted into the groove. Then I sloshed on some cold blue and called it good.

Another view.

Monday, December 1, 2008

Derrick's Xisico/BAM B26-2, Part 5

Warning: Responsibility follows the guy doing the trigger job. If this bothers you, that's fine. There's a very long list of things I don't want or can't do either. If you are going to even think about adjusting a BAM trigger, you should proceed with caution. If you even have the smallest sliver of doubt in your mind about triggers, don't mess with them.

This is the "Rekord" trigger inside the BAM B26-2. It's almost an exact copy. Almost. BAM just forgot to copy the quality of materials and tolerances. There is potentially a very serious safety issue concerning this trigger: The stock adjustment spring is on the right. Notice how short it is. It's so short, any attempt to lighten the trigger pull by backing out the adjustment screw (bottom center) runs a very high risk of the trigger failing to engage the piston completely upon cocking, or even firing unexpectedly when touching off the safety. Both of these incidents have been reported by other users. This spring is simply too short. Backing out the trigger adjustment screw even slightly can COMPLETELY de-tension all the spring's force holding the sear.
The spring on the left is one from a local hardware store. The extra length allows trigger weight adjustment while keeping sufficient force against the tongue (Weihrauch's name for this compenent). This problem will not occur if you chose to not adjust the screw from the factory adjustment. I believe this is a material issue with these rifles that could result in a serious accident--most likely to the shooter--as the gun may snap shut unexpectedly. Fingers beware.

More fair warning: Disassembly of the trigger unit into individual components is normally a huge mistake. There are several pins, sears, springs, bushings, etc. that all fly apart under spring force upon disassembly. It is not likely that you will see beforehand how it all fits back together. Attention to the circular window in the lower right. The spring pushes upward against the "tongue". You can see the rear of the "tongue" bearing against the "lower sear" (Again, HW's nomenclature) I've applied a thin green colored grease between the tongue and the lower sear. The overlap between the tongue and lower sear is felt by the trigger finger as 1st stage pull and the noticeable "creep" in the 2nd stage before the trigger breaks. Polishing those surfaces and greasing them will make the trigger feel lighter and less gritty. Do not attempt to file, grind, sand or otherwise alter the angles here or bad things will ensue. Remember the warning about taking the trigger unit apart if you want to buff the contact surfaces.

BAM "Rekord" trigger unit on the left. Weihrauch Rekord trigger unit on the right. Dimensionally, they are so, so close.

HW on top, BAM stacked below.

Stacked from the side. The difference is literally only a few thousandths of an inch. Are they interchangeable? Substitution would require some minor fitting--most likely to the bushings for the retention pins. The safetys would also have to be refitted. There's no practical reason to substitute one trigger for the other. If you want a Rekord trigger, buy a HW. And you'd never install a BAM trigger into a HW... I was just curious how close the copy really was. Despite the spring issue, It's my sincere belief that this trigger is a substantially BETTER trigger than the GAMO type trigger that airgunners have come to despise so much.

Thursday, November 27, 2008

Derrick's Xisico/BAM B26-2, Part 4

And on Derrick goes...

Replaced the flat head head bolts in the trigger guard with allens. The front bolt is a 6mm x 1.0, the rear a 4mm x .70. Just out of curiosity, I pulled the trigger guard from a HW-97K. They're not quite identical, but they are interchangeable. The BAM guard is slightly taller. The HW guard is more substantial. Definitely more metal in the German guard.

This is where I got lazy and tried to install a sling swivel stud around midnight. I eyeballed the pilot hole. Totally nailed it, but when I started to drill a flat for the stud to seat on, the stock splintered out. Making the best of a bad situation, I used a 1/4" wood chisel and carved away the splintered wood creating a larger flat for the swivel. The stock is so weird with the high cheek piece and the thumbhole, it doesn't look like a train wreck. I found that Minwax Special Walnut #224 was an exact match. Lot of extra work because I just couldn't wait until morning and do the job on a drill press.

The good news is the swivel lays flush against the flat when carrying the rifle on the shoulder.

I mentioned that the barrel/breech block assembly was used on other BAM rifles. The barrel is dovetailed for a front sight. The B26-2 comes with a black painted steel muzzle weight. It didn't do much for me, so I went back to my box-o-parts for something else.

This muzzle brake was a bit more interesting.

The slots were milled using a Taig lathe with the milling cross slide attachment. It was my second attempt at milling.

Two short 5mm x .80 set screws secure the brake to the barrel. For the finish, I used a cold blue. I first tried Permablue, then tried 44-40, then Superblue. I've found it to be really helpful having 2 or 3 kinds of cold blues on hand when trying to match a part--or just get one to work. The first two bluing compounds gave thin, splotchy coverage on this particular piece of steel. The Superblue worked much better.

Had good results by not leaving the bluing solution on the part for longer than 20 or 30 seconds. Rinse long and often with cold water to stop the bluing process and help prevent further color changes. Wet a piece of 0000 grade steel wool with bluing solution and buff very lightly to blend, then rinse some more. I've been trying to figure out how to prevent the rusting that usually occurs a couple days after cold bluing--even if the part has been oiled. So far, heating the part with a blow torch to about 200 degrees and then coating it in STP Gear Oil has worked incredibly well. The STP just seems to melt onto the hot steel, leaving a thin, slick surface behind.

Almost forgot, the B26-2 barrel diameter is 0.620".

Wednesday, November 26, 2008

Derrick's Xisico/BAM B26-2, Part 3

Derrick beavers away...

Another view of the two guides. The scuffs on the HW guide are from test fitting to the spring. A press fit is good here as the spring expands slightly as it's compressed. The tight fit helps ensure that the spring gets compressed in a straight line with no buckling.
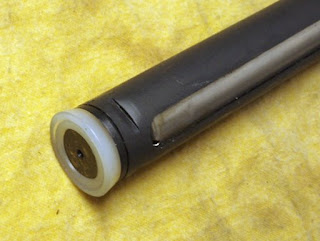
The piston seal was replaced with a brand new one. The seal is exactly the same one used by Crosman for their Remington Summit air rifle. Probably 50 airguns use this seal. Again, I found some in my parts box. (it's a big box)
It's Crosman's part number# RW1K77-002. I think it was about $4.00
The end of the steel piston is buttoned. I think Nick wrote a piece sometime back about installing seals. I used a similar technique and managed to not injure the seal, piston or myself. No mean feat.
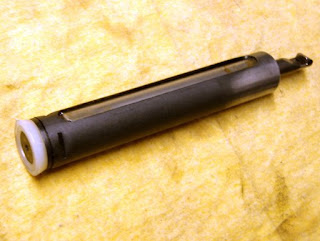
Not done with you yet, my pretty. If you look closely, you'll see that the rear of the piston body has now been buffed on a polishing wheel. The piston's seal ensures that the front of the piston can't touch the inside of the compression tube. The rear, however may touch momentarily during firing compression and the smooth surface helps eliminate friction.
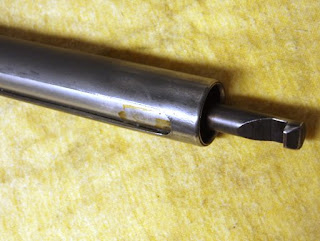
The notch on the cocking rod was also polished up. This is not the place to re-cut any angles.

Ready for installation. Anybody want an old BAM spring guide? I'll make you a sweet deal.

Sorry, no pics of the reassembly. Just the look at the disassembly in reverse. The only thing I do differently from most tuners on assembly is to use copper anti-seize on the piston seal and in the compression chamber. Just burnish it into the cylinder wall using a piece of PVC tube. Years ago, Beeman sold a "Laser" upgrade for your R1 rifle. The kit included a replacement mainspring, spring guide, piston seal and special "Laser" lube. The copper colored contents of the jar left no doubt as to what was inside the package. Been using it ever since for spring gun piston seals. It's commonly available at auto parts stores. The mainspring and spring guide can be coated with it, too. Although, I typically use a moly grease and a bit of Maccari heavy tar. Side note: If you bought an early Glock pistol, the slide rails were greased from the factory with copper anti-seize.

The B26-2 uses a shared barrel assembly with some of the other BAM rifles. Although this particular gun doesn't come with open sights, the breech block is drilled and tapped with 4mm x .70 holes.

The holes bothered me, so I measured and cut a piece of steel bar stock to turn into a sight plate cover. Half an inch wide is just about the right width to fit across the top. Marked the holes, spotted, drilled and countersunk.
Countersink vs. counterbore. I had to look this up the other day. "Countersink" means the bolt hole is tapered like a funnel for the bolt head. "Counterbore" means the hole has a flat bottom for something like a socket head cap screw.

Once it fit, I hand filed the ends to match the contours of the gun, sanded it smooth and cold-blued using Birchwood Casey PermaBlue.

Installed. Looks better than the open bolt holes.
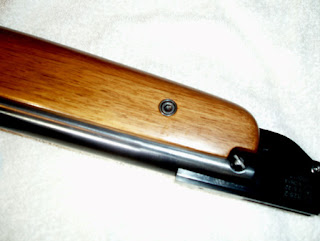
I also used the Taig and made forearm cups out of a piece of free machining steel. These are counterbored for 5mm x .80 bolts. I've found that it's too easy to slip with a screwdriver and mar a wood stock. Allen and Torx head fasteners reduce that slippage possibility substantially.

Nick covered how to easily make screw cups a few weeks ago. If you don't have a small enough boring bar, try an end mill that's just slightly larger than the bolt head. Using drill bits, get the counterbored hole to full diameter--but not full depth. Use the end mill as a drill bit to cut the last few hundredths and mill the bottom flat.

Tuesday, November 25, 2008

Derrick's Xisico/BAM B26-2, Part 2

Continuing with Derrick's teardown...

Once the end cap was removed, the spring guide, mainspring, and piston came right out. I was careful to not cut the piston seal on the slot for the cocking lever. The piston seal is a fairly soft synthetic. Dark brown oil covered everything inside the gun. Well, at least it wasn't going to rust. The seal was stained brown from the oil.
I should mention here that I had only put about 20 pellets through the gun before I took it apart. Assuming again that it's a returned gun, I have no idea how many shots were fired from the previous owner, but as there was virtually no wear on the barrel pivot, it must have been few. The gun was putting lightweight Tournament wadcutters out at approx. 675 fps. A few feet above the 650 fps rating by BAM.

Here's the piston seal looking like a million bucks. I wonder how the seal would have looked 1500 shots later? The piston is sleeved with a piece of sheet metal. Kind of surprising in a (relatively) low-cost gun--as that adds cost and time in production. Typically, this is something a tuner will do to tighten the fit between the ID of the piston to the OD of the mainspring. A snug fit helps mitigate against vibration. As it wasn't a snug fit in this gun, it was probably done so the cocking shoe doesn't rub against the spring coils when cocking.

This is the cheesiest (apologies to Kraft lovers) spring guide I've ever seen. This has to support the mainspring under full compression. Now I see how they could afford to sleeve that piston.

Another view of the seam.

The stock mainspring. No optical illusion. It's not straight. The kinks are likely the result of the wimpy spring guide combined with a low cost spring. The flex and buckling equates to friction and vibration. I anticipated when I bought the gun that I would have to order a spring from Jim Maccari and then make a new spring guide. However, I had a brand new Weihrauch R10 spring and guide that looked close enough to work.
The stock BAM spring was 11.125" long with a 0.122" diameter wire. The OD was 0.743", ID 0.500" +/-.

A silver Weihrauch (often abbreviated as "HW" for Hermann Weihrauch) spring guide next to the mac and cheese model. The BAM spring guide measured 2.937" long and had an OD of 0.473" The HW guide was 3.123" long and the OD 0.522". The single most important thing was the only thing I didn't measure: I made sure that the piston rod would pass through the center of the HW spring guide. And it fit perfectly.

Sunday, November 23, 2008

Derrick's Xisico/BAM B26-2, Part 1

Derrick's picking up the slack for me again! Here's a report on his Xisco/BAM B26-2:

A few months ago, I went to the Pyramyd Airgun garage sale. One of the guns I bought was the Xisico/BAM B26-2. The gun is based on Weihrauch's R-series. I'd been considering getting one for a year or so, but I didn't want to order it sight unseen. The few reviews that I had seen were favorable. However, everyone did mention that the cheek piece was too high to achieve proper eye relief with a scope. I ended up buying an open box .22 cal model at the sale. It was probably a returned gun. So, I knew going into this that whatever money I saved over the cost of a real Weihrauch, I'd make up for in time and effort. Plus, I'd probably figure out pretty quickly why it was returned. You gotta love a challenge.

Stock removed, trigger retaining pins pushed out. This is how the "Rekord trigger copy" looked. Brown oily goo.

Safety and safety spring. Another copy of Weihrauch. To me, the biggest surprise was that --for the money-- this was a pretty well made gun.

The trigger unit. The rough surface on the upper sear is evident. A minute or two on a buffing wheel will fix this.

Another shot of the rough surface. It's unlikely that the steel is hardened properly on the sears. I chose to polish and lube the mating surfaces to minimize wear. I'll come back to the trigger later.

The action went into my medieval brute of a spring compressor.

Used a 10mm wrench and removed the retaining nut. Surprise. Nothing happened. The end cap was still secured. ???

Close examination revealed 2 small plugs that pass though the receiver tube into the end block. Dental pick to push one out.

A drift knocks out the other side.

The end cap now must be rotated counter-clockwise a few degrees to disengage a tab. The spring compressor is finally earning it's keep.

More to come...