Saturday, March 29, 2008

Making a Barrel Band/Pivot Plug for the 1377, Part 2

I should clarify a bit, as at the end of part one, I said:
"One part of three all done. Part 2 to follow in a bit..."
There are three parts to the assembly, but only two parts to my blog post about making it! So here's how the other two parts of the assembly were made.

The plug completed, I then did a little programming and made the barrel band on the Taig CNC mill.


A piece of 3/8" thick aluminum mounted in the vise.

Notice it's supported on parallels well away from the center of the piece.

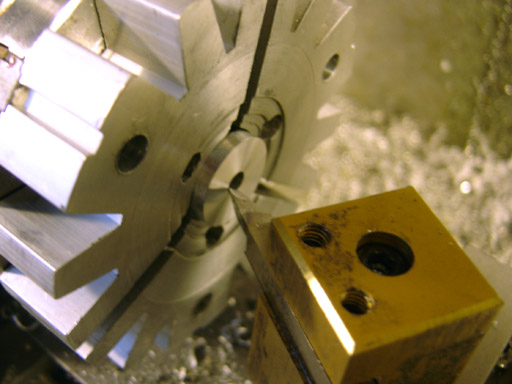
Interpolating the barrel and plug holes with an end mill. While not as good as drilling and boring, it's close enough.

Staring the contour cut.

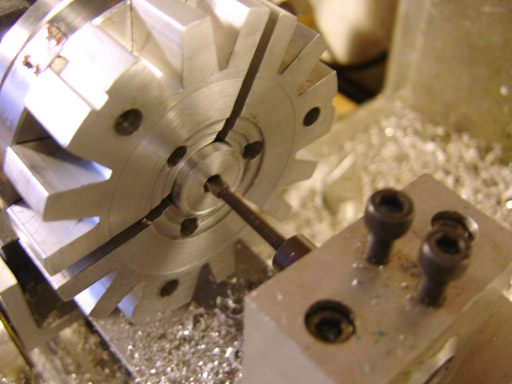
I took several passes around.

In the end, the part dropped free.

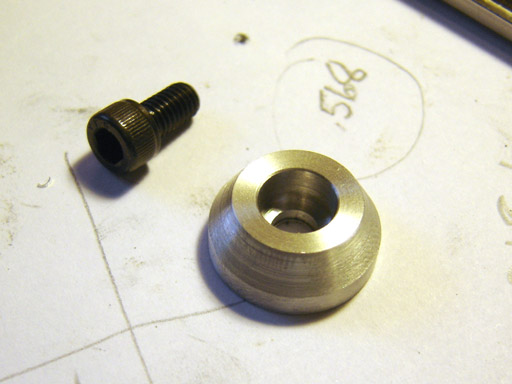
A bit of filing, sanding and general deburring and the part is done.

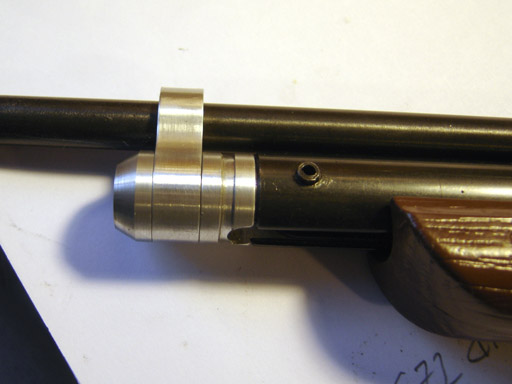
I assembled the band on the plug and barrel.

Drilling for the end cap.

Counterbore for #10 screw.

The screw will sit flush with the end of the cap.

Cutting off to length.

Wait! I decided to angle the end first. Just to make it pretty.

You'll notice the weird way the tool is clamped to the top slide. Well a customer had an emergency and needed to replace the toolbit clamp for his top slide. So I sent him mine and forgot to order a replacement one from Taig...thus this kludge.

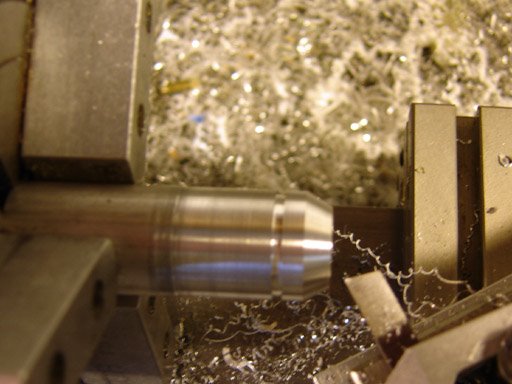
Turning the taper. Notice the groove from starting to part off and then reconsidering. This is not a planned, rather an evolving, project.

Then I parted it off, and flipped the part around and mounted it in the full circle jaws on the 3 jaw chuck. I then faced it flat as parting often isn't perfect due to flex in the blade.

I bored a slight relief on the face.

All done!

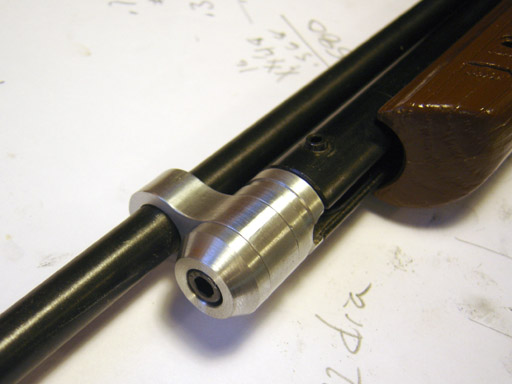
I assembled everything. It pleases me, and is a start to the sci-fi look I think the gun will end up with.

One assembly done, how many more to go?

Making a Barrel Band/Pivot Plug for the 1377, Part 1

Since I was bitten by the airgun bug, again, I've looked at all the wonderful modifications people have done to the simple Crosman 1377 pistol with awe. I figured a good first project would be the conversion the the 1377 to a small carbine. I ordered a steel breech and 24" barrel from Crosman (you have to call them to order parts), and bought the 1377 at our local BiMart.

The Steel Breech is an inexpensive upgrade.

You just take the pistol apart, and put it back together...

Add a shoulder stock (I bought two for the price of one through the online airgun classified pages)

The only modification to get to this point is to drill the barrel band/pump tube plug (part #1300A006) out to 7/16"

Pushing out the roll pin that retains the barrel band unit.

Just an ugly plastic part. The general idea of my project, overall, is to replace any plastic with metal.

I took some measurements and made some simple drawings. I decided a 3 part assembly would replace the one part unit.

Facing a length of aluminum rod.

Turning the diameter for the plug.

Filed and scotchbrite-ed.

I flipped it around and mounted it true in the 4 jaw chuck, then cut it off to length.

Turning a smaller diameter for the actual barrel band.

Drilling for a #10 screw thread.

Tapping with hand power, using the lathe for alignment.

Picking up the edge, so I can find the center line.

Picking up the end.

Spot drilling for the roll pin that retains it in the pump tube.

Drilling for the roll pin.

I then inserted a drill in the hole and rotated the unit 90 degrees, using the drill to magnify the angular position. While not a perfect technique, it's very quick and gets you spot on, generally.

At this point I had the vise snug but not tight and I pushed the plug all the way into the vise.
I milled the slot for the lever arm.

All done, except for deburring. You'll notice the groove in the plug. That's just an aesthetic groove...

Installed in the tube.

One part of three all done.

Part 2 to follow in a bit...

Friday, March 28, 2008

Fixing the Predom Lucznik Rear Sight

I recently bought a Predom Lucznik air pistol from Military Gun Supply. There is a lot written about the pistol already on the web, so I won't rehash that all here. MGS doesn't have the pistols up on their site any more, but they may still have a few in stock. The price was $50.00 plus about $15.00 S&H. The gun as received was a tad rough, which is to be expected from military surplus.
As received, my main problem was the looseness in the rear sight. Generally you want your sight to be accurately adjustable, and once adjusted, to stay put! The rear sight on the Predom could easily be wobbled back and forth. So I set out to fix it. Let me state that I would not attempt such a repair on a valuable airgun, as it is possible that in trying to fix a minor problem, a problem of far greater magnitude could be created, in this case a broken rear sight...

The rear sight in place.

With a ruler placed approximately perpendicular to the pistol, the sight can be tweaked right...

...and left by maybe 10 or 15 degrees...not good.

The sight disassembled. Remove the elevation screw, then the screw which affixes the sight to the pistol. Snap the sight mount out from the rear sight unit (see the barbed spring fork?) and then unscrew the adjusting screw and knurled nut. Don't lose the spring washer(s)!

This is the angled notch that bears against the spring of the sight mount.

It's hard to see, but basically there is a gap, the spring does not press against the notch and thus the sight is loose. I took some measurements and the slot in the spring (I'm just going to call the
sight mount the "spring" for now, bear with me) measured .083" near the oval cutout to the left of the picture, and .076" up near the notch. So it had clearly compressed over time.

First off, let me state that I am wearing safety glasses while I do this.
I put the spring in a small machine vise (a very handy Palmgren vise ), stuck a stubby Craftsman screwdriver in the slot and put it under my arbor press. Then with only mild pressure from truning the handwheel, rather than the lever arm...

...I pushed the screwdriver down into the slot. This is the point at which things could go terribly wrong. Worst case would be a fracture of the spring, and slightly less worse would be a deforming of the spring so it was no longer flat. So again, don't do this if breaking the sight would break your heart as well. In any case keeping one hand on the screwdriver to minimize twisting, and going slowly with very little force seems to have worked. I pushed down a little, removed the screwdriver, measured the width, and repeated, pushing down a little further each time until the gap was spread far enough. Taking it slowly is important for things like this. The spring was spread beyond the point at which it would spring back to the original loose dimension, and took a set so that it was slightly wider at top than near the oval.

The sight adjustment screw snapped into the spring, and was held firmly.

Now we had to fix the other issue, which was the folded ears on the sight body which fold around the spring. They were loose as well. The spring thickness is .047", and the sight ears had a gap of .053"

I placed a stack of automotive leaf gage/shims measuring .045" into the slot and squished the ears (one side at a time) in the vise (I told you it was handy). Because the ears will spring back slightly when compresses you want the shims to be undersize by a few thousandths.

Sure you could eyeball it without the shims, but why? With the shims in place you are guaranteed to not squish the slot too far, and get even pressure over the entire ear. If it's still to big, reduce the shim stack another couple of thousandths and try again.

The sight is tight! Although there is a flaw in the design. Because the spring is designed to allow the insertion of the sight body, it has to spring inward under pressure. So you can still wiggle the sight if you grip it forcefully. But it is no longer loose.