Saturday, May 21, 2011

Attempting to copy Anthony Rienecker's Pro-Top Part 1

A couple months ago, I saw an ad in the Yellow Airgun classifieds for a "Pro-Top"--a modification to the front half of a Crosman 22XX valve that does away with the standard piercing needle. The Pro-Top was conceptualized by Anthony Rienecker as a way to get rid of the piercing needle on the valve stem thereby improving CO2 gas flow. I found his design to be fascinating in it's straightforward solution. Some of his original design ideas can be found here. Crosman's valve design jams the needle into the CO2 cartridge when the stem is hit by the striker. The needle can--and does--restrict the gas flow by plugging the hole in the cartridge momentarily. Anthony's idea was to change the front half of the valve and use the old-style 38T type piercing design. This design gets rid of the piercing needle that compromises gas flow. The same 38T valve parts are still used today in Crosman's 357. It's ingenious. If you've read this blog for any length of time, it's obvious that I'm not a power hound when it comes to airguns--but I am a sucker for a nice design. I was going to buy one, but since I had most of the parts on hand and I'm an inveterate hack, I really wanted to make one for myself even more. Make no mistake, it wasn't about the cost of a Pro-Top. At $26 shipped, they're an absolute steal. I wanted to try to make one and see what Anthony went through to make his design work. I contacted Anthony about two weeks ago via email to get his thoughts about this blog post. I ended up calling him a day later and we spent an easy hour talking about his design and it's origins. Surprisingly, he's a regular reader of this tawdry blog and encouraged me to give it a shot. I can tell you unequivocally that I wish he lived next door. He's a genuinely good guy. If you want to buy a Pro-Top, simply contact him at amriensr@yahoo.com and he'll take care of the details.

Here we go--Hey, remember, this copy is not going to be an exact duplication of Anthony's work. I'm making a one-off based on his idea and design. His is the real deal that has gone through prototypes, testing and improvements.

Here's the spare 2240--yes, another gun from the Findlay, OH airgun show. Also scrounged up an extra 22XX valve and some brass rod

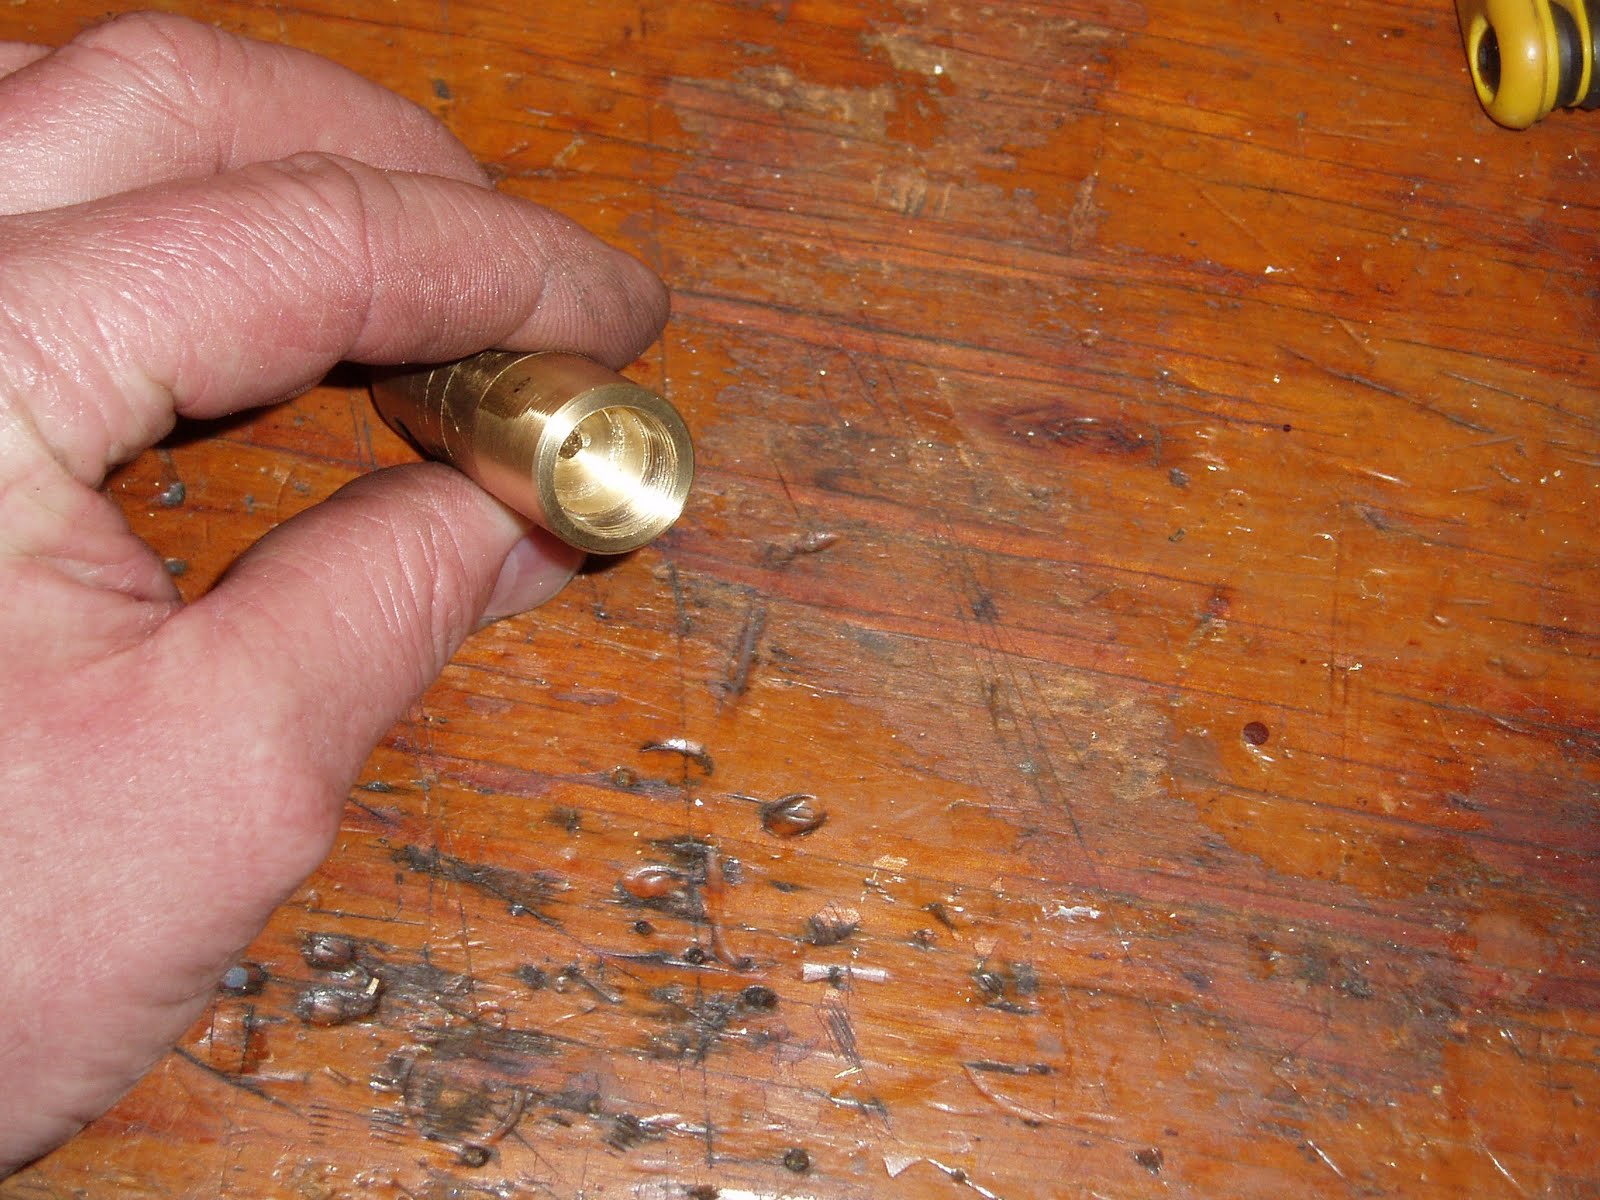
End seal on the stock valve. This one is pretty trashed. Got it used and the previous owner really overtightened the cap.

There's that piercing needle. Pressing the stem against the bench simulates the striker hitting the stem. That needle can restrict gas flow--especially when using a heavier hammer spring in an attempt to gain velocity.

Here's what I've been referring to as the 38T style piercing pieces. I have a slightly different threaded collar than what Rienecker uses.

Unscrewed the stock valve. Just trying to conceptualize how I'm going to proceed.

Cut off a 1.5" long piece of brass. Faced the ends and turned the end down.


Threaded 9/16-18 to fit the Crosman body.


Couldn't cut the full thread in the small lathe, so I transferred the work to the vise and chucked the die into a handle.

Threaded.

With a parting tool, I cut a groove for the valve body o-ring

Test fit.

Chamfered the end of the thread.

For concentricity, I threaded the piece into the (gutted) Crosman valve body and snugged it down. Took a very light skim cut to remove any runout between the halves.

Looked too long, so I used the parting tool again.


Spotted the front of the valve with a center drill.

Selected a #30 bit for the through hole.

After through drilling, I started an 11/32" hole then progressively enlarged it...

Until I finished the hole to 0.500" with a tiny boring bar. The 38T piercing pin and seal sit in the bottom this counterbore.

Had to make a quick run to Kromhard Twist Drill for an oddball 9/16-28 bottoming tap. The tap ran me $18.50 or so out the door at the good guy price. Vaughn at Kromhard is still waiting for the day when I just need a "normal" 1/4-20 plug tap. Don't hold your breath, Vaughn.

Only tapped the front half of the hole for the retaining collar.

More to come...

Monday, May 16, 2011

Notes on Reassembly of the Crosman 105

These pictures and notes show my progress, lack or progress and final success in resealing the 105…over the course of a month!


05151101
I removed the spring from a Bic lighter. It’s the correct size for a number of uses, in this case the safety detent spring and the spring in the bolt.


05151102
Turning some seals from 90 durometer urethane rubber.


05151103
The finished seals. I made a few…


05151104
The valve assembly. I figured an o-ring would work for sealing the valve body in the pistol. Unfortunately the pistol leaked. So I spent some time trying to figure out the problem…I removed the brass cup that the valve spring fit in as I couldn't find it on the parts list.


05151105
First up was the exhaust valve seat. It had dings and was rather wide.


05151106
So I recut it, I removed about .01” material from all faces. But the pistol still leaked. So I went on to the seal for the valve body. Clearly the o-ring wasn’t working.


05151107
I checked up some teflon rod and started making a seal.


05151108
Testing for fit on the ID.


05151109
The ring. It stands slightly proud to allow for “squish” so I can seal the valve body. But you guessed it, it still leaked…


05151112
I taped some 80 durometer urethane sheet down to a piece of plastic. I used a sharpened brass tube to cut the ID hole…The spindle was turning, so this was similar in function to a paper drill.


05151110
And then cut the seal out with a larger sharpened tube.


05151111
This worked well, so I’ll have to try this in the future. The 80 durometer, being softer than the 90 durometer of the first seals, seemed to work much better. But the pump was not pushing much air into the valve…


05151113
I had a Crosman 101 aftermarket pump cup sitting around, so I tried it.


05151114
I assembled the pump and it worked slightly better but not perfectly…it just didn’t seem to seal well against the wall of the pump tube.


05151115
I used the Bic spring to make a spring for the bolt.


05151116
I turned down the cut end so it wouldn’t scratch the wall of the receiver.


05151117
This screw holding screwdriver is small in diameter and worked well for putting the bolt pin back in place. You can never have too many specialty screwdrivers.


05151118
I decided to use a modified Crosman 1377 pump cup. I’ve shown that several times on the blog. I turned down an old button head cap screw for the retaining screw as the cup is shorter than the cup used on the 105 originally.


05151119
The screw turned down. I then wire brushed off the rust.


05151120
The assembly with the new pump cup and screw.


05151121
The pistol reassembled. The grips didn’t seem like they lined up with the screw holes, but then they did…odd. Now it pumps up, holds air and functions!


05151122
The pellets hang up in the bore. It seems rough.


05151123
So I used that tiny screwdriver as a split-lap and polished it with some scotch brite. Seems much better.


05151124
Finally…I noticed that Derrick said the bolt on the 116 is supposed to have tiny balls between the bolt spring and the ID of the breech, and the 105 is virtually identical, so I dug some out and put them in. the bolt is quite smooth now.


I haven’t had time to check velocity, but it seems similar to the Crosman 130, which makes sense given the size of the pump tube. I’m glad it’s done, this pistol was punishing my self-esteem!