Thursday, December 30, 2010

Rochester Disassembly, Part 4

The Christmas rush is over so I can get back to having “fun”with airguns. I say “fun” because the Rochester is definitely not a fun air rifle to disassemble, and I suspect reassemble.

12291001

First thing, I filed any dings on the valve body down.

12291002

A 3/4” 5C collet fits.

12291003

At both ends. This means I don’t have to make a special holder for the parts.

12291004

The tube mounted in a 5C collet fixture.

12291005

The valve in a 5C hexagonal collet block. I used the large wrench to the left to unscrew the halves…I did this outside as I used a propane torch to heat the join up until the solder started flowing. Once the solder was hot enough it actually unscrewed easily.

12291006

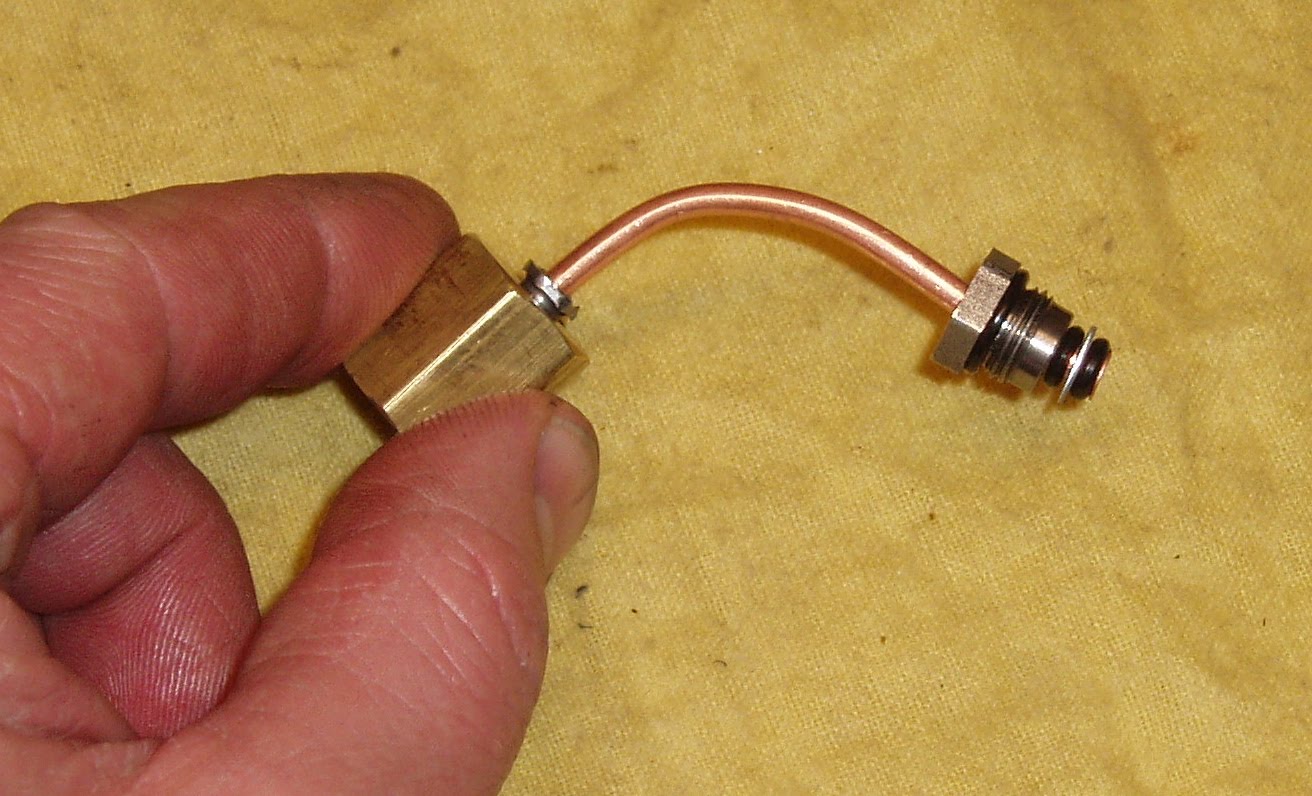
The valve. Note how much solder covers the threads.

12291007

The tube.

12291008

Well you would think that the hard part was over…

12291009

Milling a tool to fit the slot in the valve face.

12291010

Stuck so tight the tool bends…

12291011

I realized that the check valve would move out of the way when pressed, so I tried a large screwdriver, and a few other things and it still wouldn’t budge.

12291012

So back outside, I heated it up and whatever was holding it together let go. I took this picture and tried to continue unscrewing but it was stuck again…so more heat and it came all the way out.

12291013

Finally.

12291014

The valve parts.

12291015

You can see the end of the check valve stem is peened over on the end…

12291016

As is the exhaust valve stem.

12291017

So I turned off the excess.

12291018

And the parts unscrewed.

12291019

Pretty simple valve, for all that work.

12291020

I think that I’ll cut an o-ring groove under the head, for easier service later.

12291021

Not sure about how best to deal with the reassembly to the tube as the slot on the tube and the transfer port have to be coplanar – I may cut an o-ring groove on the valve where it contacts the tube, and possibly pin the valve to the tube (with a tiny setscrew?) so that they stay aligned. This should seal well and make it easier to disassemble.

They really couldn’t have made this design harder to service if they had tried.

Monday, December 27, 2010

Diopter Sight Disassembly and Modification

Back to the rear sight I'm using on my IZH-61. Obviously(?) it's not the stock sight. It's either the Avanti, Crosman or Air Arms. Maybe they're all the same. I can't tell from the pics I find online. Did I forget the Gamo? Anyway, the diopter sight "issues" I'm experiencing are due solely to the narrow dovetail on the IZH and the God-forsaken anti-glare tube I just had to have. Luckily, the sight is extremely simple and straightforward.

So here we go. Removed the tube, eyecup, and aperture.

Removed the dovetail clamping assembly. Note the two small springs: they serve only to push the clamping plate away from the dovetail to make installation and removal easier.

Removed the two tiny circlips on the bottom rear of the sight.

Unscrew the elevation knob--all the way out. I heard, but didn't see, the spring loaded ball bearing from the detent go bouncing across the room.

Fortunately, Nick sells an assortment of small bearings for just such an occurrence . Then I dropped the replacement bearing and heard it hit the floor. Third time was the charm. The bearing is a 3mm.

The sheet metal cover plate is removed. Pulled the bottom out of position first--over the pin--then disengaged the top of the cover.

It's a bit tricky to remove. I pried the edges up with a dental pick. Again, bottom first, then the top, then the plate was easily removed. It wasn't coming off without damage otherwise.

Sans cover.

Sorry about the blur. The long pin came out. This is a slide pin for the elevation.

I didn't need the pin punch for the elevation pin...

No pics, but there's another circlip holding the windage screw in place. Remove the circlip, then unscrew the windage adjuster. Look out! There's another 3mm bearing and spring.

Two plates. The threaded outermost holds the aperture. Had to use the pin punch to knock out a cross pin. It's a slide pin for windage. Sorry, the pic didn't come out.

Another pic for my orientation.

Here's the "window". It's too small on almost every side for my anti-glare tube to clear.

Silver sharpie says: "Remove about this much". This could also be done with a small file.

End miller time.

Milled all 4 sides. Didn't measure anything. This is all for clearance. Just tried to not accidentally cut it in half.

To fix that right-biased windage problem, I needed a bit more precision in the milling set up.

The dial indicator is on a magnetic base affixed to the bed.


Indicated on the base of the sight. Fiddled and adjusted until the dial indicator didn't move as I advanced the crosslide across the travel of the cut.

Lined up a small 60 degree dovetail mill and verified the depth.

Need to remove about as much material as the aperture was offset to the right. Just over 0.150".

Aluminum cutting fluid and some luck.

The unintended side effect--The clamping plate bottoms out before it's remotely tight on the gun. Just superb.

Milled out the recess for the plate, then switched to a smaller 0.125" center cutting end mill and got into the corners a bit more.

Finished. Now I just have to reassemble in reverse order. I did not drop any bearings on reassembly.

I'll throw a pic or two up of the whole IZH 61 as soon as I can get some real light. I'm shooting most of these at 10PM and later.

More soon.

Wednesday, December 22, 2010

Emergency Christmas Repair on a Crosman 38T

Bought a friend a super clean Crosman 38T for Christmas. Actually bought it for him almost eleven months ago. That's some crazy early shopping, but you buy them when they show up. Besides,  he'll be a ten year old kid all over again. Took it home, gassed it up and it worked just fine. Forward eleven months, Kathy and I are ready to wrap. At the last moment, I decide to gas the gun up and give it to him charged. Yeah, you know it. GAHHHH! Almost violated that "do not give non-functional presents" policy. Quick tear down. We've covered 38T (and 38C) guns several times on this tawdry blog. So, I suppose many of these pics are more for my reference to bring me back up to speed on this model. Before gassing up the gun, Fortunately, I'd given the piercing pin a shot of Crosman Pelgun oil before installing the 12 gram CO2 cartridge. Fortunately--because the oil sprayed out at the point of the leak. The oil pinpointed the leak at the seal between the valve and the copper gas tube. Removed everything spring loaded that had potential to shoot across the room. Pulled the cylinder indexing pawl mechanism. just some additional pics The red light indicates the location of said leak. Crosman calls this a "gland seal". Oh kaaay. The "gland seal" at the opposite end was just as bad. A close look at the gas tube showed that it was in pretty poor condition, too. It looked cracked at the valve end. The next morning, a trip to my favorite neighborhood hardware store (remember those?) netted several various pieces of brass and copper tubing. Thanks Carl! Cut and faced a 2.25" section of the 1/8" diam. copper. Started to bell one end with a 30 degree point. Bench block held the tube. A small steel rectangle under the block allowed me to hammer a wider point (60 degree) into the end. Then, a couple strategic taps with the hammer, one end was finished. Cut the bad piece in half. It's the only way to remove the nuts and washer. Installed on the single-flared-end tube. Then repeated the flaring step. Not having any 30 year old Crosman "gland seals" handy, I opted for o-rings. I think that's an #A007 on the left and #A006 on the right. Though there wasn't one there originally, it looks like the valve-end nut is cut for an o-ring at the end of the thread. I added an #A011. It sure won't hurt. Test fitting proved my eyeball method of sizing the copper tube length was a bit shy of the mark. So, I cut the short tube in half, removed the pieces and made another. Why do it once when you can do it repeatedly until it's right? Anyhow, reassembled the gun, gassed it up and it leaked CO2 even faster than the first time. The leak was at the exact same spot. A bit of cursing and a night's sleep later, I replaced that #A006 o-ring with a smaller #A005 then put another one between the small washer and the nut. Like so. Reassembled yet again, shot a couple CO2 cartridges through to test and it's gassed up and ready for gift wrap. Merry Christmas everybody!