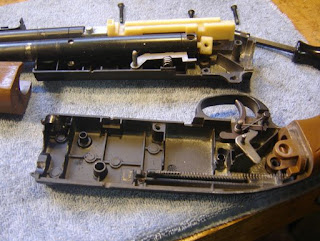
Back to the overhaul. Time to remove the compression chamber and the valve assembly. Using a 2mm allen wrench, loosen the setscrew bearing against the cross pin anchoring the chamber to the lower grip frame shown below.

It's unnecessary to remove the setscrew. About one full turn out is sufficient.

With the setscrew loose, drive the cross pin completely out with a drift.

The compression chamber lifts right out. At the bottom of the chamber there are 3 steel "fingers" held in slots by a small cross pin. Punch out the small pin and pull the "fingers" out of their slots. Note that the center "finger" is different at the base. The small tab at the bottom guides the sear through its travel pulling the hammer. It's not a bad idea to polish the bottom guiding edge of that center finger.

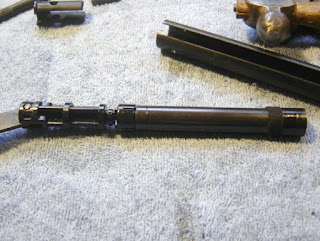
Here's the compression tube. The breech o-ring can be seen near the top, left side. The valve stem is sticking out on the top right. It's a pull open valve. The hammer pulls the stem downward releasing the trapped air through the transfer port at the breech.

A 13mm wrench removes the brass nut to access the valve.

Oops. Pulled the top o-ring off already. I'm ahead of myself. The o-ring fits on the end of the valve stem in the groove. It's a #006.

I took that #006 o-ring off so I could carefully hold that end of the valve in a padded vise. A 7mm wrench removes the black nut that the hammer pulls against. The stem is peened slightly so the nut won't come off in use. Removing the nut also removes the slight peen and allows for complete disassembly.

I polished the entire valve stem on the buffer and carefully cleaned off the buffing compound. I also found a higher quality replacement hnbr o-ring (the green colored o-ring) to seal the valve circumference. Note: this o-ring is the same size as the breech o-ring.
Buzzy's Slick Honey is a superb o-ring lube--especially for sliding fit parts that still need to air seal.
The threadlocker will replace the peening I removed.

Thought I'd also teflon tape the valve nut. You know...just in case.

The PTFE tape was too wide. I cut it in half lengthwise and gave it three full wraps.

Got all liberal with the Slick Honey. Seriously, this stuff is almost impossible to wipe off. It is incredibly thin and lasts dang near forever. It was first marketed years ago by a world renown suspension tuner, Arlo Englund, as a shock bushing grease. It was first called Englund Slick Honey. Be sure to at least lube the o-rings.

Here's the reassembled valve. I didn't have a hnbr o-ring small enough for the valve seat seal. WHAT? I know. It seems impossible to me, too.

She goes back in like this.

Holding the stem stationary while threading the brass nut back in will prevent damaging that #006 o-ring.

A dental pick lifts out the breech o-ring. If better sealing against the breech was required, this is where a small super thin shim would be placed, then the o-ring reseated.

Ah yes. My green 0-friend.

Did I mention that the black nut was installed with a thread locking agent? I don't want the nut to loosen at all in use, as the hammer pulls the black nut straight down to fire the gun.

Time to reassemble. Almost as an afterthought, I decided to quickly polish the main pivot pin for the upper assembly.

Polished out. This was the pin with the small e-clips from part one.
Please refer back to the earlier post's pictures for reassembly. Essentially it goes back together as follows: First, reinstall the barrel into the top cover. The compression tube was then pinned back in place in the lower grip frame. Don't install the piston yet.
Let's put this mess back together first.

This is actually very straightforward. About 11 individual parts, but only 3 assemblies. The hammer, sear and trigger group.

Here's the hammer assembly. I lightly greased all the parts with the Buzzy's Slick Honey, then assembled the parts onto the pivot pin.

Like this.

Then, put the hammer assembly onto the valve stem and rotate it forward on the stem and into place, pressing the pin into the hole. Notice, I did not attach the small coil spring onto the lever just yet. Then, I reinstalled the torsion spring into the bottom of the hammer assembly and set the center of the spring loop onto the post molded into the grip.

Don't seat the lower end of the torsion spring. Leave the tail end of the spring hanging out the rear of the grip as shown above. Now the sear assembly can be slid into location.

Here's the sear with it's small torsion spring oriented correctly. Not shown is the pivot pin. As an aside, I should mention that in my gun--and in buddy Jason's--the hammer and sear were about as hard as glass.

I've had best luck installing the pin just far enough to go through both the spring and the sear and then sliding the sear forward through the hammer assembly. Push the sear's pivot pin into it's hole. Don't tension the sear's torsion spring.
Now is a fine time to install the trigger and trigger axis pin. No pics necessary.

Using a small pair of needle-nosed pliers, reattach the small coil spring to the hole in the lever (part of the hammer assembly) and hook the bottom loop of the spring onto the post directly below. The coil spring is directly behind the trigger if you look at the above picture.

Here's another view of that coil spring. Finally, using the needle-nose pliers, tension both the sear and the hammer torsion springs by seating their ends into the grip frame. They bear directly on the inside plastic of the grip housing. Replace the right side grip panel--taking care to align all the pivot pins, and snug down the single grip bolt with a 2.5mm allen wrench.

Pin the top cover assembly (barrel housing) back together with the long cross pin, snapping the e-clip into place. Finally, it's time to install the piston. Is the piston's #116 o-ring in perfect condition? If not, replace it and lightly lube the o-ring so it forms a positive air seal. MOST of the P17 problems will be traced back to this
single o-ring. Slide the piston into the compression tube, tap the pin back in and snug down the 2mm set screw.

With this setscrew, it's done.
Shooting the gun across the chrony with a wide variety of pellets gave the following numbers:
CROSMAN PREMIER WADCUTTER ---VERY CONSISTENT
376.9, 376.1, 377.3, 379.8, 380.8, 380.6, 379.5, 379.2, 380.5, 381.5
GAMO MATCH WADCUTTERS
374.5, 383.1, 378.2, 384.5, 381.0, 385.1, 381.8, 387.5, 386.1, 387.0
BEEMAN SILVER BEAR HOLLOWPOINT ---FAST!
399.6, 399.4, 401.1, 405.3, 402.5, 403.9, 406.8, 401.3, 406.2, 411.6
And just for fun some weird ones,
WEBLEY FLYING SCOT
388.2, 369.0, 388.6, 382.8, 376.5, 380.8, 393.1, 374.5, 378.7, 384.8
BSA PYLARM
366.5, 373.8, 380.3, 385.1, 381.2, 379.6, 369.6, 392.1, 383.7, 371.7
A strange fact: While
Beeman has sold this gun now for several years under 3 different model names, it's never been listed on their website.
Updated note:
I've gotten many questions about P17's dumping their air on the closing stroke. Mine started doing this the other day and I immediately assumed it was the air valve not seating. A rebuild of the air valve showed nothing was wrong and the problem continued. Close examination revealed that the sear wasn't catching the hammer consistently. Sometimes it worked fine, then--whoosh. Frustrating. It appears that the problem was the v-shaped hammer spring binding inside the grip frame. I'd put the rear end of the spring into the left grip panel on reassembly and that's not the way to do it. The tail end of the spring must be seated into the RIGHT grip panel or the spring will bind.


