Picking right up from the last blog post...
Straightened the sleeve again at work, then it was back to my basement lair for the rest of the milling.

Have to line up the vises for this next cut. I want a .250" radius along the top of the sleeve. Like the long flats previously milled, this is strictly for cosmetics. Trying to make something look nice for a change. OK, so the vises get lined up on the x-axis as well as to each other. This is often more difficult than it sounds. Only the fixed jaws of the vises are used for the alignment. It's a lot of back and forth until it's right. And "right" is very much relative to how accurate each piece of the puzzle is. I was able to line the two vise jaws up to just under 0.001" along roughly 14 linear inches.
Still not done indicating. As before, I got the sleeve to the exact same height at each end. I'm doing this because the groove (like those two previously cut flats) won't look even and/or straight unless this is aligned.
Most of machining is like this--all the time is spent setting things up. Used a 1/2" ball mill for the groove.
Some chatter. Probably need to sharpen the ball mill. Should've done a few things differently. Likely would've cut cleaner had I not just plunged and cut both sides at once. Offsetting each side .005" or .010" would've been smarter on my part. It'll be OK, the cut is even and doesn't run off centerline.
I though the sleeve was just a bit too plain. Since I didn't have a plan, no one will know that the drilled holes along the top were spur of the moment.
When machining, if you can make holes or slots in a straight line and evenly spaced, you'll always look like you have your act together--even when winging it.
Some M4 x 0.7mm set screws to hold the sleeve in place.
Using the same locations from the Crow Mag muzzle weight because there are matching dimples machined into the Marksman 56 barrel...
Magic marker layout.
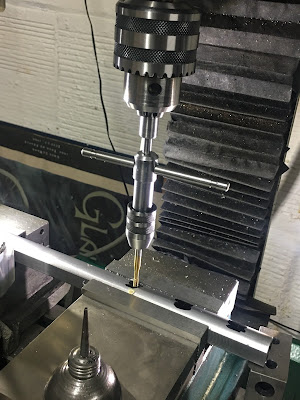
Spotted and drilled the first hole.
Used a spring-loaded tap follower to guide the M4 tap.
The internal spring puts downward pressure against the tap as the threads are cut.
After some deburring, I did a quick test fit on the rifle, and as expected, the long unsupported rear of the sleeve would vibrate against the barrel with a metallic thunk.
Not shown, back to the vise and added a fourth set screw at the rear of the shroud as well as a M5 x 0.8mm threaded hole for the sling stud.
And two additional (unthreaded) holes between the forward mounting holes. Just for future options.
Back to the shop.
My favorite media blasting cabinet. It's usually loaded with a very fine-grained glass/sand.
Minutes later.
A little more time was spent blasting the groove to remove and blend the chatter marks.
Leaving traces of the milling marks on the sides.
Rear set screw and sling stud holes.
Didn't touch the sleeve with bare hands after the bead blasting. I think (hope) this makes the bluing easier.
First pass with an "ultra-fine" Scotch-Brite pad. Added bluing to the pad several times. This blended the color.
Then several follow-up coats--wiping it dry between each coat.
Update: About three months later, I had the opportunity to have the sleeve treated by H&M Metal Processing with their black nitride finish.
Finally, that sling stud. After a couple test fits, shortened the thread to the same length as the sleeve wall thickness.
Loctite 680 bushing retaining compound.
Set screws ground to length.
Let the bluing dry overnight, then gave it a few coats of paste wax.
And here we are.
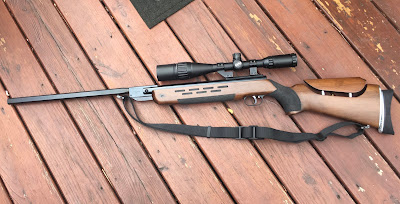
Looks original to the rifle. The matte finish is a good match to the scope and stippling. With the sleeve, the rifle now comes in at about 10 pounds. First impression was that it shoots well offhand. Going to spend some time with it and see how it shakes out. If you follow the blog, you know I like the options and modularity from various accessories.
Not sure what's on deck, but the project list on the workbench is pretty long.


2 comments:
Hubba, hubba! Really like the look. I hope you publish a report on how it shoots now. Looks like a great squirrel rifle! :-) I suspect it balances further forward now, should help for off hand standing shots.
I'm very pleased with the outcome--especially considering those long cuts on a relatively small milling machine.
Post a Comment