Not quite a year ago, I bought a vintage bulk-fill Crosman 112. If you have one, you already know that the grips are on the diminutive side and leave much to be desired. As a near future project, I'm interested in making a set of "free pistol" style grips as a woodworking exercise in pain and humility. However, the biggest hold up has been my reluctance to spend a relatively large amount of time making such exotic grips that only fit a gun from 1952. I don't want to get stuck if the vintage gun goes down with some weird problem--and I'd also like the option of using the grips on one of my (what 3 or 4 ?) Crosman 22XX pistols.
A quick detour. This picture of a 112 wearing a red dot is probably enough to get me banned for life from any and all vintage airgun forums. Nick, are you crying? Well, in case anyone is still reading, that's a Tasco RedDot model BKRD3022. It's got a .22 dovetail base. The rings are current Crosman production MT459 intermount rings for the 22XX guns. Do they fit the old gun? Yep. Perfectly.
The grips and grip frame at the bottom of the picture are from a current 22XX.
Since I'm looking at new parts compatibility with old, this seems topically appropriate. Morally inappropriate, but still...
A wide brass trigger from my Crosman 2240.
While I had the grip frame removed from the 2240 during the brass trigger blade upgrade extravaganza, I thought I'd see if it's close to fitting the 112.
Pulled the grip frame off the 112. That's the vintage assembly on top. Current down below. Safeties are obviously in different locations. Looks promising.
Side by side. New 22XX is on the left. Looks even better. Also easy to see why the 112 grips always felt "small".
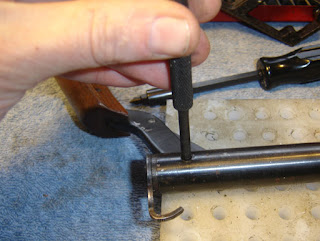
Bottom of the 112 shows a threaded boss standing slightly proud of the gas tube.
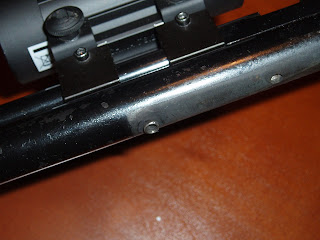
An #8-32 thread in the boss.
This pic again. Better view of how the boss protrudes.
A quick test fit showed that the mounting holes were a match for location. The ONLY thing I had to do was countersink the grip frame for that boss.
The sears looked completely different. The 112 has a triangular tip. The 22XX, almost square topped. This would be the square one...
I slightly countersunk the hole and it bolted right on. It's NOT necessary to drill completely through the 22XX grip frame. About halfway is plenty. As a bonus, the frame still works on 22XX guns.
The difference in sear shapes made not a bit of difference. The 112 fired like a champ. This swap should work with most any of the old Crosman vintage airpistols. In order to complete the swap the following Crosman part numbers will be required:
1322A051 NEW GRIP FRAME
1322A044 GRIP SIDE COVER
1322-054 COVER BOLTS 2 REQ'D
151-020 LEFT GRIP
151-019 RIGHT GRIP
1322-017 SAFETY SPRING
105-039 SAFETY BALL BEARING
105-054 GRIP SCREWS 2 REQ'D
1300A07 TRIGGER
1322A048 SEAR
1322-045 PIVOT PINS 2 REQ'D
I also needed to fit some slightly different bolts to hold the new grip assembly to the 112. I used some easy to find (in the USA) #8-32's
Cost to buy all this was about $20 or so. Get it direct from Crosman. 1-800-724-7486
Obviously, if you're going to make custom grips, omit the right and left grip panels above.
I'm planning on making my own, but here is a good alternative, too. I'll also mention that the Crosman 2250 stock can be attached. It actually will bolt to the original 112's grip frame, but there are some unsightly gaps at the bottom.
Saturday, February 14, 2009
Friday, February 13, 2009
Reassembly of the Crosman Model 130 Pistol
Reassembly goes in reverse of disassembly for the most part.
I did end up prying off the staked washer on the valve. Probing with a dental pick showed that the o-ring was rock hard and I couldn't fish it out.
The old o-ring did not survive my probing.
My camera decided to focus on its own interests, I staked between the old stake marks which is ugly but should hold well.
A new o-ring for the other end, then the washer goes on top of it.
Old seals are shiny, new ones dull. The smaller o-ring that goes against the back of the threads looks smaller but the one in there had flattened, making it seem much larger than it was.
A new o-ring for the inlet valve.
Back together like this.
The bolt got a new o-ring as well. The old one was hard. Notice the cross hole for the "flow through" bolt tip.
The "flow through" bolt nose needs to be aligned with the transfer port, so you should not see the cross hole when putting the bolt in. The bolt cover and screw are replaced at this point.
The valve slides in from the front.
The threads are aligned with the grip frame hole.
Then I held it in place with the grip screw.
The transfer port was off slightly.
I used a pin punch to rotate it back into alignment. This is why I used the screw to hold the valve body. I replaced the transfer port seal.
Hammer and spring go back in, make sure the hammer stem is fully in place and the screw hole is lined up with the cocking knob cut out in the tube.
I think the cocking knob cleaned up well. I took some pictures of the process but they were all blurry. I made a mandrel that has the same screw threads, screwed the knob into the mandrel and then took off about .01" off of the OD and then filed it smooth. Some Scotchbrite to polish and Oxpho blue afterwards.
I lightly screwed the forward grip frame screw to connect the grip frame to the tube. Don't lose the safety spring & ball! I then screwed the breech and barrel, grip frame and rear sight all together.
The piston received a new o-ring. From asking around it seems this is a stock Crosman piston on the early 130's (or all 130's? I don't know.)
With a pin punch in place of the roll pin I determined the amount to adjust the piston so it just barely touched the valve face. Because there is slop here as opposed to with the roll pin it's better to have too much headspace. The barrel band/plug was replaced and the roll pin hammered in. The gun pumps and shoots, but then it did before. I'll have to dig up the old chrony numbers if I can find them and do a comparison. But that's a project for another time.
Thursday, February 12, 2009
Disassembling a Crosman Model 130 Pistol Part 2
Continuing the disassembly...
The piston head does not seem to be original? I'd love some opinions on that as it should have a pump cup, not an o-ring?
Loosening the lock nut.
The pump head taken apart.
Some time ago I had replaced the worn transfer tube seal with some poly tube.
The cocking knob. It's scarred up already from being disassembled previously by the first owner.
I gently gripped it with some ignition pliers and unscrewed it. If it were in better shape I'd have used some copper or aluminum sheet to protect it from the plier jaws. I'm going to refinish the knob.
Once removed.
The knob also locks the stem into the hammer.
The valve is pushed out the front of the tube.
Not the same valve as shown in the Crosman drawings, rather than a cap, a pin. That staked washer retains one of two o-rings that seal the pin. I will not be removing that washer.
The body unscrews.
The intake valve.
Spring.
I pushed (not punched!) the pin out.
The valve pin.
There was a washer retaining an o-ring inside the valve. Now to clean it up, replace the o-rings and reassemble...
Disassembling a Crosman Model 130 Pistol, Part 1
I wasn't planning on working on the 130 but several people expressed an interest in seeing how to disassemble the older variant so I figured, "why not?" It can always use some new o-rings and a little TLC.
My Crosman Model 130 pistol.
Grips removed.
Unscrewing the grip frame.
You think this will work...
But first you have to remove the rear sight as it screws into the rear grip frame screw.
Don't lose the safety spring and ball!
The (not original) sight screw, screwed into the rear grip frame screw.
The screws removed, the barrel slips out of the barrel band.
The rear breech plug slips out.
Unscrewing the bolt cover screw.
All the parts removed.
Unscrewing the barrel set screw.
Again it just slips out.
Punching out the pump roll pin.
Then the parts are slid out.
Subscribe to:
Posts (Atom)