Continuing with the BAM B26-2 saga... Some revelations. I'm going to go out on a limb or two with this post. Disagree all you want. Just read it first.
Flung some lead down range. Now, I'm a lousy shot, but this is just plain rude. There were many other similar targets not shown, but this is pretty representative. The gun is primarily stringing the groups vertically. I've not had enough first-hand experience to state this as fact, but I've seen many test targets and read enough airgun posts on the net to have a theory as to why this happens with (relatively speaking) cheap guns. I think cheap break-barrel spring guns often have lock-up problems. (At least the few that I've bought did) The lock-up between the breech block and the compression tube is inconsistent--resulting in ever-changing barrel alignment discrepancies. Every time the barrel is latched closed, the barrel points to a slightly different location. A break-barreled airgun with typical iron sights suffers no ill-effect from this problem--as both front and rear sight are attached to the barrel assembly. Only having a sight or a scope mounted on the compression tube reveals the misalignment.
I think this particular gun represents an extreme case. I'll surmise that IF this was a returned gun, the previous owner sent it back because it wouldn't hit the broad side of anything.
The groups were SO bad, I first thought I had a bad scope. Swapping the scope to a known tack-driver ruled that out. There was also no perceptible side-to-side movement at the hinge, so that ruled out all the easy stuff.
All that was left was the spring loaded lock-up mechanism. If that wasn't closing with the same force, to the same place, the gun would shoot erratically. I drove out the roll pin and pulled the chisel-shaped plunger and spring. My next hope was that a stiffer spring, or even just a different spring, would latch the barrel shut consistently.
I tried some different springs. I tried a spacer between the spring and plunger, too. No real success.
I went to the hardware store and bought every single size that was even remotely close. I cut them to different lengths. Some of the groups got even worse. Some marginally better.
I tested some springs with several different pellets. I had exactly zero success in achieving a group worth telling anyone about.
It wasn't completely fruitless, as I DID discover that it's possible to minimize or even possibly eliminate barrel droop issues by changing to a stiffer plunger spring. There were differences of up to 8 inches of vertical pellet impact at 10 meters due to changing the plunger spring.
Q: How do you "fix" a break barrel when you've run out of elevation adjustment on the scope? A: Stiffer plunger spring.
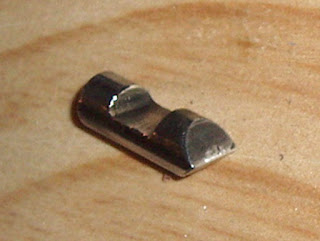
Over a couple evenings, I came to the conclusion that the plunger was most of the problem.
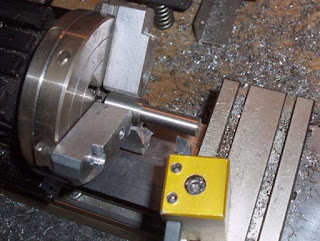
Notes: I made many, many guesses at this point as to how I thought the new plunger should be made based on what I thought were the shortfalls of the old. The old plunger was loose in the base block hole, allowing it to cant and latch slightly differently each time. The chisel's edge was also not even. I also felt it could be slightly longer overall to gain bearing surface against the bore to reduce that tendency to cant. So, basically, lots of ideas but no empirical evidence for any of this.
The stock BAM plunger measured out to 0.313" dia and was 0.861" OAL. I measured the ID of the base block hole and came up with about 0.318" +/-. It's not a precision hole. ***If I had to do this again, I would ream the hole to 0.320" or whatever reamer size I had on hand that was close. The important thing to be concerned with is be getting the hole truly round and a known size to work from.
Nothing to lose, I went though my steel stock and found a piece of half-inch diameter 303 series stainless steel. Wanting to use the 3-jaw scrolling chuck, I first trued the jaw faces to achieve an accurate center. Next, I turned about 1.250" of the stock down to 0.317" dia.
Used a carbide tipped right hand knife.
Next, I had to add a relief slot into the side of the plunger for the roll pin. I mounted a 1/8" end mill into an arbor on the lathe's headstock and set up the Taig milling attachment on the cross slide. The part got some dykem layout fluid so I could see the milling cut.
Please don't tell Nick, but I actually just eyeballed this. I guessed that what mattered most was depth of cut--not so much length. I cut my depth to just allow the plunger to pass the roll pin without dragging.
Old plunger on the left. New on the right. I hand filed the flats for the chisel edges. Put the plunger in a vise and cut. Does the EXACT angle matter? Surprisingly, no. I don't believe that you need to nail the angle to an "exact" degree.
Some crazy ideas: I THINK you need a plunger angle (and enough spring force behind the plunger) that gets the barrel into a relatively straight plane with the compression tube. In other words, you need an angle that gets the barrel pointing into the elevation adjustment range as your scope.
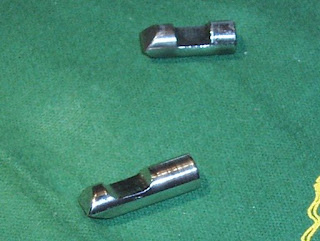
Notice how much longer the bearing surface is on the lower plunger. I cut the plunger off the half-inch stub with a hack saw and used the lathe to machine the base flat for the spring to bear against. Wanting to only make the new plunger longer, I found that it measured exactly 1.000" in OAL. Very bizarre--as I'd not once measured the length at any point.
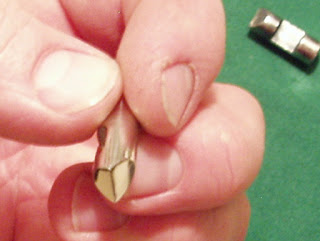
Unsure as to heat treatment, I felt (and Nick later confirmed [ED: "Guessed"]) that a very high polish on the plunger's face would be the best way to minimize potential wear.
Another view. Since no one has taken me up on my offer for a super cheap deal on a genuine, rare, unique, last one, original BAM sheet metal spring guide--I'll sweeten the deal and include a stock low mileage BAM plunger, too. As seen in the background...
Installed the new plunger into the BAM. Wanted as much latching force against the plunger as I could get, so I went as long as possible on the spring. I fitted the spring to about a hundredth on an inch in length to get max force against the plunger. It's really easy to size the spring for length as you simply try to close the barrel. The spring becomes coil bound and won't let the plunger retract far enough to close if it's too long. Simply shorten the spring in small amounts with a side cutter until it locks closed.
After the new plunger was installed, this was the very first group fired. Yep, I shot at a 10 meter pistol target. I didn't expect to even be on paper, so I just grabbed a convenient target. The shots just kept hitting the same spot. Ten shots, off-hand into 11/16 of an inch edge to edge with a 4X scope. And believe me, I pulled at least 2 of those shots or the group would have been even smaller. Suddenly, this cheap gun has my attention. Pellet used was a .22 cal Crosman wadcutter.
Friday, December 5, 2008
Tuesday, December 2, 2008
Slavia ZVP, Fabricating the Front Sight
Having measured the dovetail and drawn up the sight based on pictures I found on several sites, I got to work making a replacement front sight for the ZVP.
1/2" steel chucked in a collet block and faced with an end mill.
Cutting to depth on the first side.
Flipped 180 and the other side is cut. You'll notice it's sticking out less...well I actually had to start all over again at this point due to a dial revolution counting attention deficit problem. I could really use a DRO.
Turned 90 degrees and more milling.
And 180 to finish the process.
Tilted at 30 degrees to mill the dovetail. I didn't mill all the way as I wanted some wiggle room for final fitting.
Milling the chamfer on the blade.
Just a little more to go.
I filed the radius for the blade. I was going to do some fancy rotary table work, but figured it would be faster to file it.
Sawing off the sight.
Now to deburr...
I did several test fittings, filing the dovetail until it was a firm fit when drifted into the groove. Then I sloshed on some cold blue and called it good.
Another view.
Monday, December 1, 2008
Derrick's Xisico/BAM B26-2, Part 5
Warning: Responsibility follows the guy doing the trigger job. If this bothers you, that's fine. There's a very long list of things I don't want or can't do either. If you are going to even think about adjusting a BAM trigger, you should proceed with caution. If you even have the smallest sliver of doubt in your mind about triggers, don't mess with them.
This is the "Rekord" trigger inside the BAM B26-2. It's almost an exact copy. Almost. BAM just forgot to copy the quality of materials and tolerances. There is potentially a very serious safety issue concerning this trigger: The stock adjustment spring is on the right. Notice how short it is. It's so short, any attempt to lighten the trigger pull by backing out the adjustment screw (bottom center) runs a very high risk of the trigger failing to engage the piston completely upon cocking, or even firing unexpectedly when touching off the safety. Both of these incidents have been reported by other users. This spring is simply too short. Backing out the trigger adjustment screw even slightly can COMPLETELY de-tension all the spring's force holding the sear.
The spring on the left is one from a local hardware store. The extra length allows trigger weight adjustment while keeping sufficient force against the tongue (Weihrauch's name for this compenent). This problem will not occur if you chose to not adjust the screw from the factory adjustment. I believe this is a material issue with these rifles that could result in a serious accident--most likely to the shooter--as the gun may snap shut unexpectedly. Fingers beware.
More fair warning: Disassembly of the trigger unit into individual components is normally a huge mistake. There are several pins, sears, springs, bushings, etc. that all fly apart under spring force upon disassembly. It is not likely that you will see beforehand how it all fits back together. Attention to the circular window in the lower right. The spring pushes upward against the "tongue". You can see the rear of the "tongue" bearing against the "lower sear" (Again, HW's nomenclature) I've applied a thin green colored grease between the tongue and the lower sear. The overlap between the tongue and lower sear is felt by the trigger finger as 1st stage pull and the noticeable "creep" in the 2nd stage before the trigger breaks. Polishing those surfaces and greasing them will make the trigger feel lighter and less gritty. Do not attempt to file, grind, sand or otherwise alter the angles here or bad things will ensue. Remember the warning about taking the trigger unit apart if you want to buff the contact surfaces.
BAM "Rekord" trigger unit on the left. Weihrauch Rekord trigger unit on the right. Dimensionally, they are so, so close.
HW on top, BAM stacked below.
Stacked from the side. The difference is literally only a few thousandths of an inch. Are they interchangeable? Substitution would require some minor fitting--most likely to the bushings for the retention pins. The safetys would also have to be refitted. There's no practical reason to substitute one trigger for the other. If you want a Rekord trigger, buy a HW. And you'd never install a BAM trigger into a HW... I was just curious how close the copy really was. Despite the spring issue, It's my sincere belief that this trigger is a substantially BETTER trigger than the GAMO type trigger that airgunners have come to despise so much.
Subscribe to:
Posts (Atom)