Make sure the gun isn't charged with CO2.
Remove the trigger guard...
then the rear grip screw.
Grip pulls off.
Remove the single shot tray or magazine.
It's not necessary to remove the bolt handle if you're just servicing the valve, but I unscrewed it from the bolt.
End cap retaining screw.
With the end cap off, the hammer spring guide and hammer spring can be removed.
Breech screw removed. --It's the small screw in the middle of the shot tray/magazine slot.
Here's the top of the transfer port.
Here's the entire transfer port. Pulls right out.
The hammer cocking pin is a small bolt.
The hammer can be withdrawn now by pulling the trigger to get the sear out of the way.
Here's the hammer, hammer spring, spring guide and the hammer cocking pin. I polished the sear contact area on the hammer. (Call it a striker if you prefer) Shooters looking for additional power will often swap out the hammer spring with something stiffer.
Another approach is to add an additional spring inside the hammer spring.
Like so.
A spring within a spring.
Inside the gun, it looks like this.
Underside of the breech shows the bolt cocking pin
The bolt withdrawn.
With the valve screw removed...
...the valve slides out of the gas tube.
And unscrews.
Face of the valve is similar to the Crosman 38T. Hollow piercing pin held in place by a threaded retaining ring and a face seal.
Sometime shooters looking for additional power will substitute a weaker spring into the valve. This also has the advantage of not increasing cocking effort --provided the original hammer spring is utilized.

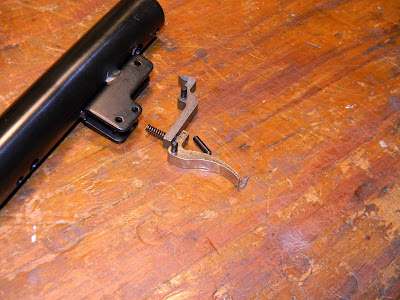
OK, trigger time. The lower stop pin practically falls out on it's own. (That's OK, when assembled, the trigger guard keeps it in position.)

Here's that 3mm threaded hole mentioned in the first CP1-M blog post. On the first run of pistols, this hole was threaded (thread size is M3 x .5mm), but the adjusting screw was not installed. I've already added a sear adjusting screw.
Trigger pivot pin is pushed out and the trigger removed.
Use about a 5mm long set screw. Round over and polish the end.
The trigger as it sits in the gun. Polish and moly all the contact points.
Only the sear is directly spring loaded. Note that any trigger adjustment requires removing the grip and the trigger pin stop to access the 3mm screw. This can be done with the gun charged with CO2 and dry fired until it feels right to you. As always, err on the side of caution when working on any trigger.
The three set screws on top of the forward end of the breech are loosened to remove the barrel.

The barrel arrangement is similar to the QB series of rifles. The transfer port is located between two o-rings on the barrel shank.
Of course, they're metric like everything else on the pistol.
Finally, an o-ring at the breech seals around the loading bolt.
Reassembly is a simple reversal of the above. I found the gun to be extremely easy to take apart. It was encouraging to see viton o-rings in several key spots as well as thread locking agent on all the fasteners. Build quality was excellent. And not just "given the price point". I found this to be a solid attempt at making a very good pistol. After having it a couple weeks, as a target pistol, it's easier for me to shoot offhand than my modified Crosman 22XX guns, or my Daisy 747. It'll also outshoot my Gamo Compact, largely due to having more weight at the muzzle for stability.
Oh, that "spring within a spring" power boost took my .177 cal pistol from 365 fps to approximately 525 fps with RWS Hobby pellets. Probably want to tweak that down a bit. For paper punching, I'd like it to be around 410-420 fps--mostly to keep the shot count up.
More soon.


