Saturday, April 11, 2009

Early Crosman Model 101 Resealing, Part 4

Now to make the new exhaust valve seal...

I decided that Delrin would be a good choice for the valve seal material since the old seal seemed to be made of hard plastic.

Drilling.

I ground a sharp tool with lots of positive rake and a flat face, set it to the proper angle with an angle gage.

One cut.

The other.

Parted off, compared to the old seal.

The exhaust valve reassembled. You can see my precision drawing underneath.

Friday, April 10, 2009

Early Crosman Model 101 Resealing, Part 3

Some valve work...

The inlet valve was full of rock hard rubber.

Here are some chunks. It was extremely hard to pry them out.

Almost clean.

Machining the inlet valve seal from urethane.

The assembled inlet valve.

I didn't have any asbestos gasket handy, nor would I really want to, so I used a urethane ring to seal the two halves of the valve assembly. I reassembled but it was leaking from the exhaust valve. I had hoped to reuse the antique seal.

I removed the exhaust valve seal.

Thursday, April 9, 2009

Early Crosman Model 101 Resealing, Part 2

On I go.

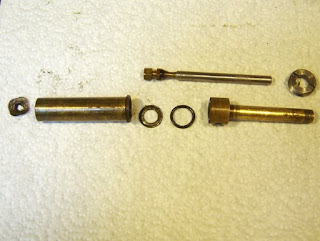
The valve as removed from the 101. The screen at the end is not original, nor is the o-ring and metal washer?

There should have been an asbestos gasket between these parts, but someone had evidently tried to reseal it and substituted the o-ring and possibly the washer.
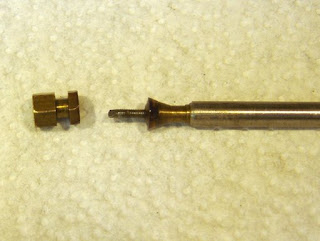
The Pyrasteel valve end unscrews. Not sure what the conical seal is made of.

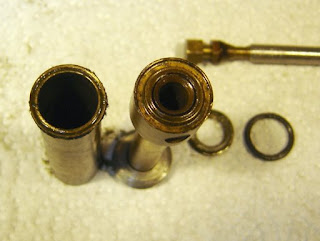
The inlet valve is crusty with disintegrated rubber.

There was an o-ring there as well.

The remnants of the paper gasket (paper? fiber?).

The tube is in good shape.

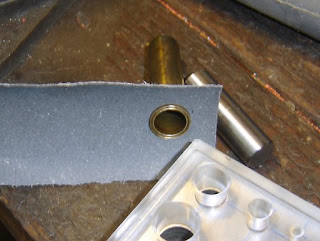
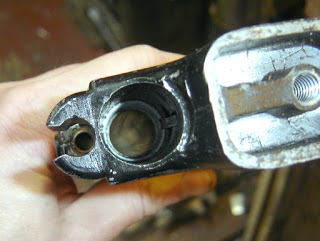
I fabricated a new gasket from gasket stock by punching a hole to fit the compression chamber.

Then trimmed it with scissors.

Not bad. If I wasn't keeping the system stock, this would be the time to cut an o-ring groove at the other end of the valve chamber, for better sealing with the tube. I'll do it on the next one. I'd either eliminate the gasket or make a thin one from teflon or rubber.

Wednesday, April 8, 2009

Early Crosman Model 101 Resealing, Part 1

As I said before I wanted to keep this 101 pretty much stock, so I had to make a new leather pump plunger instead of converting to a rubber one.

Some flat spring steel strip.

It was a little too wide so I grabbed it in my handy Vise Grip Sheet Metal pliers and ground it down.

I also ground the tapers on the ends.

There was much cursing involved so I have no pictures of the forming, but basically I bent it into a rough circle then formed it in this hole with a tapered punch.

Even so it was a little too springy so it got bent a little more. The round nose pliers were my weapon of choice.

I had a hard time getting 1/4" thick leather but finally salvaged some from an old leather drive belt. I punched the disc oversize.

I punched the center hole and mounted it temporarily, then sanded it down to size. Then I sanded the ends to get the proper thickness.

The finished plunger leather.

Mounted, and you can see how the expander pushes it out at the bottom edge. I need to put a new felt ring on.