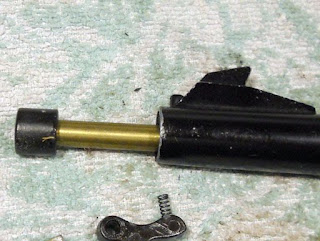
Still going....
With the barrel epoxied and pinned back into the breech block, I was finally able to begin reassembly. For the most part, it's just a reverse of Part 1 found here.
Started by smearing a thin film of moly grease on the inside and outside of the sliding compression chamber. I used Honda moly 60 grease. Look for it at motorcycle shops near you. It's used to lube driveshafts.
The slot in the compression tube accepts the front of the anti-beartrap safety. You'll figure it out.
Piston also gets a thin coat of moly--inside and out.
Not really shown here: From part one, the pin at the rear of the anti-beartrap mechanism was reinstalled and peened.
After installing the piston, I used a dental pick to align the holes for the cocking lever.
Like so.
Spring and spring guide? Yep, moly'd--then they took a ride in the spring compressor.
Trigger and sear got the treatment, too. Moly for everyone!
Started the multi-purpose retention pin. It holds the endcap, trigger, and sear in position.
Inserted an appropriately sized transfer punch from the opposite side through the trigger blade and sear.
Tapped the pin through. Not shown: Peened the end of the pin so it won't vibrate loose.
Moly on the cocking lever at the contact points.
Fit the end into the piston first, then the pivot at the rear.
And grease the pivot pin. Tighten snugly.
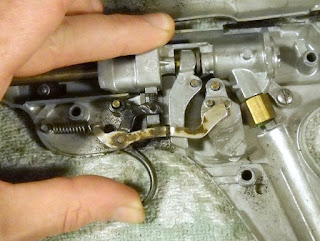
Trigger spring is a direct action against the sear. Fit the spring into the rear of the sear then hook the rear over the metal "V" shape formed into the endcap.
Like so. The trigger dropped over 2 pounds of pull weight from simply polishing and greasing the trigger, sear, and piston rod's cocking notch surfaces.
Another view.
Reinstall the two M6 stock attachment bolts.
About time. Mounted the modified Weaver base from Part 3.
Installed a spare red dot sight from buddy Joe.
Another view or three
This is a bit out of sequence, but I wondered if using a rubber bushing between the action and the stock would affect accuracy?
Removed the stock and installed a 0.125" rubber washer. The mounting bolt runs right through. This isolates the breech/barrel assembly slightly. Helpful? Who knows?
Mentioned in an earlier post that I'd free-floated the barrel. A sheet of paper just fits between the barrel and the forend. Again, is this helpful to accuracy? Dunno yet. I've changed and altered so many aspects of this gun... I can say with absolute certainty that the gun now has a much smoother firing cycle than before and it hasn't lost any power.
I fired about 100 shots then set up the chrony.
Here's the 10 shot string with .22 cal RWS Hobbys
552.1
553.2
552.1
555.9
554.4
556.6
554.3
552.1
552.3
556.4
So the velocity is still ridiculously consistent. Truthfully, if I saw this shot string posted for a BAM B3-1, I'd think the guy's chrony was broken or he'd been drinking heavily while posting. I fired 4 other guns across the chrony and they all posted appropriate numbers.
It's really interesting to me that both pre and post tune, the gun was shooting almost identical speeds (There's a pre-tune up 10-shot string in part one.) -- especially considering I used a different mainspring. I gained smoothness, lighter trigger pull, and a very slightly tighter velocity spread (only 4.5 fps from highest to lowest). How can this cheap spring gun have this kind of shot-to-shot velocity consistency? I wish I had some kind of wisdom to impart about this, but I'm just as surprised.
One more post to go on this gun. Gotta take care of that muzzle.
Saturday, October 10, 2009
Wednesday, October 7, 2009
Roger Mondial Pistol Disassembly, Part 2
On I go.
There's a setscrew that holds the barrel in.
The setscrew.
I pushed the barrel out by twisting and pushing.
The power adjustment mechanism. It regulates the relationship between the valve lever and hammer.
The underside of the grip frame, showing the adjustment screw.
The valve assembly.
Lovely green goo in the CO2 piercing cup.
An 11mm wrench unscrews it.
The piercing pin came out with it. YMMV.
The piercing pin and cup. I love that green color.
The end of the valve assembly.
The end unscrewed. Should I throw in a pitch for using a properly fitting screwdriver?
There's an o-ring to seal the end. The exhaust valve and spring came out.
The exhaust valve and spring.
It's difficult to make out but there's a slot into the valve stem right where the seal is. The seal was toast...
The stem is hollow. Gas flows around the seal, through the slot and through the stem to the barrel, picking up the BB on the way.
The spring for the valve lever. The steel washer bears against the step in the valve stem.
All the parts.
There's a seal I couldn't get out where the piercing pin and cup screws in. It seems fine so I'll leave it.
One exploded gun. Note the large diameter piercing screw and huge brass nut. Forgot to mention those, not that it matters.
I'll blog about resealing it in a few days.
Tuesday, October 6, 2009
Roger Mondial Pistol Disassembly, Part 1
This is another recent gun show purchase, a Roger CO2 BB pistol made by MMM Mondial. The manual is here, and there's another page on it here.
Not a bad looking piece of potmetal.
Removing the grips.
The other side of the grips have hexagonal countersunk nuts.
As does the frame, molded haxagonal recesses for the nuts.
The 4 screws removed. Don't lose those nuts, and it's a good idea to study which screw goes where...
The sight is a lot like the one on the Daisy 200.
The two screws pivot it on the angle for elevation.
There's a phillips head screw on the other side.
Be careful pulling the frame halves apart...I wasn't and parts got unsettled.
Here's the proper relationship of the parts.
Pulling the trigger pushes back the hammer until the sear slips off the pins, at the same time as the trigger raises the BB feed mechanism.
One more screw holds the valve assembly to the frame.
You can never have too many pictures of the spring assemblies...
Ok, no complaints if you can't get it back together.
The hammer and spring.
The long end fits down inside the slot.
The BB feed mechanism slides up in that slot.
The magnet.
A BB held by the magnet. Exciting!
More to come...
Subscribe to:
Posts (Atom)