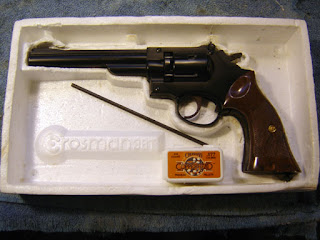
The 38T was in pretty good shape cosmetically but with as most old CO2 guns (at least the ones I buy), when I inserted a CO2 cartridge gas spewed all over the place. Sigh. I downloaded the .pdf of the exploded drawing from Crosman. This drawing shows how all the components fit together and has instructions for rebuilding the valve.
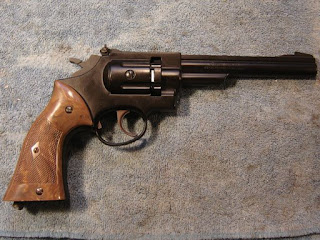
The is the other side. That screw in the middle of the fake cylinder holds the valve body in place.
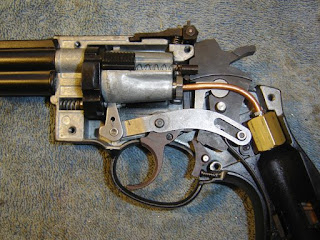
With the side plate removed you can see the mechanism and valve. Notice the small bushing that rides in the slot of the pawl arm. This can fall off if you flip the pistol over, so be careful.
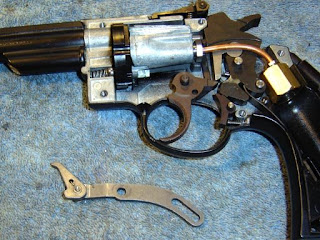
First up was to remove the pawl that rotates the cylinder each time the trigger is pulled.
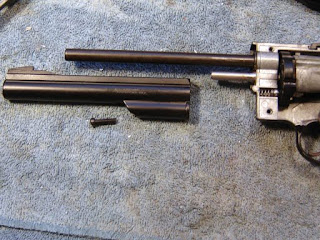
Then the barrel shroud retaining screw was removed with a long screwdriver.
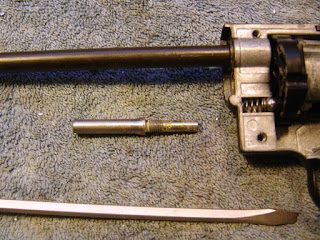
The pin that retains the pellet cylinder was unscrewed.
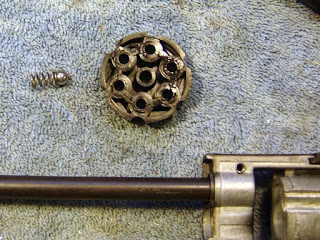
And the cylinder, spring and ball were taken out.
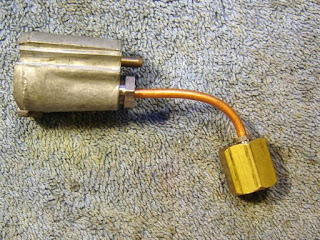
The screw on the back was removed and the valve assembly came free.
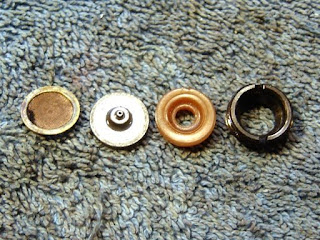
The CO2 cartridge seal parts were removed by unscrewing the black nut on the right. The seal itself seemed scarred up a bit.
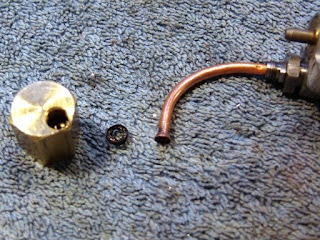
The copper line was pulled free after unscrewing the small gland nut, the seal seemed chewed up, whether by removal or age.
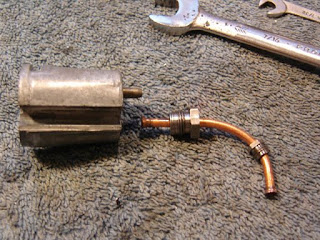
The other gland nut was unscrewed.
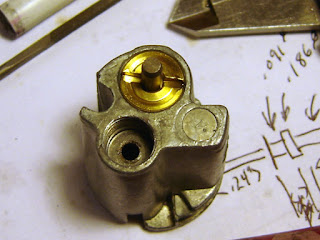
The valve requires a tool that clears the valve pin to unscrew.
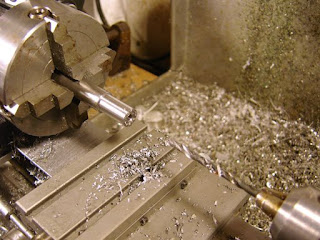
A piece of steel was chucked up, turned to a diameter smaller than the valve nut and drilled to clear the valve pin.
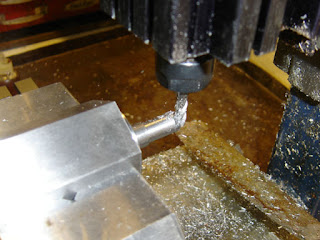
I then milled it to make a screwdriver type blade.
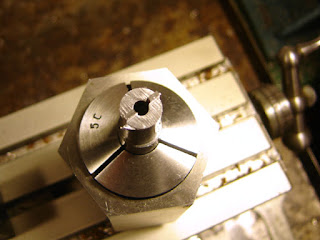
Not a complex tool, and you can just grind a small socket or screwdriver rather than machine a tool.
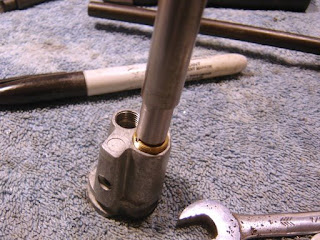
Unscrewing the valve nut.
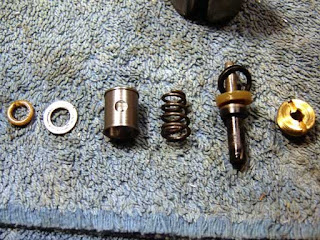
The parts were removed.
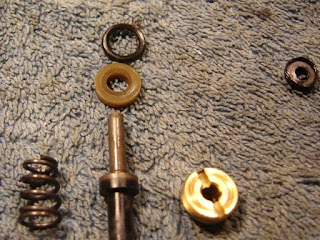
The small black seal on the upper right is for the gas tube where it goes into the valve body. It looks bad but actually wasn't.
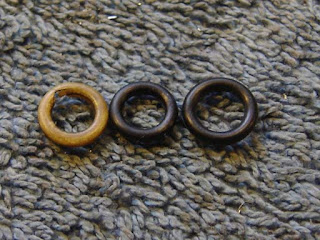
The valve o-ring on the left did have a big nick in it. So I replaced it with a buna o-ring. This is not ideal, and it would be better to use Viton or Urethane, but I figured it would hold long enough to see if the rest of the valve could be sealed.
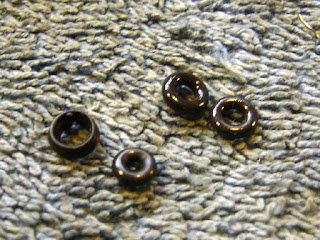
I replaced the small copper tube seal with a viton o-ring. Not ideal either, but I figured it would deform to seal. I was going to use the larger ones on the right, but the small one ended up expanding when placed on the tube to virtually the same OD as the original seal.
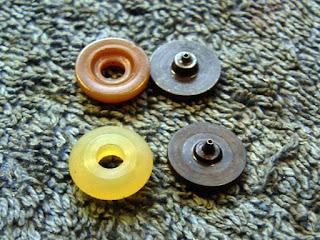
Luckily I had a replacement CO2 piercing pin and seal that came with another 38T I bought from the yellow classifieds. Otherwise I would have to hunt around for parts from the usual suppliers such as Bryan and Associates. Notice the difference between the parts - the new seal is a later design recommended in the .pdf from Crosman.
I was going to make a new seal out of Urethane rod or Teflon, but since I had the replacement part I figured I'd use it and see if the other repairs held. Now of course I'll have to find another leaky CO2 gun just so I can try making a CO2 seal...
Anyway, that's how you take one apart. To put it back together, just go in reverse...
I mostly made this post so I'd have pics should I take another one apart and forget what goes where.
A day later and the pistol has held CO2 overnight, shoots well, and I'm delighted. I now have 3 functioning 38T revolvers, 2 in .177 and one in .22.

52 comments:
I could never get standard o-rings to work you lucky devil. Nice work. That lathe is invaluable. I wish the budget allowed for one here. Gary
Well, time will tell how well they work, the small one was Viton, so it should hold up, but the other one, being buna, isn't ideal. Then again it is pretty well constrained in the valve so it shouldn't swell up too much.
I'm going to order some viton o-rings in that size just in case.
i have a pre-1975 .22cal 38t. do you know what its worth? or know any collectors that would be interested in buying it?
I'm not an expert, but depending on condition (both appearance and function) it's probably worth between $20-$100.
Best places to sell or search for values are here:
http://www.network54.com/Forum/79574/
and:
http://www.gunbroker.com/Auction/Browse.asp?cat=3049
thank you.
I've got a crosman SA6 44 peacemaker. I need new seals a lot like the ones you showed here. Specifically the end seal where the CO2 goes by the puncture pin that yellow one as well as the o-rings. you mentioned viton where can I buy these kinds of seals??? I also need the cylinder ball and spring as well.
Here's my email slumett@gmail.com
Thank
Steve.
Steve,
You should contact either
Bryan and Associates:
http://www.bryanandac.com/new_page_4.htm
or JG Airguns:
http://www.jgairguns.biz/
They should be able to help you get exactly the parts you need.
Very useful post. Can you tell me the sizes of all the o-rings in the 38T? Particularly the 2 valve o-rings.
Thanks
Unfortuney it didn't occur to me to note the sizes of the o-rings when I was resealing it. Best to just check against the existing o-ring, or buy a reseal kit from one of the vendors I mention above.
I just resealed a 38C
The 38-130, I used a #009
The 140-58 I used a #011
For the 38-017 square ring I used a regular o-ring #004
I was able to reuse all the other seals.
Not sure if those sizes are correct, but it's holding gas too!
Just in case it helps someone else, I got hold of a replacement for the 38-130 o-ring which seems to be holding:
11/32 OD, 7/16 ID
I got a 38T when I was 10yo. The brown plastic handle has been damaged. Does anyone have parts they can sell me. My father got this gun for me. e mail me at mgonz15535@aol.com or Mark 719.201.6248
I got a Crosman 38T.
To overhaul it I need some seals;
please can you tell me where I can buy them.
Regards
http://www.bryanandac.com/parts.htm
has the seals and tool you need.
http://www.bryanandac.com/parts.htm
has the seals and tool you need.
Hey, excellent breakdown of the 38T. I'm restoring a very derelict 38C and recently got the same new-style co2 seal 38-128. Still waiting on the other o-rings and seals, but I can't see how this co2 seal will work. It appears to be thicker than the height of the piercing pin, but the ID is thinner than the co2 bottle's neck, which would mean when you press the co2 cartridge into the chamber, it wouldn't pierce. Is there a trick to seating it properly or something? Will it really work unmodified?
You have to get the new style piercing pin as well, but it does work. I agree it looks odd.
I had my 38T since 1981, resently the seals showed there age and leaked like the co2 was free. I found your site, and took my gun apart and replaced the o rings.I found the square ring at a JOHN DEERE dealership, but i had to cut it in half and sand it to fit. Now my 38T lives to shoot another day. THANX
-Bango Shank said...
-Yoe Baby Yo Baby yo baby yo, followed your procedures and my pristine Crosman 38T is shooting hard & straight for the first time in it's previously silent life. Xcuse me it's Trigger Time!" - B. Shank.
Anyone from canada find a good source for all these o rings and seals. Just found my 38t that my Grandad gave me over 20 yrs ago but I forgot about due to this leaking.
Hey, I want to thank you for your post (more like awesome instruction manual) because without it I wouldn't have had the slightest clue on where to begin repairing my father's 38T. Currently, I'm just waiting for a new CO2 end seal to arrive, hopefully that will be the only thing I need.
Nick Carter,
Nick Carter,
I have a Crosman 38T revolver, .177, that I bought in 1967. It shoots about the same as it always did, or shot about as well until the last cleaning. It was getting a bit gritty on the trigger pull so I opened it up (side plate removal) and removed the bar that rotates the pellet carrier and the trigger to clean surfaces (they get dirty pretty regularly so this wasn't the first time). A little oil and reassembled the revolver. Now it will not cock with the side plate on and screwed down--not with either the hammer (single action) or trigger (double action). Take off the side plate and using fingers on left hand to keep things in place and it works marvelously. Obviously I did something incorrectly. Have you any ideas? Any help would be appreciated.
Regards,
John (antelope1@sbcglobal.net)
John,
The only thing I can think is the little steel round bushing that rides in the slot of the pawl arm might be lost? Is the side plate screwing down all the way or are they jammed slightly open?
Nick
hello, i have a crossman model 38t that i wish to sell,it needs seals,but i cannot see well enough to replace.it is the 22 cal model.was a lot of fun for me .my e mail is stinger63@live.com.thanks.
Felice,
I must have missed your comment on Nov 15, 09 because I did not reply. Thanks for the response. I did check both the bushing and final assembly fit and both are good. I have dis- and re-assembled several times since then and continue to come up with the same problem. I guess I keep doing the same things and expecting a different result but it looks right and I believe that it must be some really small thing I am overlooking, like a piece of grit in exactly the wrong place. If you ever run across and fix a problem like this please let me know otherwise I'm going to have to work on a Zippo (they always work when you put the back together).
John
hello,
i have a 38T crosman revolver..but we need new seals so the co2 wont leak. If anyone know where to get a seal for the 38t crosman please email me at: alexcampomizzi@yahoo.com
For parts and service you can try Bryan and Associates, Mac1, Precision Pellet or JG airguns.
http://www.bryanandac.com/
http://www.jgairguns.biz/
http://www.mac1airgun.com/
http://www.airgunshop.net
Tell them I sent you.
I have a T38 purchased in 1984 that started dumping gas. With you photos I was able to repair with a $.69 O ring I got from my local hardware store. Gun works great! Thanks alot.
Carl
Thanks for the great info. I have a Crosman 38T/.177 and need to know where to reassemble the trigger spring. Thank you in advance.
Rene
Rene,
Check out the exploded drawing here:
http://www.crosman.com/pdf/manuals/crosman/38T/C38T177-EVP.pdf
It shows the trigger spring.
antelope... take your barrel out.. you probably have pellets lodged inside jamming up the mechanism.. you'll need to ramrod them out.. That's what I did to my 38c from a yard sale
I am trying to put the spring that fits under the
Trigger mount
I have the black rod with perpendicular ends that fits vertically with one end comingup thru the second hHole in the trigger
Where does this spring go in relation to the above rod and trigger. It is obscured in the diss. Photos
Thanks!! Jeff from doon under
Jeff,
It's not a spring, Crosman calls it a "safety link" As you know, the trigger fits on the lower end. The upper end of the link just sits between the hammer and the valve stem. When the trigger is pulled completely to the rear, the top end of the link moves upward. The hammer actually hits the upper part of the link which is driven forward to strike the valve stem. It's a safety feature--if you drop the pistol and it lands on the hammer, the hammer cannot go forward far enough to strike the valve stem with enough force to discharge the gun with any force--because the link won't be in position to transmit the impact.
I have just come into possession of a 38T and it leaks.
Hoping the teardown an reseal process goes well. This
is a hand me down from my father who recently passed.
I like the look an feel an hope to shoot it in the near future. Thanks for the visuals..here goes.
I just used a small needle nose'd pliers to remove that valve thing or w/e it's called... worked perfectly fine for me. Just stick the tips of the pliers in the "flat head" part of the nut and twist it. The only trouble I had was removing the pieces where the CO2 cartridge goes without damaging it, so I just left it be before I ruined something. (if it ain't broke, don't take risks as I always say)
I have a Crossman peacemaker 44.
I recently had it repaired (there were 2 pellets stuck in one chamber and, after taking it apart, I couldn't get it back together again).
Anyway, the fellow who fixed it put in a new co2 cartridge and tightened the screw to the point where I cannot undo it. And it's been so long since I've done it that I don't recall which way to turn it!
My first instinct is to turn it counter-clockwise (as I look from the head end of the screw). But I'm wondering if the screw is actually reverse-threaded and I should be turning it clockwise instead?
In any case, I can't get it to budge in either direction; and having arthritic fingers I've tried using a wrench, pliers, and even a hammer and screwdriver!
Can you please tell me which way this is supposed to turn? Appreciate it.
Thanks,
Kathryn
Kathryn,
It should be a standard threaded screw, however the knurled knob turns the opposite way as it's acting as a nut. So if you are turning the knurled nut, go the other way...
Read the owners manual on the Crosman site. It has a detailed diagram.
One thing that can prevent screws from being undone is if the cartridge still has pressure in it, in which case loosening the screw can have exciting, unpredictable and dangerous effects.
So make sure first of all that the cartridge is empty. Then loosen it carefully. People always crank down too tight on those screws, you really don't need to.
Hi, i just had a Crosman 38T from my grandpa and, when I tried to remove the barrel, it just stucked there, even if I removed the screw from the bottom of the barrel. How could I remove it? Can someone help me? Thanks
I just finished rebuilding the valve assembly (38-60) and it still dumps air. The spacer sleeve(38-22) has two holes drilled through it. Do those holes have to be oriented in a certain way?
Fred,
Give it a whack with a plastic hammer. That should break it loose.
Bud
I don't believe it needs to be oriented.
Nick,
I'm still having fits with the valve body rebuild. The seal kit I bought included everything except the main valve seal which is identified as part -12 in one drawing and part -94 in another. You can see from my photos that this (nylon?) washer has disintegrated. Can you think of a replacement source? Hardware store? Also, the drawings/instructions refer to a teflon liner that seats in the bottom of the valve body. My valve body doesn't seem to have one. When I look down inside all I see is the zinc seat. Any thoughts on that?
I'll try to include photos.
I'd be extremely grateful for any advice from the air community.
You folks are invaluable!
Thanks, Bud
contact Bryan and Associates, or other airgunsmith, they should have the part.
Nick,
After much searching for the correct valve seal I was finally able to find it at JG airguns. And it worked!
I've broken down and reassembled this gun so many times I can now do it blindfolded - a great parlor trick for your friends.
When shooting across my hundred yard pond I can see the pellet splashes on the far side. Plenty of power and decent accuracy - well worth the headache of rebuilding.
Thanks for all your help.
Peace,
Bud
I would hope by now someone has given you the answer. There's an Allen screw on forward top of frame that needs to be loosened. Its just behind where large barrel attaches.
Need to send off for repair a .177 38t.
I recently purchased a Crosman 38T at an auction, and of course it needed new seals. I sent for the seal kit, but noticed no sign of the retainer that is supposed to slide in the trigger assembly (the thing that they tell you to be careful and not lose - guess what?) Anybody have an idea where to purchase one, or at least post a picture of one, so I can fabricate one. Thanks.
You mean the small bushing? Just make one with an OD and ID that are a sliding fit, if you have a lathe. If not you'll have to check with teh various airgun parts sellers.
Nick
Just found my old faithful 38t..my grandpa got it for me on my eight Bday.man am I stoked..wish I could post a pic
I purchased seal kit from jg,no problem fitting no leaks! Problem is will only fire double action. Hammer hits top of seal nut cannot reposition. Brass block seems to be angled back towards hammer cannot get it to sit better. Has anyone had to pack behind to bring level?
Maybe you’ve got the piercing/valve assembly slightly off side a bit. So when cover is screwed down causes to much pressure on the tube jamming it into the hammer ? Sometimes it’s a bit of a chore to keep the tube and valve assembly sitting in there flush and tight to the housing /frame.
Post a Comment