
A new style "Premium" #14 Morgan pad is on the left. It is much nicer than the old version on the right.

The new Premium model has a machined base to fit against the gun. The pad can be set for height incrementally on the machined sliding interface. The old model has a die-cast base with interlocking grooves. It works really well but Morgan's casting die was damaged a few years ago and Morgan took the opportunity to refine and update the design.
I bought the old vintage Morgan a week ago at a local gun show. It was missing the main adjustment bolt that holds the rubber recoil pad to the base on the gun. Figured I'd just go buy a bolt and be done with it. That didn't quite go as planned. The slot is substantially wider on the old base. The new base looks like it was redesigned to accept a more readily available 3/8-24NF bolt.
FCC Disclaimer: Due to new FCC regulations I should mention that I got the new Morgan from Nick Carter. I do not believe any money traded hands. Nick and I send airgun stuff back and forth on a regular basis and rarely is cash money involved. It just comes out in the wash.

The head of the bolt from the new pad didn't fit the counterbored slot in the old base. The only thing that matched up was the bolt threading. 3/8"-24. It's probably not possible to commercially obtain a bolt with this oversized, shallow head in this thread size. I'd venture that this was a custom fastener made by--or for--Morgan years ago.

Following the path of least resistance, I bought a 1/2" diameter shaft axle bolt. The new Morgan mounting bolt is on the right for size comparison. The head on the axle bolt is huge, allowing excess material for fitting to the slot in the old base.

A piece of 220 grit emery paper on a granite surface plate was used to remove the casting irregularities on the old base. This step is critical to obtain a flat, true fit against the gunstock. With the new Premium model, this step is already done by the manufacturer.

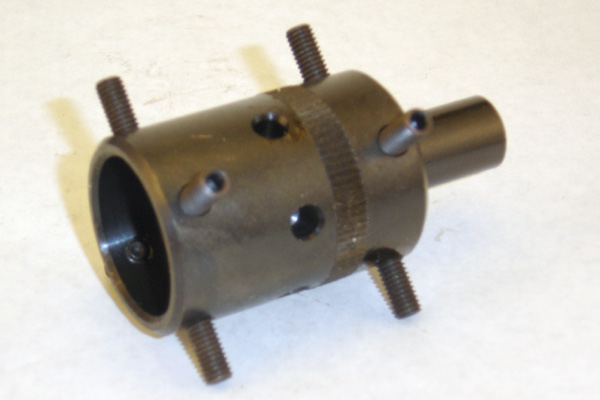
Here's the slot that the bolt head must recess into. The larger slot is 0.661" across the flats, the smaller counterbore is 0.429".

Installed a nylok nut on the axle bolt...

And chucked it into the taig fitted with a 3-jaw scrolling chuck. The nut is kinder to the soft aluminum jaws on the 3-jaw than grabbing the coarse threads of the bolt.

Turned the shaft down to 0.368"--roughly the OD of a 3/8"-24 bolt.

Had to reposition the tool post to get right up to the bolt head. Left a small shoulder to fit into that small inner 0.429" slot in the base.


Once at size, I changed to a left-hand knife and finished the shoulder to 0.423" in diameter and 0.080" tall. Then faced the inside of the bolt head to make it flat.


Cut the original threads off.


Mounted it back into the Taig and set up the threading die holder on the tailstock assembly. Not shown: First cut a slight taper to ease the start of the die. As always, used lots-o-cutting fluid.

Cut about 4 or so full size thread then took it out of the lathe and went to the vise. Threading die went into a die stock.

Easier this way. Cut thread to the small shoulder then flipped the die over and re-cut the thread full depth to the shoulder.

Filed 2 of the flats down to fit the slot in the base. Used the bench grinder here too.

File (or grind) and test fit. File (or grind) some more and check again. Stopped at 0.657". It was faster than setting up the milling attachment and plenty good enough.

Got a nice fit that just clears without binding on the sides, and maximum surface contact in the counterbored slot.

Faced the head of the bolt down to 0.110" thick. It must sit below flush in the slot or it will drag against the gunstock.

How long to make it? The nut in the recoil pad sits 0.578" deep from the face of the metal plate. Measured that amount from the base, then threaded a 3/8"-24 nut down to mark the location to cut as well as chase the thread afterwards.


A wire wheel deburred all edges.


Finished with Formula 44/40 bluing solution.


Final fit. Aside: The base is about 1.64" at the widest point and 4.60" top to bottom.

Pad is down tight and achieved full thread engagement.

The rehabbed vintage Morgan. Now, the question I should have asked first: Since it's been previously fitted, do I have a gun that it will still fit? A quick look at stock dimensions in my notebook is not particularly encouraging. I did some very quick and dirty measurements months back for Nick when he was deciding which pads to stock. The Air Arms Pro Sport and the Beeman R1/HW80 look to be pretty close.
It'll be a few days before I know for sure. Worst case? I'll fit the new model Morgan pad to a gun instead and this one can wait a bit longer.
Update: I checked the measurements on all the airguns in the safe. Nothing fits. Judging (Guessing) by the size, my best bet is probably going to be a vintage Crosman 160/180 or a more current 2260. Something like a reasonably priced QB78 will probably also fit the bill. I'll keep an eye out.

1 comment:
Can u make me one
Post a Comment