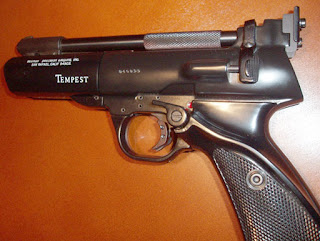
Nick and I pondered the trigger situation. Then, Nick forwarded this link: http://www.rimfirecentral.com/forums/showthread.php?t=219638
Seems like I'm not the only one who thinks the trigger pull weight is absurdly high.
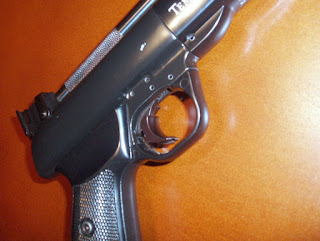
The trigger is retained with, yep, small roll pins. What a great way to start! More required reading: Nick disassembled a Webley Hurricane on a previous blog post. Pay attention to the way he numbered the roll pins for disassembly. Handy! http://anotherairgunblog.blogspot.com/2008/05/disassembling-webley-hurricane.html
Note: Worry not. There is exactly zero danger that the mainspring will come blasting out of the gun by removing the roll pins.
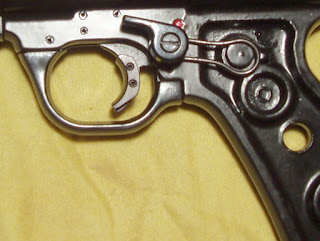
Grip panels off. Unscrew the flathead holding the safety lever and pull it off the stud. The safety spring then comes right off.
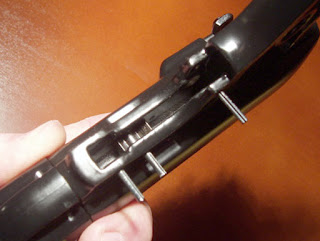
Knock out the roll pins in the order Nick has them marked in blog post #31. Not necessary in the least to push them completely out of the frame. I pushed them out from left side to right.

The trigger and sear are buffed (bench grinder fitted with a 6" stitched wheel). Lots of polishing compound on the wheel. A small container of water near the buffing wheel keeps the part cool. All the mating faces are polished until they look like mirrors.

Trigger and sear after buffing. The allen set screw behind the trigger blade gives the spring something to bear against. Screwing it in increases trigger pull weight. Backing it out lowers. The trigger spring is so stiff (and so long) that the set screw only really gives you the option of "too high" and "really too high" in it's adjustment range. The spring is 0.145" diameter and 0.616" long--"free length" in spring speak.
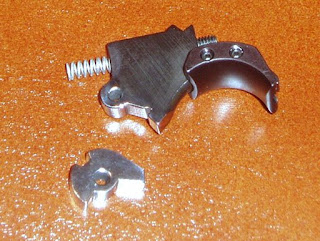
The trigger shoe is from Crosman It's for their 2300 custom shop guns. It fits quite well. Crosman part number 2300-012. About $9 if I recall. It's not always available for after market sale. Beeman used to sell a really nice steel trigger shoe from Flaig Ace. Beeman's old part number was #7761.
I looked around at all my springs, but couldn't find anything small enough in diameter to replace the stock trigger spring. A trip to several local hardware stores also came up dry. It's possible that Webley used a metric sized spring. If that's the case, it's probably a 3.75mm OD and it crushed very, very slightly when I put a caliper on it. I found several good options in a few seconds online, but didn't want to order and wait. I chose instead to cut 2 coils off the spring to lower the preload. Alternately, it might have also been possible to change to a shorter set screw in the trigger itself that bears against the spring. Either way, the spring will then exert less force against the sear.

Pick your poison. Just cut the spring shorter. Reassemble in the reverse order. I lubricated all the contact surfaces with Castrol MP grease. Use whatever bearing/chassis grease you have around. And, yes, a moly grease is fine for this as well.
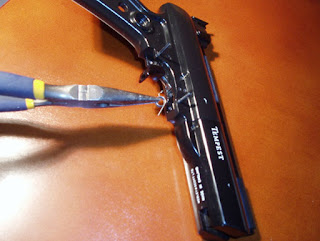
The return spring for the sear goes in this way. This is the only part that might cause some head scratching during reassembly.
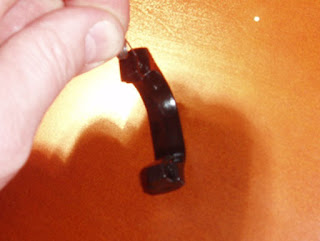
There's a relief cut on the trigger guard for the long leg of the return spring.
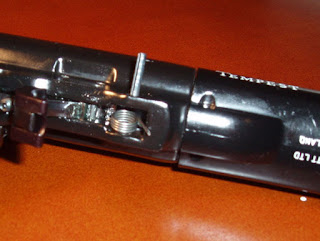
Gun is lying right side up. Long leg of spring is on top and towards the front of the gun.
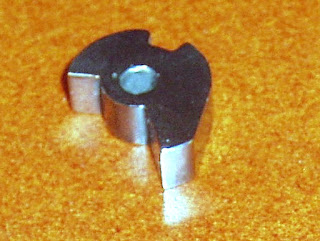
The short leg at the rear of the return spring fits in notch cut in the sear. Notch is there at the top.
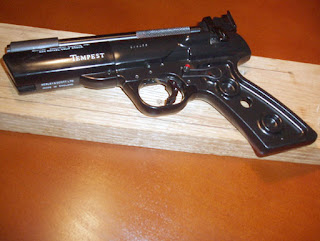
Once the guard is pinned back into place, only the safety lever needs to be reinstalled.
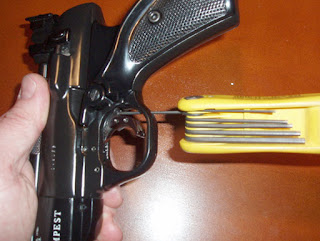
Have I mentioned yet that these Webleys have single-stage triggers? Well, there you go. The trigger pull weight can be fine-tuned using the set screw at the rear of the blade with a 1/16" allen wrench. By adjusting the set screw to preload the trigger spring, my pull weight was variable from a high of about 4 lbs 2 oz down to 2 lbs 8 oz. Mine is currently adjusted to about 2 lbs 12 oz. Pretty good considering it was in the 8 pound range before the job. It's still not "match grade", but perfectly acceptable for a fun plinker.
Side note: IF the set screw is backed out of the trigger blade more than approximately 0.120" from flush, the gun will fail to cock. The protruding set screw will contact a shelf inside the rear of the trigger guard and the sear will not hold the piston back. Turning the set screw in a few turns will immediately fix the problem.
Warning to Americans: I failed to match up the thread size on the set screw. It's not metric--and it doesn't match up with SAE. It's probably a BA #4. You are hosed if you drop this under a work bench outside of the UK.

8 comments:
"Hosed if you drop this under a bench outside the UK"
This is why you make friends with the people from the UK who chance upon your blog and become avid readers ;-)
Great article, by the way. Very nicely done!!
May I suggest that mention is made of the fact that the sear return spring will disappear into the wild blue yonder, (as mine did)if you are not aware when removing the trigger guard.Apart from that.A very good strip down article.Rod
Thanks for posting this. I've just had the job of reassembling a basket case Tempest, which had me beaten until I found your mention of the sear spring. Cheers!
I bought a rather close to as-new condition Tempest recently, probably made after '95 and very little used. It's been very stiff, kind of grainy/sandy feeling on cocking, and the trigger action about the same. A bit of oiling here and there helped trivially but then yesterday I accidentally discharged it before putting in a pellet... and after this blunder the cocking action was downright alarmingly rough. So it was time for an overhaul.
Following your guide on the trigger was straightforward, even enjoyable, so thanks so much for this! Further, the Hurricane tear-down you linked to was most helpful in taking absolutely everything except the rear sight apart. I polished everything which seemed relevant to polish, including the inside and outside of the mainspring which was very, very rough everywhere and slightly corroded. Also buffed the rear of the barrel to a high gloss, as this was finished rather roughly and while it was sealing well, it can't have been good for the seal. On assembly I sparingly applied Bisley's Gun Grease here and there, figured out how to get that sear spring lined up for insertion of the trigger guard which retains it, and everything worked out just fine. I took the plunge and cut the spring a bit shorter too, and thanks for that; trigger action is a lot closer to that of my Baikal 46m now.
I'll mention a couple of cautions. I greased the barrel locking saddle spring before putting it back in, and that's not a good idea. Had to pull it apart and clean it and lightly oil it, as the thing was sort of sluggish in locking the barrel with grease. And the saddle retaining pin, on my pistol, has three long swaged, raised areas in its middle, making it a royal pain to drive out. I found it necessary to brace the saddle very well on driving this out, as the mild steel of the saddle bent a bit and had to be bent back.
Anyway, the pistol still challenges my grip awareness, but the way it cocks and shoots much more smoothly is more than worth the couple of hours I spent working on it.
I,ve been doing a little playing around with Webley Hurricane and Tempest triggers recently. Altering the trigger spring does very little. If you have a look at the trigger set up and how it works, you will see that the mating faces of the trigger and sear make a lot more difference. This is because of the amount of pressure on the faces due to the mainspring. A shorter mainspring improves things a fair bit and I have used Webley Typhoon springs as well. If you have the sear and the trigger out, you will get a fair feel of where to polish and remove material. The back edge of the sear can be more rounded,where it engages on the the trigger to reduce "drag" ans the "Bump" on the trigger can be reduced as well. This is the "pause" in the trigger pull. If you take too much off each, the safety will not work correctly. Slightly rounding the engagement point of the sear and trigger works well, as does slightly rounding and polishing the part of the sear that holds the piston back. I,ve found that these things improve the trigger better than a shorter or weaker trigger spring or a wider trigger/trigger shoe.
Thanks for the info. I followed your instructions and was able to significantly lower the weight of the trigger pull of my Tempest! I used my digital Lyman trigger gauge and I am consistently getting a 3.5 to 4.5 pull. I was very conservative in shortening the spring and I am now tempted to cut off the full two coils that you recommend. Thanks again!
Thanks for the info. I followed your instructions and was able to significantly lower the weight of the trigger pull of my Tempest! I used my digital Lyman trigger gauge to test the results and I am consistently getting a 3.5 to 4.5 pull. I was very conservative in shortening the spring and I am now tempted to cut off the full two coils that you recommend. Thanks again!
There are pictures here http://www.network54.com/Forum/681456/message/1461661812/Webley+Tempest+trigger
of tuning the trigger.
Post a Comment