So,
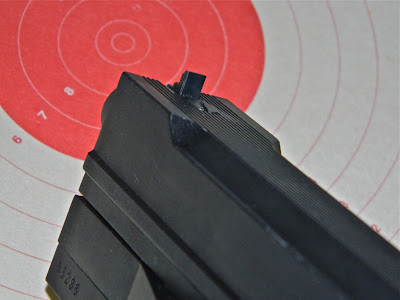
here's the reason it's in my grubby hands again. The front sight has
sheared off. It looks like a casting. Wish I had the rest of the blade
to measure the height and width.
The
base is really a tiny thing. It's only 4mm wide across the base and
the through hole for the mounting screw is about 3.46mm in diameter.
Not much wiggle room. I'll add a few thousandths to the thickness of
the base and make the blade thicker front to back as well.
Loosened the single screw that holds the shroud to the barrel. There was no reason to remove the shroud, but I wanted to shoot the pistol without it attached after making the replacement blade.
Started with a piece of 1/4" x 1/4" keystock.

Cut off a small piece.
Squared it up in the mill then cut a step. Eventually, this was milled down to the thickness of the blade.

Not shown: The piece was milled to exactly 4mm wide.
Applied some dykem and scratched a centered line. Here, a pointed indicator is being used to center the drill chuck.
Drilled a clearance hole for the mounting screw.
There was no wiggle room here. The clearance hole needed to be precisely located as there are only a few thousands of an inch of metal left on either side of the hole.
Turned the piece over and milled the base flat.
Amazing. All this equipment and I managed to make an L-bracket.
And it fits in the notch. It's even a slight press-fit and the mounting hole centers up.
Without the original front sight for comparison, I had no idea how tall the sight needed to be. Colored the blade with a Sharpie marker and shot some targets. I stuck the rear sight towards the bottom of it's elevation range to bias the adjustment for distances further than 10 meters.
Shot some targets, and noted how low the groups were. Milled a bit off the top and shot some more.
After bringing the shot groups to the center of a 10-meter target, I cut a bevel on the sight.
Here it is still in the white. It's awfully small.
Rather than cold blue it, the sight was covered in oil and heated with a small torch until it was heat blued.
Installed. Nice sharp edges to frame the target.
I'll probably cut a second, slightly wider sighting notch in the bottom of the rear sight blade. It could then be flipped over for different range lighting conditions.
Another pic of the rear sight and the dry-fire lever--in the dry-fire position.

Many, many trigger adjustments.

A few pics without the sight extension and weights.

Here's the rail for the accessory weight again.

There are five separate weights that can each be installed. They each secure to the rail with a setscrew.

My preference is for muzzle heavy pistols, so I'll likely use them all.
Planning on using the front sight extender as well.

With the extension installed, the sight radius is a whopping 14" long. No surprise that I ended up purchasing the gun. The sharp trigger guard edges needs radiused and the grips look a bit dry. Not sure if I'll give them a bit more color or just oil them.
All this work on a 10-meter pistol also makes me want to add some muzzle weight to my old Gamo Compact as well as replace it's way too skinny front blade.
More soon.


1 comment:
Wow, great repair job. Would you consider making one for my 600 which is also missing a front sight ? I'm willing to pay for your time, parts and shipping. I'am kinda desperate, as I do not have the tools or shill required to do this repair. Thank you, Anthony
Post a Comment