A few weeks ago, I bought a small milling machine from Grizzly. It somehow seems only fitting that the first real project would be a breech for a 22XX. And since I have almost no milling experience, this will probably be a complete and utter disaster. This whole project may end up in the recycle bin.

Bought a bar of 12L14 from Speedy Metals on my last order. It's 3/4" x 1" x 6". Took a clean up pass on one of the 3/4" sides with an endmill.

With the piece on parallels and cleaned up the opposite side. This makes the two sides parallel to each other. Vise parallels are simply pieces of thin metal that are precisely ground top and bottom that sit on the bed (bottom) of the vise so the top of the work sits above the jaws. If the work is really thin, just use a single parallel.

Wanted to try something different on the sides, so I used a flycutter. The flycutter can sweep a larger surface than an endmill in a single pass, so it's good for cleaning up large surfaces--though it's not as accurate.

Flipped the piece and did the opposite side.

Need to drill for the barrel and bolt. Drilling a six inch deep hole in a piece of steel is not an easy task. The new mill doesn't have enough vertical travel to accommodate the vise, workpiece and 6"+ drill bit. The Taig lathe doesn't have enough bed length, either. Hmmmm... Guess I need a full size drill press after all. Since I didn't want to buy one at 9 PM last night, that left the small bench top drill press. I swung the table out of the way and used the base. The base on this machine has slots to fix workpieces. For the size and low cost of this drill press, it's pretty well thought out. I used a 3" drill press vise that is ground on the bottom and both sides. The vise was mounted sideways and clamped down with step blocks, t-nuts and strap clamps. Getting the fixture right took some time. Found hole center with a pointed indicator in the chuck.
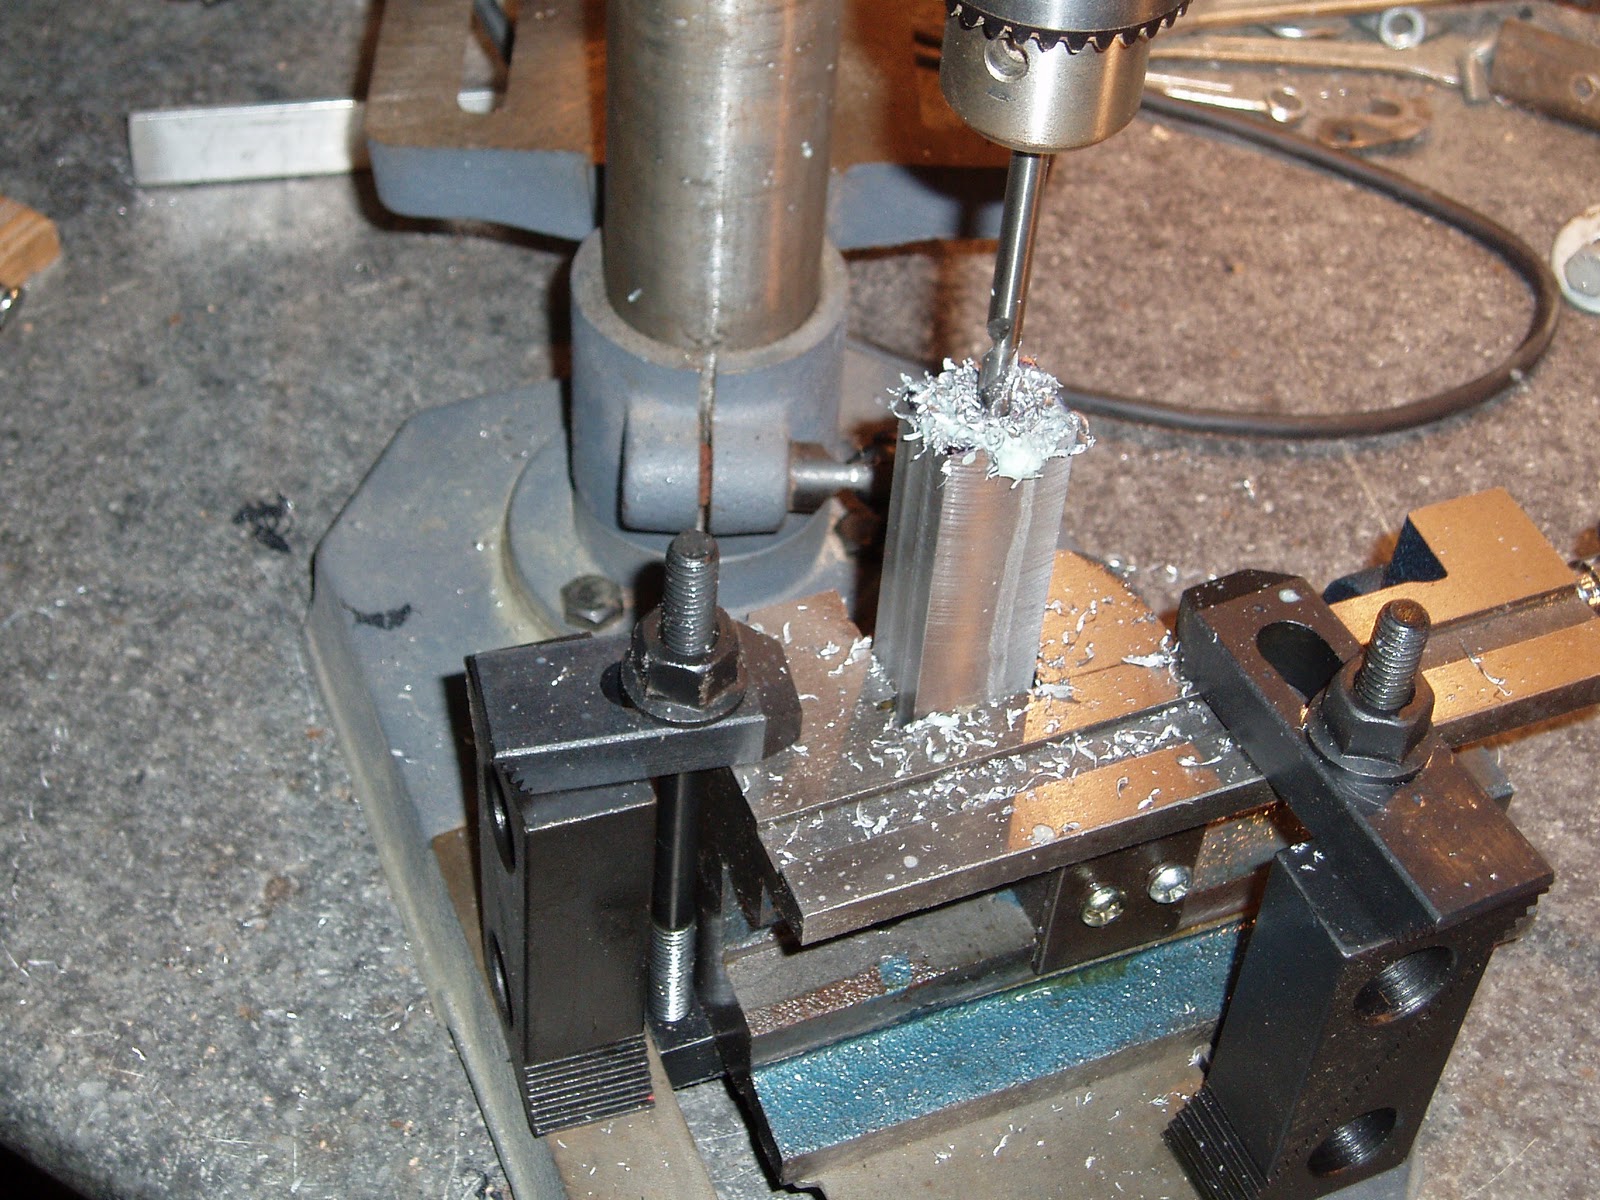
Started drilling with a 1/4" standard length drill bit.

After drilling into the work approx two inches, I removed the bit and the workpiece then inserted a longer bit into the drilled hole. The work was reinstalled into the vise and the drill bit chucked and I continued drilling. After drilling over halfway through, I turned the work 180 degrees in the vise and drilled from the opposite end. With some luck, the holes met halfway and lined up quite well. Ran a 0.250" reamer through the length of the hole to clean it up.

Slid a piece of 0.250 drill rod through the hole and noted that the hole wasn't completely straight through the steel. Not unexpected, since it's almost impossible to keep a long drill bit from wandering as it cuts. It was very slightly angled side to side--which means the barrel will be pointed left or right depending on which end becomes the front. Had the angle been in the vertical plane, it would have been easy to fix when milling the bottom radius to fit against the gas tube. As I still need to drill for the barrel diameter, it seemed that I should fix this now. It made sense to use the hole itself as the reference point and just make the outside of the breech parallel to the drill rod.

Probably a lot of ways to do this, but I have a nice set of gauge blocks and I'd like to put them to work.

The gauge blocks are very precisely graduated lengths of steel. They can be combined to make exact lengths for layout, measurement...

I stacked four together on one end. I lifted the work just off the parallels and hung the piece by the drill rod.

Could have duplicated the stack height with the gauge blocks for the other side, but I grabbed an adjustable parallel instead. With a caliper locked open at the exact measurement of the gauge block stack, I matched the parallel to the exact size of the stacked blocks.

Slid the parallel under the other side. With the work hanging from the drill rod, I clamped down the vise.

Top of the workpiece just barely clears the top of the jaws.

Could've used the flycutter again, but this time I milled the top surface--just kissed it until the entire surface had material removed. The top is now parallel to the center hole. I turned the work over and seated that freshly cut face against the parallels in the vise and took another cut. Now both sides are parallel to the center drilled hole.
Lot more to do. Check back in a couple days.

3 comments:
Woo hoo! Looks like fun. I see you got the fourth notch up on the price scale! It's a pretty nice model! I'm wondering what you think of this option?
http://www.grizzly.com/products/Combo-Lathe-w-Milling-Attachment/G0516
Is there a reason to be suspicious of the all-in-ones?
Ryan,
That's a nice machine, it's more of a lathe with a mill/drill added. It lacks a milling table of any real size and doesn't looklike it'll take much in the way of a milling vise. I was looking for a milling machine that didn't require rewiring to 220V (or a static phase converter), had a relatively large table, and fit in the basement without killing anyone involved in moving it down the stairs. The all in ones can be great machines and I looked hard at them--just wasn't what I was after this time around.
I've come to realize that milling machines should also be given away for free by the various manufacturers and they should simply charge you for the associated tooling that will be required. In the last few weeks, I've needed to purchase several vises, a couple different collet sets, fly cutters, 30+ milling cutters, parallel sets, more v-blocks, angle plates, indicators, indicator bases, clamps sets, arbors...It really never ends.
So, budget for all the necessary tooling. Without it, it's just a heavy drill.
Post a Comment