The Crosman 600 semi-auto has long been considered one of the finest achievements in CO2 airgun development. The 600 uses a small portion of the CO2 gas to cycle and load the gun. It's a true semi-auto, not a revolver like most all the CO2 repeaters on the market today. Ten .22 cal pellets are loaded along the top left side via a built-in spring loaded magazine. (It's actually possible to load one or two additional pellets if they're short--like the Eley Wasp) The CO2 powers a "toggle" action that aligns the forward pellet with the barrel where it's then immediately fired down the barrel. The 600's are typically very pellet sensitive, though the two I have both like .22 cal Eley Wasps,
H&N Match Wadcutters, RWS Hobbys, and Crosman Wadcutters. The guns were designed back in the late 1950's and first marketed in 1960. I'm a huge fan of the ray-gun look. The ergonomics, sights and trigger pull are pretty tough to beat. National Match Shooters may note that 600's will often outshoot Ruger Mk 2's offhand at 50 feet on a good day. At the least, it'll be interesting.

The vintage Crosman data indicates that the pistols will fire a 14 grain pellet at 340 fps and 40 shots are available from a 12 gram CO2 cartridge. I've never managed more that 35 shots and I've found the average velocity to actually be about 305 fps. Max velocity with a similar weight pellet is indeed in the quoted 340 range, but the velocity seems to drop pretty quickly into the low 300's and remain there until the gas exhausts.

The stock barrel length is 5". The barrel is easily removed by loosening a single set screw at the rear of the barrel.

Set screw is on left. Top of pistol frame. A 7/64" allen wrench does the trick.

Uh, so what am I doing? Well, a second 600 recently presented itself and I couldn't resist. My single complaint (aside from the gun only holding 10 pellets) is the low shot count per cartridge. The 600 is often--and accurately--described as a "gas hog." One solution to the gas consumption is to increase the on-board CO2 carrying capacity. Many vintage Crosman CO2 guns don't seal the cartridge against the valve. The valve seals the gas tube at one end and the cap seals the other end with the CO2 cartridge in the middle. These guns can benefit from higher shot counts and cheaper CO2 refills by adding an extension tube and a bulk-fill cap. The tube simply adds volume, while the bulk-fill cap allows filling from a paintball tank. Cheap refills and more shooting.
OK, so the bottom 600 has been converted with a bulk-fill adapter and gas tube extension from
Bryan & Associates. Tim at
Mac1 is another great choice for bulk CO2 parts.

While the gun will work with the 5" barrel in place, it looks absurd with the extension. I had a spare 2260 rifle barrel in my parts stash. One problem: the 2260 barrel diameter is 7/16" or 0.4375". The stock 600 barrel is 0.370" diameter to fit inside the frame.

Eyeballed the length and cut the 2260 barrel down to about 15".

Chucked into the Taig lathe and faced off the cut.

Switched tool bits and cut a tapered lead for the business end of the breech. A high speed (and very light) cut finished the surface like a mirror. This is essentially a "forcing cone" to use a revolver term. The pellet jumps from the toggle into the barrel under rapidly expanding CO2 pressure so I think that is an apt comparison.
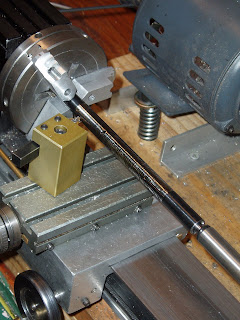
Turning down the barrel to 0.370". A live center is being employed to stabilize the end of the barrel at the other end of the bed.

Primarily used a ti-nitride indexable tip to make the cut. Higher speed, heavier cuts.

Finished with a carbide tipped right-hand knife to create a shoulder. The barrel will slide into the 600 frame, seat on the shoulder and lock with the set screw. Length of the 0.370" diameter portion is absolutely critical. Too long, the toggle will hang up on the barrel. Too short, the gap between the toggle to breech is too great allowing CO2 to leak and pellet velocity suffers. Careful and repeated measurements were taken and the length was set at 4.945" from breech end to the shoulder.

Time to cut the muzzle to final length. Another precision cut.
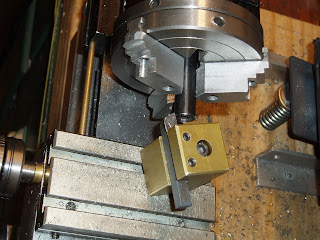
Faced.

Another pic.

Cut a slight recess to protect the crown. Once finished, I cleaned the barrel thoroughly of swarf then lapped the bore with
J-B non-embedding paste.

Hand filed a small flat for the set screw.

Sort of like this...

Installed. Barrel ended up at 14.25" long. 9.25" longer than stock.
Couldn't help but make some chronograph comparison notes: We all know that adding barrel length to CO2 guns increases velocity as the CO2 continues to expand behind the pellet.
Stock gun, 12 gram CO2 cartridge, 5" barrel. RWS .22 cal Hobby pellets 11.9 grain:
341* highest velocity
320
314
315
315
310
310
306
309
308
325
318
313
310
307
300
310
300
300
296...
Ending velocity at #33 shot (gas exhaust) was 281 fps.
Bulked gun, with the 14.25" barrel. RWS .22 cal Hobby pellets 11.9 grain:
468
473
472
472
475
478
470
478
478
476
482
480
479
483
480
481
486* highest velocity
477
482
476
482
486
475
466
474
482
481
477
473...
Ending velocity at #69 shot (gas exhaust) was 376 fps--still 35 fps faster than the first and most powerful shot from the 5" barrel.
So, the bulk extension tube essentially doubled the shot count while the 14" barrel added approximately 165+ fps over the stock 5" barrel. 165 additional fps--how often do we see a gain like that?
Downsides? The weight of the tube extension and barrel makes for heavy leverage during offhand shooting. I can do it, and I'm getting better, but it's not the gun for the weak of wrist.
Upsides? You can empty a 10-shot magazine in about 2 seconds and just watch the target bull vaporize. In a couple seconds, a tin can at 50 feet looks like you used a shotgun. --And I don't have to burn through CO2 cartridges anymore.


