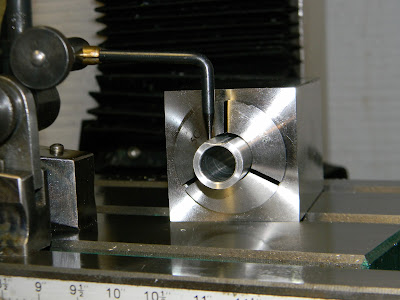
Picking up where I left off...I need to enlarge a tiny portion of the radius cut at the breech end to clear the bulk tube sleeve. To do that, I need to first center on the radius to get an even cut. Put the muzzle brake in a 5C collet and then into a square collet block.
That funky steel block thingy with rods on the left is a surface gauge.
Might've been a bit more accurate to have set this on a surface plate, but the mill table is plenty flat. Brought the indicator down until it just touched the left-side top edge of the radius.
Slid the block over and compared with the right side. Rotated the piece in the collet until the left and right sides indicated the same way. This centered the radius to the top of the block. Plenty of other ways to do this, but this worked well.
A 4-flute 7/8" endmill.
Block went into an insert vise. Insert vise went into the milling vise. Not shown: Used a chucked 7/16 reamer in the mill head to center the work on the X-Y axis(--when the reamer would enter the hole in the muzzle brake, it was lined up)
Brought the work away from the cutter without moving it side-to-side. The amount the tool overlaps the piece represents how long the step needs to be to clear the sleeve.
With the depth set, the radius was deepened then I cut each side out by 0.008".
Flipped the work in the collet and aligned again using the surface gauge. This is the muzzle end of things. More protrusion this time so I can add some slots. Did some layout that proved to be a waste of time.
Fortunately, I didn't start at the muzzle. Made the first slot with a 1/4" ball mill. Cut in several passes until I'd cut through and into the bore.
When I got to final depth, I turned on the spindle depth readout and set it to zero.
About then, I realized that I might want to add a front sight to the muzzle brake in the near future to increase the pistol's sight radius. Did some quick math and changed the location and spacing of the slots.
All the slots were cut until reaching zero on the readout.
Some clean up polishing removed the clamping marks.
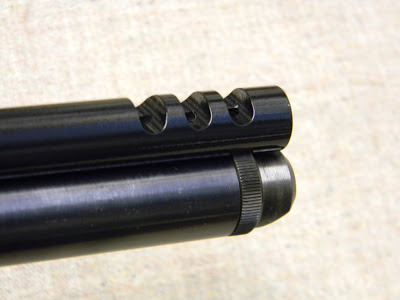
Neat. Round holes at the bottom of each cross slot.
Was going to add set screws to the brake, but realized that it doesn't really need to be removable. Epoxy will be fine. The painter's tape is to ensure there will be a gap between the bottom of the brake and the gas tube after the glue dries. Essentially, it ensures that the barrel remains free-floated.
These non-regulation sized Gamo targets are good for something.
Removed the now one piece barrel/brake unit and pulled off the tape.
I like the way the radius hugs the gas tube.
Gave it a quick shot of black Krylon and let it dry inside.
Just enough room at the muzzle if I ever want to add a front sight.
Thanks for reading. Please check back soon.
Friday, December 28, 2012
Sunday, December 23, 2012
Muzzle Brake for a Crosman 600 -- Part 1
Been telling myself that I'd finish this Crosman 600 for way too long now. I fit a longer barrel to the gun several years ago then later switched from 12 gram CO2 cartridges to bulk-fill with an extended gas tube from Bryan and Associates. So, now, the problem here is rather obvious--the barrel is too short. Could've made a new barrel, but I've already been down that road. A muzzle brake that extends to the end of the gas tube seems like a reasonable solution.
A piece of 5/8" aluminum rod.
Suppose I'm technically making a "shroud" since it's going to cover the entire exposed length of barrel.
Faced off one end and spotted with a center drill.
Progressively drilled about three-quarters of the way through until I had a 7/16" hole to fit over the barrel.
A slight chamfer to remove the sharp edges.
Flipped the piece, faced and center drilled.
Drilled 17/64" to ensure the .22 cal pellet will clear with room to spare.
Countersunk the muzzle.
A couple of edge finders.
Want to find the center of the workpiece. Set the work on parallels in the milling vise and found the edge. The contact tip is 0.200" diameter, so the edge is 0.100" from the center of the indicator. As I want to center on a 5/8" diameter piece, I need to move the milling table half of 5/8" PLUS the 0.100" the center of the indicator is from the edge. (5/8)/2 + .100
Cranked in 0.4125" of travel and I was on center.
Used a 7/8" ball mill to radius the bottom of themuzzle brake shroud to match the gas tube.
Wasn't sure how much metal to leave in the web, so I checked the gap between the barrel and gas tube with a feeler gauge. Want to free float the shroud, so the web needs to be slightly thinner than the feeler gauge stack.
A couple more passes and...
it'll clear with several thou to spare.
Test fit.
Looks promising.
Need to make a small relief cut in the shroud to clear the flange at the rear of the bulk tube. I should be further along soon. Check back in a couple days.
A piece of 5/8" aluminum rod.
Suppose I'm technically making a "shroud" since it's going to cover the entire exposed length of barrel.
Faced off one end and spotted with a center drill.
Progressively drilled about three-quarters of the way through until I had a 7/16" hole to fit over the barrel.
A slight chamfer to remove the sharp edges.
Flipped the piece, faced and center drilled.
Drilled 17/64" to ensure the .22 cal pellet will clear with room to spare.
Countersunk the muzzle.
A couple of edge finders.
Want to find the center of the workpiece. Set the work on parallels in the milling vise and found the edge. The contact tip is 0.200" diameter, so the edge is 0.100" from the center of the indicator. As I want to center on a 5/8" diameter piece, I need to move the milling table half of 5/8" PLUS the 0.100" the center of the indicator is from the edge. (5/8)/2 + .100
Cranked in 0.4125" of travel and I was on center.
Used a 7/8" ball mill to radius the bottom of the
Wasn't sure how much metal to leave in the web, so I checked the gap between the barrel and gas tube with a feeler gauge. Want to free float the shroud, so the web needs to be slightly thinner than the feeler gauge stack.
A couple more passes and...
it'll clear with several thou to spare.
Test fit.
Looks promising.
Need to make a small relief cut in the shroud to clear the flange at the rear of the bulk tube. I should be further along soon. Check back in a couple days.
Sunday, December 16, 2012
Daisy 790 Sight Rail Part 2 Final
Finishing up the scope/sight mounting rail on the Daisy 790. OK, yeah, technically it's a 780 since it has a .22 cal barrel installed...
Went through my magic box of parts and found a Picatinny 1913 rail as well as a smaller 3/8" dovetail rail.
This is clearly the best for mounting options these days. All kinds of stuff fits the Picatinny standard--but to my eye, it overwhelms the gun. Might be more practical, but it just looks gigantic on the slender receiver.
Here's the 3/8" dovetail rail. I like the sleek lines and to me, it evokes a vintage look that suites an air pistol almost three decades old.
Of course, the 3/8" rail has a concave base that needs to be removed. A six flute milling cutter took it down pretty fast.
Work is on parallels.
Taking it down in several passes due to the overhang on the vise. Could've (should've) blocked up the ends with jacks, but this worked.
Five or six passes later.
Some layout for the mounting holes.
Here's a jack screw. Needed it to prevent deflection from the downward pressure of the drill.
Three holes for the long front rail and a fourth for access to the barrel setscrew at the breech.
Two holes in the rear rail.
Transferred the hole locations to the receiver.
Drilled.
Tapped for #6-32 screws.
Each hole was spotted, drilled and tapped without moving the mill head. Barely snugged the tap in the chuck for alignment. The tap wrench is snugged to the body of the tap and turned by hand to cut the thread.
Five tapped holes later, some filing of the rear spacer and it's done for now.
Five shots and it was zeroed. I really like this combination.
Not sure yet what's next, but check back soon.
Subscribe to:
Posts (Atom)