Showing posts with label Haenel 311. Show all posts

Monday, December 28, 2009

Finishing Up the Haenel 311

So, here I go, taking it apart again...So I took some more notes applicable to both the 310 and the 311...

The lesson I've learned: Insert a pin (not a punch, it's too long) to hold the auto safety spring in place so it doesn't spring inside the housing.

As I said, the set screw seems too tall. Perhaps that's keeping it from cocking reliably?

The hole is full of burrs.

So I drilled it out and a bit deeper.

Much better.

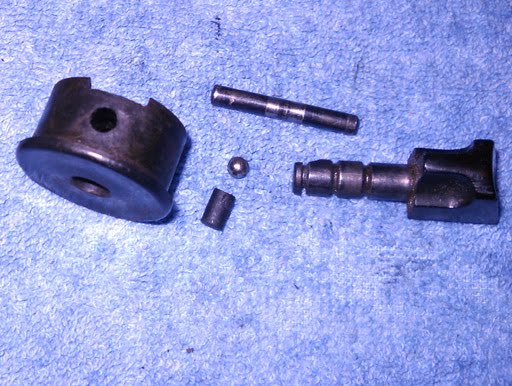
I took some time to understand exactly how to reassemble the safety...notice the ball protruding inside. First I inserted the ball and the rubber "spring".

Then I put the end cap on. I have to insert the safety with the flat aligned down.

Here we go...the suspense is killing me...

Notice the pin that retains the end cap is not in place.

The safety pushed home.

Then rotated to pick up the ear on the automatic safety link. The pin was then inserted to hold the cap as well as the safety in position.

I figured I should write down what the two trigger adjustment screws do. A is a screw adjusted spring loaded plunger on the trigger. B is a screw that determines sear engagement.

Location of the screws.

The only obvious problem beyond that setscrew was that the trigger guard screw wasn't, um, screwing in.

Threads are stripped.

Thankfully the threads in the trigger housing were fine.

Rather than spend a half hour making a screw...I found a longer one in my big box of screws.
Would this solve the problem?

Nope...Neither of those two small problems were causing the larger problem of the gun randomly not cocking.

At rest, the cocking lever is centered in the slot...

When I pull it with a bias to the left, it rotates obviously. Just a small amount but you guessed it...if I pull it straight back it catches. If I ride the left side of the slot it doesn't. I don't see why it would matter but it seems to be the problem. I shot repeatedly without it failing to catch. We'll see if that's all it was over time. I can't see how to tighten things up without a huge amount of work, so I'm calling this done. I learned a lot about the Haenels and now it's time to move on...to other damaged, beat up, ugly and abused airguns.

Sunday, December 27, 2009

Haenel 311 Sight and a Small Problem After Reassembling the Rifle

I had disassembled the Haenel 311 sight a while back and finally found the time to reassemble it. There was a lot of slop in the sight...

The flat plate that covers the guts had a serious dish.

Here's a view after a quick rub on the surface plate against some sandpaper. I worked it until that center section was flat.

I pressed the knobs back in with their balls and springs.

Clean and ready for reassembly...

Except that the sight had a problem in that the piece that holds the iris was too thick now. Which makes no sense as I didn't take any material off of the housing...but it explains why the plate was dished...

So I lapped it until it worked smoothly...you can see there's no visible gap.

Anyway, the rifle was sold to me with the problem that it wouldn't cock reliably...so I reassembled it not finding anything obviously wrong.

Just as on the 310, the surfaces that the spring contacted were rough.

So more lapping against sandpaper on the surface plate (a separate plate than the one I use for measurements, thank you very much...)

Still a few gouges but mostly flat...

Then I polished them.

I aligned the piston seal screw lockscrew hole...

It seems to stick up a bit proud compared to the 310...hmmm....

Anyway I reassembled it easily and it seemed to work fine...until I there were several times when it wouldn't catch. It seems to happen randomly...so I have to take it apart again.

Thursday, December 10, 2009

Haenel 311 Aperture Sight Disassembly

Well I found a small amount of time in the shop between work and decided to take apart the Haenel 311 sight for cleaning.

The sight.

Mounting block removed.

The underside.

The parts. Notice the flat cut on the screw.

Two screws in the face.

Removed.

That shoe is just loose and under spring tension...

The Iris body unscrewed, but I couldn't get the stem to unscrew from the sight...

Neat little adjustable aperture setup.

The adjusting screws.

Both are left hand threaded.

Removed.

Punching out the pins that retain the knobs in the body. Notice the finger below to catch the pin once I punch it out...

The knobs were a bit tight in the body...but just pull out when the pin is removed. Tiny spring and ball on each for the detent.

I chucked the threaded part of the eyepiece in some aluminum soft jaws and unscrewed the block.

This is one of the useful properties of soft jaws...

That post threads in and binds on the eyepiece.

All the parts. I have to wait for this cold snap to be over before getting much quality time in the shop...hard to do any work when your fingers are numb.

Wednesday, November 25, 2009

Haenel 311 Disassembly

All Haenels, all the time...

The Haenel 311. It doesn't catch when cocked.

A nice aperture sight. This will get its own post, later.

Unlike the 310, this is a tap loading .177 cal. pellet rifle.

Disassembly is largely the same as with the 310, see those posts for more details. (Part 1, Part 2)

The stock screws.

As I mentioned in my last post, this spring keeps tension on the trigger cutoff linkage.

The pivot pin for the cocking arm is retained by c-clips, unlike the 310.

When I removed the plug from the end of the action, I saw this ball...

Odd. Certainly not supposed to be there.

The piston is almost identical to the 310's, except it lacks the probe tip for loading from a magazine.

The face of the piston is a large screw head. No special tool needed. Important to remember to loosen the lock screw before unscrewing the piston.

The piston assembly.

Notice the hole in the cap? That's where the ball bearing goes, with that rubber plug as a spring to hold the ball against the detent grooves in the safety. The 310 has the same mechanism, I just didn't notice it.

The tap loader.

I removed the plate.

The ball detents.

There's a small spring for the ball detent.

And another ball that acts as a bearing for the tap.

The other side has a plate too.

With a small divot for the tap ball to ride on.

Anyway, that's most everything taken apart. Now I have to clean it, reassemble and hope that clears up the problem with cocking. I didn't see anything obviously wrong with it.