Showing posts with label benjamin 317. Show all posts

Tuesday, September 9, 2008

Benjamin 317 "Bar-V" Stock Nut and Washer

A kind person sent me the stock locknut and washer for the Benjamin 317.

The new nut, which appears to be brass, and the lock washer. The washer looks exactly like a standard internal toothed lock washer, or rather it is a standard lock washer.
The nut I made on the left, which looks just a little crude compared to the Benjamin.

The assembly restored to stock condition.

Wednesday, August 27, 2008

Benjamin 317 "Bar-V" Sight Locknut

Since I resealed the Benjamin 317, there's been one little detail left to finish...

The "Bar-V Rear Sheave Sight" is supposed to have a lock nut, not a cheap looking hex nut. So as I thumbed through my copy of DT Fletcher's "The St. Louis & Benjamin Air Rifle Cos" book, I found a few line drawings of the nut in various advertisements that conveyed how it should look.

Drilling some 1/4" stock for a #4-48 tap.

Straight knurling. Notice my crude knurling tool. This isn't ideal on the Taig lathe, due to the force needed. But I didn't feel like setting up another tool on my South Bend.

Tapping the nut.

Parting off. Usually for parts like this I'll hit the outside edge with a file to chamfer, then part halfway through, hit the inside edge with the file, then finish parting off.

Screws right on.

I hit it with some "perma blue", which is neither perma nor blue...

Of course I decided to search for the patent on this sight, and found it, so I may have to see whether the production sight used the toothed spring washer described in the patent.

Friday, August 8, 2008

Benjamin 317 Rifle, New Seals

Now to put it all back together...

I made a new lead seal using the technique I've used before for shim washers.
I was lucky enough to have some lead sheeting that was within .004" of the thickness of the original.

I dug the old seal material out of the inlet and exhaust valves.

I used a dowel pin to get the cup walls straight.

The brass cracked a bit, probably would have been a good idea to anneal them first.

The dowel pin has a through hole so I could fit the valve stem inside.
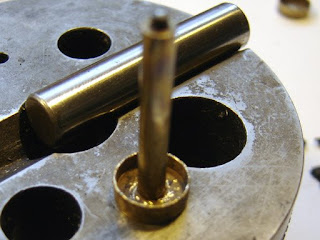
All cleaned up.
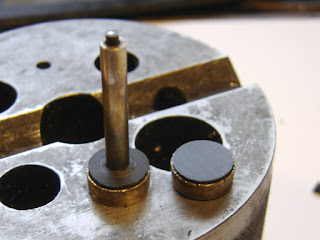
New seals from 80 durometer polyurethane rubber.

I made a crimping tool, bored to fit over the rubber seal.

Used a 1/2" ball end mill to make a radius on the inside edge.
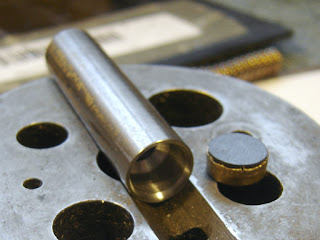
The tool.
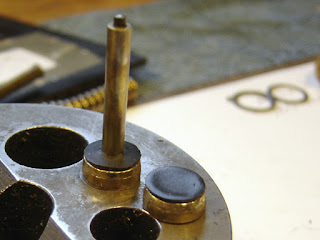
Crimped the cups. Notice that it distorted the inlet valve seal...

Which leaked upon reassembly. It took a while to figure out why, but when I did I decided to just turn up a solid teflon inlet valve. Sealed perfectly. I think the inlet valve spring just didn't have enough force to seat the harder urethane against the seat, or the deformation induced by crimping the seal threw off the seal surface. Or a combination of the two.

When reassembling I found that I needed to trim the length of the square end of the wrench to just under the thickness of the valve nut. Otherwise it's nearly impossible to get the nut started.
Another lesson learned.

So, how does she shoot?
I did some quickie chronograph shots
2 pumps: 395 fps
3 pumps: 480-500 fps
5 pumps: 600 fps
7 pumps: 675 fps
8 pumps: 695 fps

The valve does not dump all the air though, so you can get followup shots.
With 3 pumps, you can put another 2 pumps in and get almost the same fps
With 5 pumps, no extra pumps gives you 300 fps, one extra pump gives you about 400 fps
With 7 pumps, you get a followup shot at 440 fps
With 8 pumps, you get a second shot at 510 fps.

The manual implies this is normal, "Usually all of the air is not discharged when firing and fewer pump strokes will be needed for recharging."

Anyway, it's wonderful to have it working.

Wednesday, August 6, 2008

Benjamin 317 Rifle Disassembly, Part 4

Now to pull the valve...

The valve is pulled!

The inlet valve spring, washer and the exhaust valve spring.

The exhaust valve, lead seal. The lead seal has an alignment ear that I don't see on the replacement seals offered on gunbroker. Probably doesn't need it. I dug out some lead sheeting and will just make an earless one.

The exhaust valve seal & stem. The rubber seal has extruded around the valve stem. I'm assuming that's not how it should be.

The inlet valve, inner side. I had to push the pump a couple of times to get it to break free.

The inlet valve seal. It also has extruded to fit into the inlet valve hole. Again I'm assuming that's not correct? Both the inlet and exhaust look like the edges are rolled over to retain the seal. I need to do some dissection...

All the valve parts.

The exhaust valve seal really looks bad. Notice the hardened piece pressed into the top of the stem that is contacted by the hammer.

I now have to do the following:
1) clean everything
2) find out whether anything else comes out of th valve assembly.
3) make a lead seal
4) make a new exhaust seal
5) make a new inlet seal.
6) put the whole thing back together and test.

Fun!

Monday, August 4, 2008

Benjamin 317 Rifle Disassembly, Part 3

So then I chucked a piece of 7/16" diameter tool steel (I have no idea the exact alloy...came from the scrap bin)...

Setting a threading tool on center.

Turning down the OD to 9/32"

First pass threading 32 tpi.

Halfway through.

I swung the compound over to 10 degrees and put a taper on the end of the tap.

Milling the flutes. They have zero rake.

All done.

Milling the flats for the tap wrench.

I hardened and tempered with my acetylene torch and it was done.

Tapping the puller end.

Threads look good.

And I threaded the end onto the valve to check.

Saturday, August 2, 2008

Benjamin 317 Rifle Disassembly, Part 2

One last part to remove that's easy...

The manual safety catch unscrewed from the receiver.

Now to remove the valve for resealing...there's a square hollow retaining nut that comes out first. But the square wrench has to have a hole in it to clear the valve stem.

A blurrier pic, somewhat hard to focus down the tube...

I used my collection of brass tubing to determine what the square and hole dimensions need to be. I'll measure all the parts when I do get the valve out to determine what the correct dimensions are (rather than those that worked here...)

Milling the square after drilling on the lathe.

Rounding the corners off to fit the radius of the square.

The finished tool.

The nut removed.

The next bit is going to be more difficult as I need to make a puller that screws on the valve stem. Searching around the forums, it seems as though it's a 9/32"-32 tpi thread. Neither I nor my tap-happy friend Kent has a tap that size. I don't really want to order one so I think I'll try making one from tool steel. If that fails, then I will have to bite the bullet. It's worth noting that you can just buy a tool from Bryan and Associates ($12.95)and on Gunbroker, etc. I'm just trying to do it all myself, for the experience.
