Showing posts with label walther LG55. Show all posts

Sunday, August 9, 2026

Tweaks to Volvo’s Walther LG55 Air Rifle

Haven't had much to report lately.  The dearth of posts probably gave it away.  I've mentioned before that it's difficult to post when we're just doing repairs or minor tweaks that seem mundane.   The house has also been demanding attention this year.  The roof and deck both needed some love.  The basement is now calling for some fresh paint.  Airgun projects sometimes get back-burnered.

Nevertheless, I do want to get something new posted.

Made a couple tweaks recently to the old Walther LG55 I got from Volvo.  I de-glossed the stock with a very fine bronze wool pad.  Didn't even touch the base color, just removed most of the sheen and gloss.


I also had another opportunity to have more metal work  FNC black nitrided by H&M.  

Didn't have a lot of notice, so I was scrambling to find something to add to the batch.  The Walther's barrel sleeve made the cut since it had a bit of rust freckling, scratches and some discoloration from the last 60 or more years of wear and tear.  The constant handling of break barrel guns also makes them prime candidates for ferritic nitro carburizing.  New life with an almost bulletproof new finish.

Sorry for the lack of pics of the work I did.  I polished off all the bluing and took the barrel shoud to about a 1200 grit polish.  Then I masked off a bit more than the lower half of the barrel.  I then bead-blasted down the length of the top of the shroud--essentially the sighting line.    Removed the tape and just got it wrapped up in time to ship to H&M.  A couple days later, I had a black two-tone barrel sleeve.


Can you see the two finishes?  Click on the picture(s) to enlarge it for a better look

Must've shot these pics three times.  Can't get the light to cooperate.  The top of the shroud between the front and rear sights now has a fine matte black finish.  The rest of the barrel looks like polished blued steel.  


It's VERY subtle.  Almost goes unnoticed, but it's a nice touch on such a fine target gun.


Between the subtle stock treatment and the new color on the barrel sleeve, I think she looks amazing. I have another modification I'd like to make, but I'm still mulling some things over.

Couple posts back, I'd mentioned refinishing the Crosman NP2 Trail stock my Remington Summit is currently wearing.  Haven't forgotten about it.  It's probably nearing the top of my que.  

My .20 cal Crosman 2050 carbine project gun has also been getting some target time.  Put a tiny 3X scope on it the other day and it's perfect.  I wouldn't mind blogging the new scope as it's something I hadn't seen before.   Leave a comment if you're interested.  

We'll see what shakes out.  As always, thank you for following along.  


Saturday, January 12, 2013

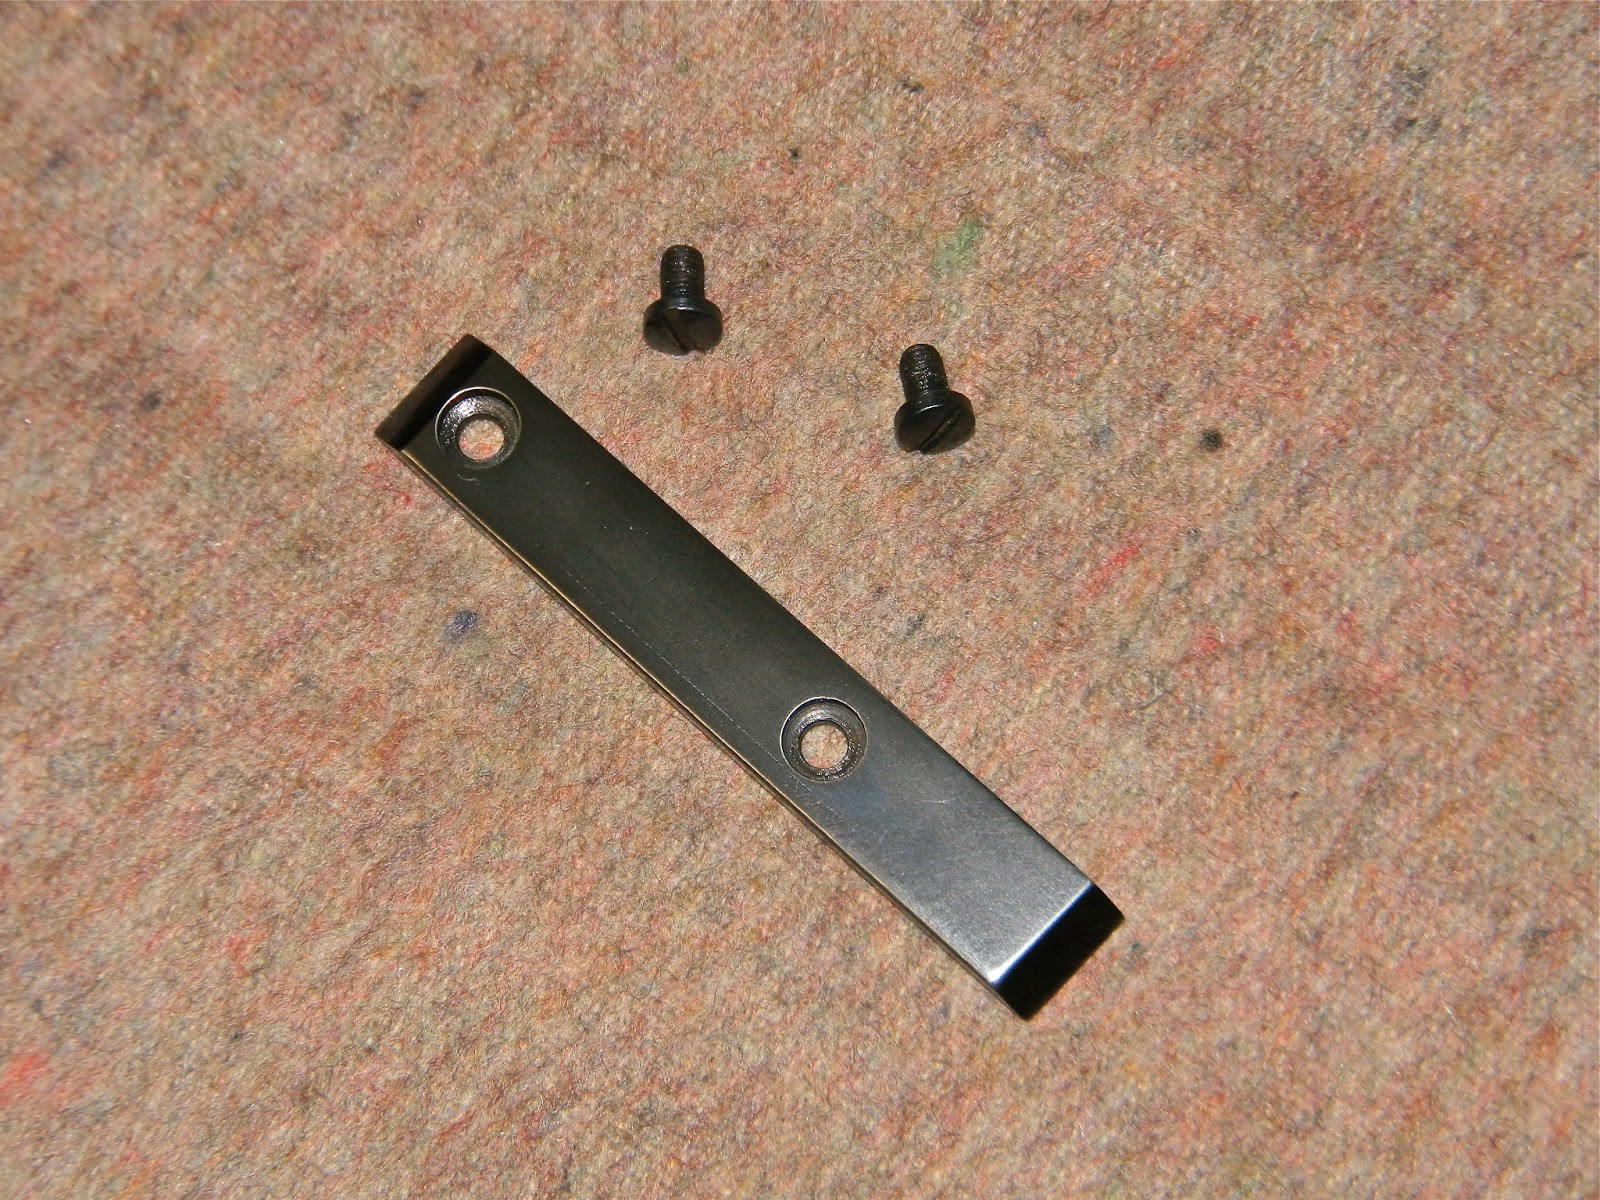
Walther Sight Cover Plate

Nick and I are now at 650 rambling airgun posts and counting. Yeeeow!

I need a cover plate for the Walther LG55 target rifle formerly owned by Volvo.  Apologies, as I've blogged cover plates for various rifles before and they're always pretty much the same.   With all the various airguns in the pile, there are a multitude of small projects like this--and right now, this one is calling.


Look at the gaping holes on top of the base block probably made for some field sight that I don't have and likely never will.  This rifle is set up with a target aperture at the end of the spring tube and there's really no place for an open notch sight on this kind of gun.  Has anyone even seen such a sight for a 55?  There's even a counterbored hole for a pin to resist recoil.   Yeah, Walther goes all in.  However, the holes for this nonexistent mid-ship sight are tapped M4 x 0.5mm.  This is not the normal 4mm pitch--which is 0.7mm.  I looked pretty hard and couldn't find any M4 x 0.5 screws in the US.  It was easy to find both taps and dies, but the actual fasteners?  Nope.  None.  Of course, in my haste, I'd already cut the plate, squared the sides and done the layout before realizing this.  So, the plate sat on the bench.


Finally, I went through my box of airgun pieces parts.  There, I found some extra grip screws for a Weihrauch HW45/Beeman P1 in the correct pitch.  Maybe this fastener is common in Europe.  The project was back on track.


Try to keep this short.  0.500" wide cold rolled piece of steel.  It's 0.125" thick.  Cut to length, did some layout for the mounting hole locations and started drilling through holes.  Used a #25 bit. 


Couldn't find a suitable endmill to counterbore for the screw heads, so I had to make a suitable cutter from a reground drill bit.  Had to cut it really short to minimize flex. 


Milled the front and back edges to match the angles on the Walther's breech block.


Gave the sides a finish pass.


And a 0.750" endmill to take a clean up pass on the top.  Probably should've used a fly cutter, but the machining marks polished out without too much effort.


Wet sanded it (WD40) down to 420 grit on a granite plate.


Hit it on the buffer for a few minutes, then blued it with Van's cold blue.


Installed and done.  Angles carry over pretty well.


Looks like it's been here all along.

More soon with blog #651.

Tuesday, March 29, 2011

Walther LG55 Final

Not much left to report. With the leather piston seal well oiled and the anti-beartrap fixed, I went to the spare mainspring box. Ended up trying a few different springs but didn't see any difference at the chrony. So I reinstalled the original spring.

Original spring is on top. Rebuild was pretty much a reversal of the first post. The spring got a razor thin coat of copper anti-seize. Painted it on the coils with a flux brush to get complete coverage. Then added two very thin hardened steel rotation washers to the base of the spring guide. Cocking linkage and the outside of the piston were burnished with moly. Went really light on everything in the hope that the velocity would climb into an acceptable realm. The gun was assembled and test fired about fifty times to burn off the excess lube in the compression chamber, then the barrel was cleaned and the gun set aside.

The barrel weight was missing the set screw at the breech end of things. The hole was also stripped. Looks like it was initially an M5 x .8mm thread.

I opened it up by running an M6 x 1.0mm tap through the hole.

Don't forget the cutting oil.

An M6 set screw is way too long.

Cut it down and slotted with a saw.

A bit of cold blue...

And it's pretty well blended in.

Went through my pile of inserts looking for a suitable annular element. A Feinwerkbau--or maybe it's a Weihrauch--4mm insert fit the bill. Much better for shooting at 10 meter targets.

Here is the high end of the chrony's tale. It's more than a few feet faster than I expected and very consistent. Gave the rifle back to Guy Sunday morning. He looked pretty happy.

Sunday, March 20, 2011

Walther LG55 Takes A Few Detours

Had some issues with this particular LG55 that I'll get into briefly. Suffice to say, it's probably a good thing for this rifle that I don't live next to a lake.

Here's the LG55 mainspring and retaining plug/spring guide.

The piston was an absolute devil to remove from the compression tube. Especially in mid-power guns like this, the piston should easily slide out. This one needed a drift and a dead blow hammer to tap out.

Problem was the piston seal was far too tight in the tube. And it looks brand new...???

Some of the schematics floating around on the net seem to show a seal shaped like this one. The schematics are in black and white, so it's tough to compare. As far as I've been able to ascertain, early LG55's had leather piston seals (like my own 55) and the synthetics came at the tail end of the production. No doubt everyone knows that I'm not any kind of authority on Walther technical information. Just piecing together some information from all the various sources. I do know that the trigger unit in this gun is also different than the one in my LG55. Mine has two additional adjustments--for amount of sear contact and first stage travel. The trigger in this gun has been sealed with what looks like an epoxy so that the amount of travel has been factory set and locked so it cannot be further adjusted. The sealing looks to be factory done. The two triggers also do not seem to be 100% interchangeable.

While it was apart, I buffed the rear of the piston body.

Here's how looks when assembled.

The seal is waaaay too large in diameter for the compression tube and that's the culprit for the sub 300 fps the gun was delivering. So, turn it down on the lathe or ??? I had doubts about turning it down. I felt that there was minimal chance of the seal working even with a reduced OD.

Mid power guns were made for many, many years with leather seals. It's a great seal material as it conforms to the inside of the compression tube and requires only occasional oiling. I found a 1" leather seal in my parts box. I can't find these online. I bought it at an Ace Hardware store. It was in a refillable parts bin from a company like Hillman or Jandorf. Think it was labeled as a "leather water pump seal".

Needed a leather backing washer, too. A piece of an old carrying sling and a punch...

gave the center hole. I traced the piston and cut out a disc with some shop shears to the approximate OD. Size really isn't critical on a backer washer.

Installed. Now to soak the leather in silicone oil.

Since I was this far, I removed the locking screw on the right side of the pivot bolt. It serves to expand inside the main bolt's split thread thereby wedging the threads tightly in place.

Unscrewed the main pivot bolt from the left side.

The pivot and the locking bolt.

Pulled the breech block, greased everything with moly, and reassembled the block. This is where it takes a dark turn. I noticed that the end of the sheet metal anti-beartrap lever was slightly bent and had a partial crack in one of the bends. Examining the trigger block revealed similar damage to the folded sheet metal plate inside. Superb. The trigger block is spring loaded to move backward--blocking the trigger from moving. If the anti-beartrap unit fails, the gun can never be fired.

The stock has a fairly large crack at the left front near the front screw holes. That crack has a secondary split on the inside of the inletting visible only after removing the action. The wood is also cracked at the right side screw hole with a few spider veins. Yet another hairline crack at the rear of the compression tube inletting on the right side... Taken all together, I'm pretty certain that the gun was bear-trapped. It certainly explains the damage to the related components.

The stock can, and will be fixed by Guy. He's got more than a bit of gunstock repair experience and seems keen on taking on the project. But I still had to be able to test fire the gun (assuming I could get it to work) so I did a quick repair on all the right side cracks. I hope that Guy will have a hard time finding them and will be able to concentrate his efforts on that left split.

I considered removing the trigger disconnector entirely. In retrospect (and had this been my gun) I'd have done this in an instant and saved a couple evenings. However, one can never for a moment let go of the barrel while loading if this is done. Not that you should ever let go of an open break barrel. Of course, I never opt for the easy way...

The cracked sheet metal tab in the trigger unit almost fell out with a poke with a dental pick. A piece of 1/8" OD brass rod was cut and faced down to approximately 0.250" long. It was then spotted and through drilled with a #39 bit.

The trigger unit was set on a bench block on the drill press and a hole was spotted through a clearance hole into the side of the disconnector. Through drilled the plate with a #47 and hand tapped the hole to #3-48.

Brass pin installed. I've got a new tab!

When the cocking lever is in the closed (forward) position, a connecting rod linked to the cocking lever pulls this pin forward, un-blocking the trigger.

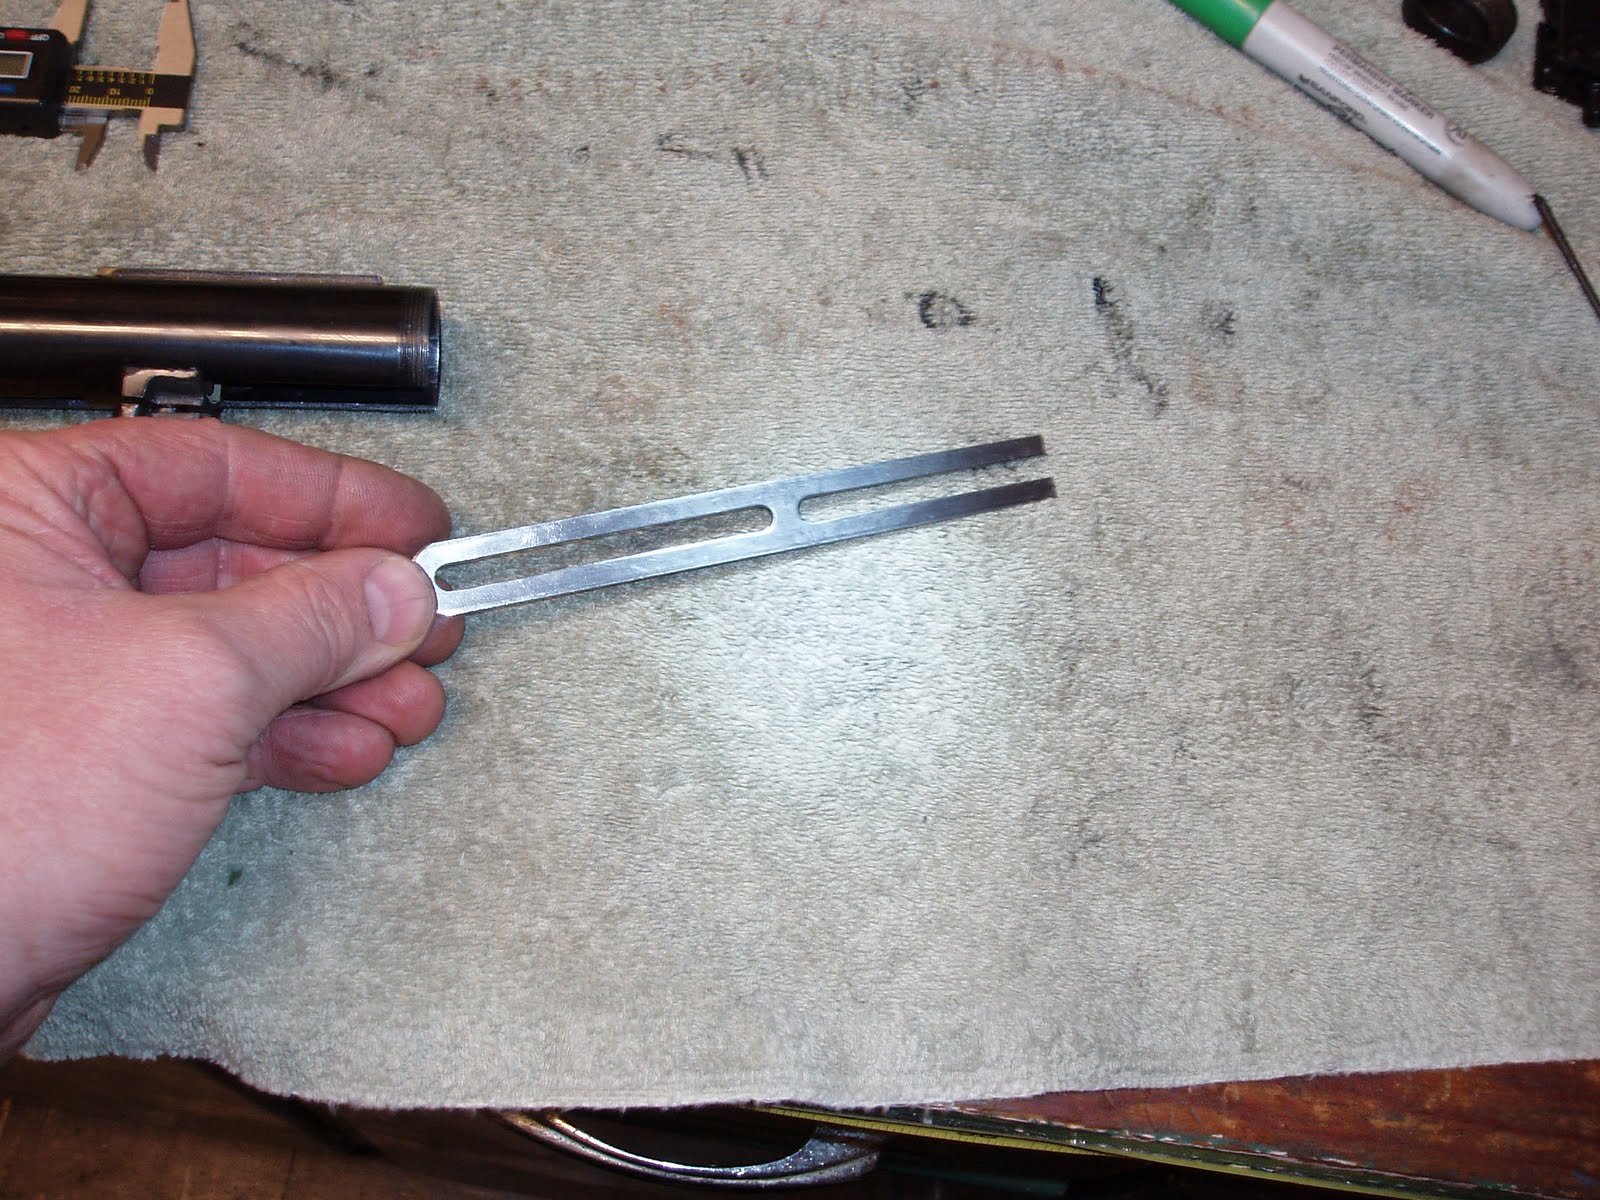
Now for the linkage. I found a spare piece of slotted steel that very closely matches the original lever in width, slot width, slot length and thickness. Crazy, but true. It's the strut for a rear bicycle rack.

One end was cut off.

Another cut to remove unneeded material.

And I started hand shaping the thin end for clearances.


Two bends in close proximity let the tail pass through the side slot in the retaining plug.

Some cursing, grinding, cursing, filing, cursing and starting over from scratch got the linkage to here.

The tab still needs trimmed down a bit. A lot of measuring, eyeballing, cursing and more cursing took place bringing the lever to correct length. By correct length, that means that when the barrel is closed, the cocking lever pulls the linkage forward slightly, unblocking the trigger. When the barrel is broken open, the linkage moves very slightly to the rear allowing the spring loaded trigger block to move backward--yep--blocking the trigger. Did I mention that the length was critical? That's where the cursing came into play. It was also critical that the linkage not bind anywhere in it's minimal movement. Again, more cause for cursing.

A lot of missing pics from this blog. The time put into making this link work correctly was extensive. Taking pics of all the trial and error wasn't in the cards.

Still more to come: reassembly, function testing and I still need to fix the stripped hole in the barrel shroud.