Saturday, April 15, 2017

Findlay Airgun Show Finds

Here's some of the stuff I found at the Findlay show last week.    


At $5/tin,  I couldn't have done any better on pellet pricing.


An inexpensive Daisy target aperture. 


Don't have a plan for this sight yet, but it should fit a variety of rifles.  


A Hammerli Master target pistol from noted collector Larry Hannusch was too good to pass up.


I read an online review where the writer claimed that the Hammerli was what a Crosman 2240 wanted to be when it grew up.  That might be the best way to describe how much I like this pistol.  


Some projects coming up:  The adjustable recoil pad got a revision, some carbon fiber tubing for a barrel sleeve, wood grips for the Hammerli...


Check back in a couple days.  I'll have something up.


Saturday, April 8, 2017

2017 Flag City Toys that Shoot Airgun Show Findlay, Ohio

The 12th annual Flag City Airgun Show was today.  At 9:05AM, Dan Lerma called us to attention and let Boy Scout Troop 308 present the flag for the Pledge of Allegiance followed by a short prayer. It was a fine start to a great show.  It was packed from the start.

I'm just going to throw a few pics up to show you some of the things I experienced. 


No, these aren't all mine. 


There were BINS of repair parts.


A display table of gorgeous vintage Walther 10-meter rifles.


Tubs full of guns.


Mr. Hollowpoint was on hand.  


He brought his 20mm rifle.


Tom Gaylord had a few tables of goodies that he's show us on the Pyramyd Air blog.  


An old Crosman adapter to let you shoot .177 pellets through your Series 70 .45Auto.  Yeah, its also new in the box.  And it wasn't crazy money. 

I'll get another post up in a few days and show a few of my acquisitions.  

Thank you to all the show organizers and vendors for making the show happen. 

Sunday, April 2, 2017

Adjustable QB Recoil Pad Part Two -- and Sterling Misc.

Reminder:  The Toys that Shoot Airgun Show in Findlay, Ohio is next Saturday, April 8th. 


Finished up the pad spacer.  There was no crash and burn, but the UHMW plastic didn't work out as well as I'd hoped. Anyway, here's how it went.


Rough cut the spacer to shape with the scroll saw. 


Then went to the belt sander to finish.  There was a bit of additional shaping with a sanding drum in a drill press, but the plastic sized down pretty easily.


Which got it to here.  Note the fine scratches.  


Finer grades of wet/dry paper had virtually no success removing the scratches.  ScotchBrite pads also didn't faze the scratches.  I even tried flame polishing with a torch--that had some minor improvement.  About here, I jumped on Google and found out just how difficult it is to achieve a good finish quality on Ultra High Molecular Weight (UHMW) plastic.


Installed, before the last finishing attempt.  It works perfectly, so there's the upside.


As a last ditch effort, I installed a fresh cotton buff on the grinder and used a plastic buffing compound.  It did work, but took substantial pressure to get the compound to cut.  More likely what was happening was the surface was simply melting from the friction.  This resulted in tolerance loss in areas affecting the fit.   There's still some trace of the scratches, but it's definitely better. 


Some varnish lifting at the edge of the stock.  This was present before I fit the new spacer.  The old white spacer hid this pretty well.  The stock will probably be refinished in the future. Guess it's more of a base hit than a home run.  I may revisit this again and make the spacer out of aluminum.


A few weeks ago, I noted that I had a Morgan adjustable recoil pad that was almost on size to fit my Sterling HR-81.  We've covered fitting Morgan plates before, so I didn't take any pics of the minor fitting process.  Here's a couple images I quickly took of the result.


Thanks for checking in.  More soon.

Sunday, March 26, 2017

Adjustable QB Recoil Pad Part One

Looking at the modified QB rifle,  I noticed it would be relatively easy to make a new pad spacer that both adds length to the "kinda short-for-me" stock and makes the existing butt pad adjustable at the same time.


Here's the hodgepodge extended gas tube QB77 action in a AR2078A stock.  


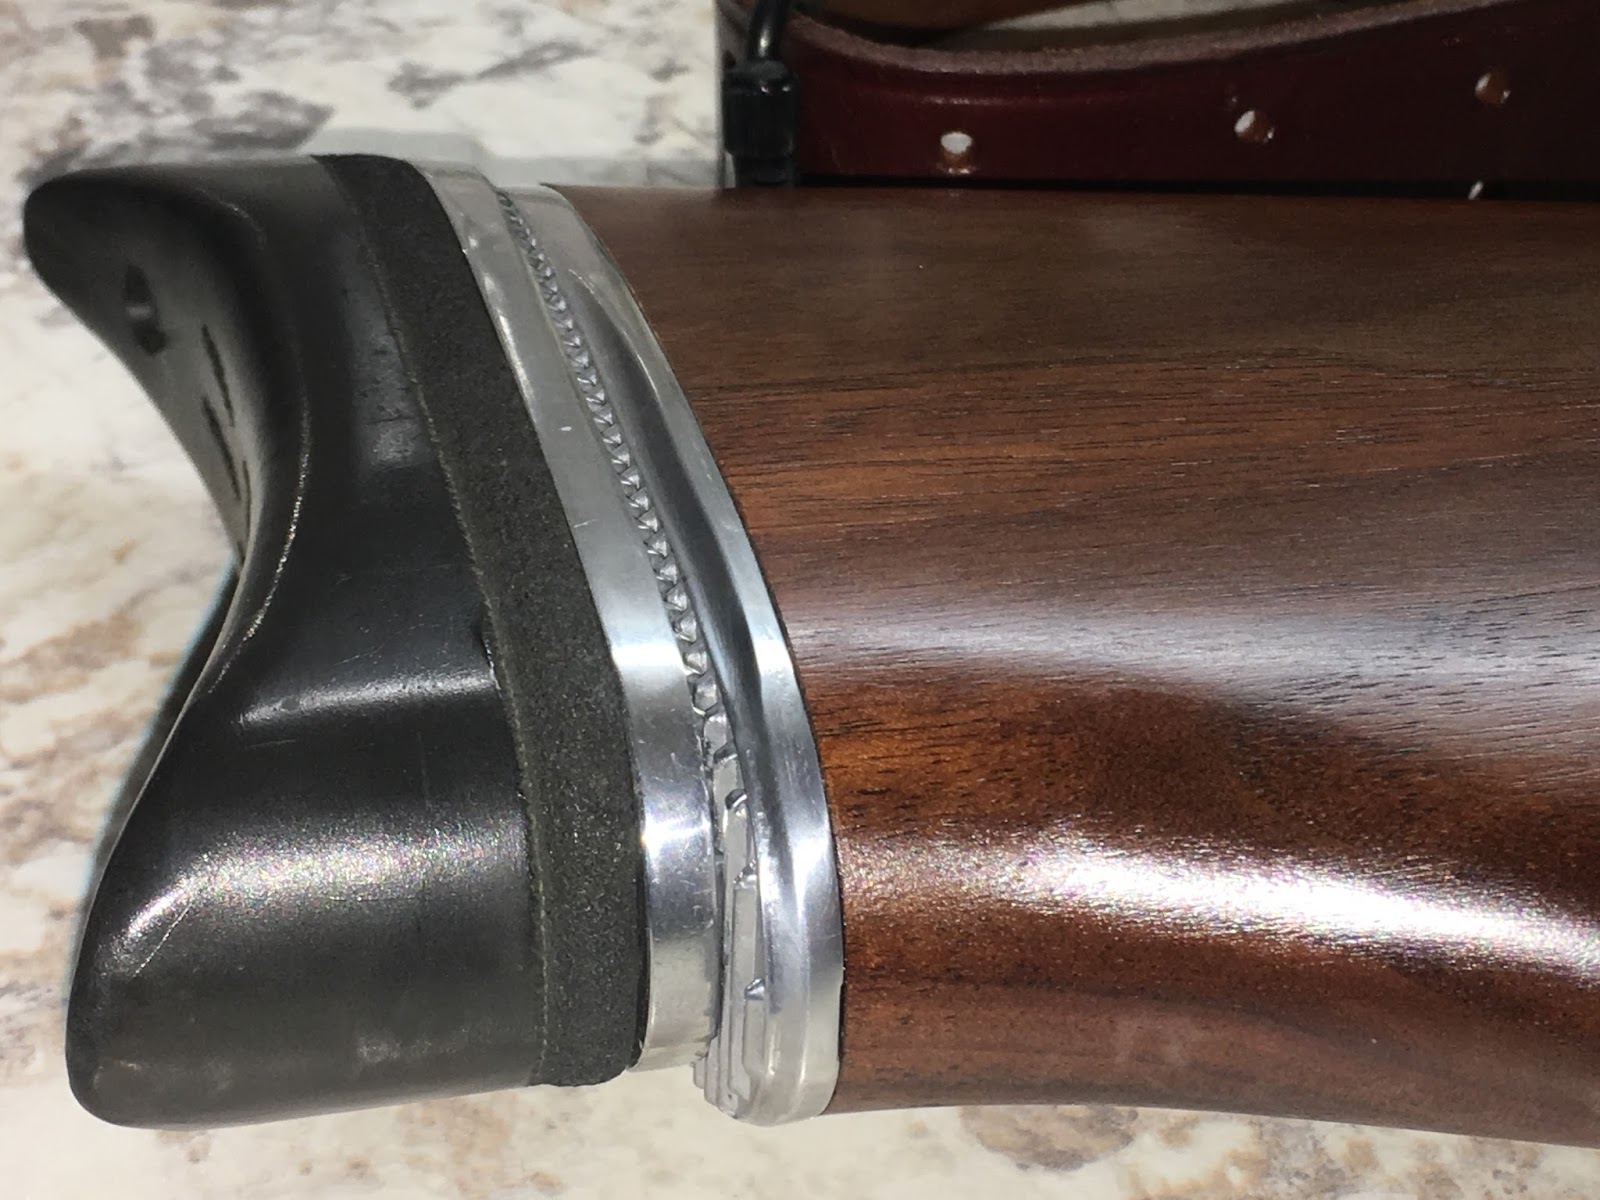
The white line spacer and recoil pad aren't especially well fit at the factory.  Suppose that's about par given the cost of the rifle, but it looks pretty bad up close.


A "normal" recoil pad like a Pachmayr, is ground to fit the stock and has hidden mounting screws that are buried in the rubber.  The QB pad has two holes for ready access to the mounting screws and a metal plate molded into the base.  The pad design actually lends itself to this modification.


Pad and white spacer removed.


I splurged and spent $6 in 1/2' thick UHMW black plastic for the new "base plate".


 Cut a piece on the bandsaw about 1-7/8" wide.


Yep.  Almost done. 


Fly cut the edges to clean it up.  Makes it easier to clamp in the vise.


Measured the width.


Marked the center.


Got out the transfer punches.


Centered the recoil pad's holes on the scribed center line,


and spotted the hole locations with the transfer punch.


Drilled clearance holes in the spacer for mounting screws.  These are the holes to secure the plate to the stock.


Milled a 7/32" slot down the center.  This slot is clearance for the shank of the key seat cutter in the next step.


Here's the cutter for that next step.  


Took several passes back and forth to make, size and clean up this slot.  I've no experience machining plastic.  None.  The plastic wants to melt, make strings and gum up the track.  I don't know exactly what I expected, but it didn't go quick and easy.  This track will allow the recoil pad to be adjusted vertically.


Eventually, it was clean enough to fit a 1/2" wide, 1/8' thick piece of steel.  Used a parallel to test the slot clean up.   I'll countersink the clearance holes in the base plate and use flat heads to mount to the rifle stock.  The stock mounting screws will need to be slightly below the bottom of the slot.


Milled a piece of mild steel to size and deburred all the edges. 


 Again, marked the center line and the holes.  


Spotted, drilled, tapped the holes.  The rifle is made in China, everything is metric.  Went with M5x0.8mm threads.


Plate is done and slides in the t-slot track with no slop.


Steel plate is fit to the recoil pad.


Sized the pad mounting bolts.


Next, the base plate will be cut and ground to fit the rifle stock. 


Thanks for reading.  I'll post more in a few days.