Used Van's Instant Gun Blue.
Passed a bolt through the cocking handle so I could chuck it in the lathe for knurling.
Used an old Brown and Sharpe knurling tool adapted to fit the Taig's tailstock.
It's a pressure forming knurl. The diamond pattern is forged into the metal.
The end point of the knurling was a bit vague, so I took a clean up cut to add definition.
This will be heat blued with a torch.
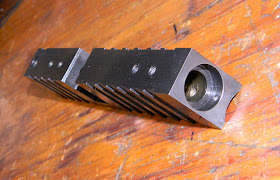
Wasn't quite finished with the barrel shroud. Wanted to add some porting. After some basic layout work (consisting mainly of making decisions as to hole spacing and size) the shroud went back into the 5/8" 5C collet and hex block.
It took some time to index the shroud and line up on the flutes.
A jack screw to support to the free end and prevent downward deflection.
As a time saver, I centered, spotted and drilled with a short single-flute 1/4" bit.
Used a homemade vise stop to locate the collet block as I drilled each hole in 60 degree rotations.
Almost done drilling.
Trimmed the muzzle end down then deburred the holes and did some light polishing.
Much nicer than I expected.
More Van's bluing and it was assembly time.
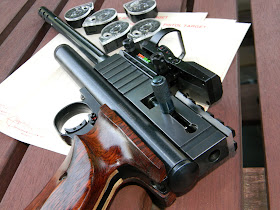
Done--at least for now. Mounted a reflex dot sight to the picatinny rail. I'll probably swap the short 2240 gas tube to the longer 2250. The rosewood grips are from a project earlier this year.
Click on any of the pics for a larger image.
Next project will probably be an easy modification to a hand stop for a target rifle. Check back soon.


Very nice...
ReplyDeleteDidn't I see Dr. No with a gun like that?
Beautiful work.
ReplyDeletecan you make me one for a 1322
ReplyDeleteBeautiful job and thank you for documenting the process.
ReplyDeleteHow much clearance is there for the magazines?
Good work and good blog.
ReplyDeleteGreetings from Spain.
Wait, what? How does it shoot? Surely you didn't do all that work and just look at it?
ReplyDelete