 Set the accessory rail in place and ran the screws home.
Added a simple handstop I had waiting in the parts box.
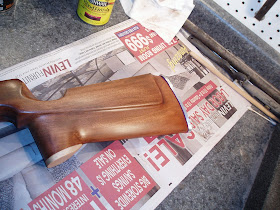
Last look back. Here's the stock just before I started this whole mess.
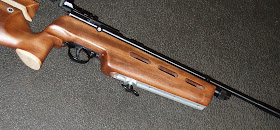
And now...
Well, it's done for now. No doubt, there will be additional tweaks as I shoot the rifle. Did a quick two minute set up to get the cheek piece set and the vertical height of the buttplate more or less dialed. It now comes to shoulder and immediately aligns my eye to the diopter without any neck strain. I can see where the blocks on the buttplate will need to be narrowed slightly. I expect that I'll eventually taper them, too.
Next up is a FWB 124D tear down and rebuild. I've already got most of the images for the first installment. I should have a post ready to go in a couple days.
Please check back in.
Wednesday, September 21, 2011
Tech Force TF79 / AR2078A Upgrades--Part 11 Final
Finally, finishing up the TF79.
Started with a thin coat of Tru-Oil rubbed into the stock, but it wasn't laying down well.
Thinned the Tru-Oil with mineral spirits. About a 50/50 mix.
This burnished into the wood much easier. Was able to get about two coats per day.
The end grain filled beautifully.
After several coats, I rubbed the stock down with Birchwood Casey Stock Sheen and Conditioner to remove the gloss and high spots in the finish. I then switched to Arrow wood finish and quickly applied several super thin coats. This consisted mostly of rubbing a few drops of oil into the stock with the heel of my hand.
With a finish on the stock, it was time to fit the base plate that bridges the gap between the stock and the buttplate.
Some dykem on the plate shows my scribed line.
The belt sander let me grind to the line. I kept a bucket of water at hand and dunked the plate whenever it got too hot.
Eyeballed the angle at the heel and toe. Good enough.
Pulled the plate one last time...
...and added the threaded nut into the stock.
Then screwed the base plate back on and added the adapter.
Like so.
Attached all the buttplate components to the adapter. The three wide lower blocks will likely need additional fitting.
 Set the accessory rail in place and ran the screws home.
Added a simple handstop I had waiting in the parts box.
Last look back. Here's the stock just before I started this whole mess.
And now...
Well, it's done for now. No doubt, there will be additional tweaks as I shoot the rifle. Did a quick two minute set up to get the cheek piece set and the vertical height of the buttplate more or less dialed. It now comes to shoulder and immediately aligns my eye to the diopter without any neck strain. I can see where the blocks on the buttplate will need to be narrowed slightly. I expect that I'll eventually taper them, too.
Next up is a FWB 124D tear down and rebuild. I've already got most of the images for the first installment. I should have a post ready to go in a couple days.
Please check back in.


I've enjoyed following along with this saga. Very interesting and you made a great job with this project.
ReplyDeleteAs you mentioned in part 1, replacement stocks are available from Archer Airguns in case of disaster!
Stephen,
ReplyDelete"Freehanding" that slot for the accessory rail was a real leap, but knowing I could instantly undo any damage with the click of a button on your site made it a bit easier.
Very nicely done. Grandpa would be very proud of you and your work. Dad
ReplyDeleteHe'd have finished it in a week and it would've looked twice as good.
ReplyDeleteDerrick,
ReplyDeleteI've followed your work on this blog for years and have never been inspired to comment until now. Oustanding work!
Po Chung
Nice work, Derrick, very nice work. You should be very pleased with the results.
ReplyDeleteFrank