In the case of this 116? Well, the gun looked trashed. Who wants that? It also helps to remember that these were mass produced mainly for the young adult market. As a result, many of the factory finishes really weren't all that hot to begin with. Airguns were often seen as gateway guns to "real guns"--firearms.
Again, here's what I started with:

Click on any of the pics to enlarge. The gas tube is missing exactly 37.281% of the original(?) finish.

In the last post, I stripped the gun down completely.

Strypeeze does what it says.

An old brass brush dipped in Strypeeze was wiped across the metal.

Followed immediately by a paper towel. The black paint wiped right off.

Had I been in a hurry, this would have been a three minute job. I took my time and was done in four minutes.

This pic is for you Slinging Lead! Note the brass breech is soldered to the gas tube.

Both breech and front sight are brass. The front sight is soldered to the muzzle and the gas tube. I was sorely tempted to polish out the brass then blue the barrel and gas tube. I think the effect would be beautiful--if you like the look of shiny brass on your gun--which I don't.

I wanted to try my hand at recreating the somewhat crinkly factory painted finish.

Somewhere (not shown) is the stripped grip frame. Two whole pins to removed the trigger and sear.

Four hardware stores later, I finally gave up and went to an AutoZone. Wrinkle paint at last! VHT Wrinkle Plus-- apparently, it also comes in red... I followed the directions on the can to the letter and the VHT worked exactly as advertised.

The first coat didn't make me think it was gonna wrinkle--looked like a semi-gloss. The second coat wasn't much better...

By the third coat, I knew I had something. The top coat just sort of pulled back as it dried and left a random orange peel texture.

Painted the grip frame, too, as well as the fill cap. Gave the paint 48 hours to cure. Heated the paint to 200 degrees as per the instructions for half an hour as well. The crackled finish is really beautiful. Much nicer than what I'd envisioned.

Not gonna cover the reassembly. It's just the reverse of the tear down blog post. I did wrap the fill cap and the valve retaining nut threads in PTFE tape.


After the valve was installed, I gassed up the tube and checked for leaks. Tapped the valve stem several times with a drift to test fire the valve. Looked good.

A white paint marker was used to fill in the Crosman logo.

Allowed it to almost dry, then wiped the excess off. Intentionally took out a bit too much of the paint to make it look somewhat aged and worn. Why didn't I add a trigger stop?

Installed the grips.


Looks slightly better than brand new. My wife, the arbiter of design and style, gave it the nod of acceptance.

Yeah, after shooting it all evening, I need to drill the frame for that trigger stop pin. Won't be hard to touch up...
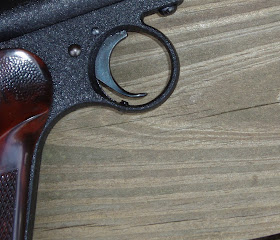
OK, I added a #6-32 set screw as a trigger stop.

Short enough to not protrude from the guard.


Center punched the guard, used a hand held drill and hand tapped. Didn't even disassemble the grip frame. Finding a #6-32 tap took longer than doing the actual work.

You can just see the allen head of the 6-32 set screw .

It takes a 1/16" allen wrench, so it's pretty small. I touched up the very edge of the threaded hole and the screw almost disappears into the frame.


Not sure what's on the menu next. I've got the longer barreled older brother to the 116--the Crosman 112--that could stand a tear-down and rebuild. Sometimes it helps to do these in succession while the procedures are still fresh in the brain (and the tools are still on the bench).
The 112 will need some grips though, as I parted them out and sent them off to Nick for a project gun he has. Since I wanted to make grips for it anyway, it was a good way of forcing my hand.
One of us will have something new in a few days.
Derrick
ReplyDeleteDespite the wild claims made by the makers of 'Strypeeze' I detected no stripes after you used it. Maybe you should take it back to the hardware store.
"Overly restored"?! You only made the wood in that stock look how it always wanted to. I would let you screw up my guns anytime.
Another great post on anotherairgunblog.
That 116 is jaw-dropping. Great job on the refinish!
ReplyDeleteHow did you keep the engraving on the breech ( Crosman ".22" ) so clear, despite 4 coats of paint?
SL,
ReplyDeleteI'm prety happy with the stock. Wish I would've thought to inlet an accessory rail at the time, though.
Joel,
The 116 refinish worked out. I'm spraying a 112 at the moment. Wanted to blue the barrel and gas tube, but on this gun, it looks like the entire top end is brass.
Pure luck on the stampings. I chalk it up to Belgian beer and moxy.