Sidetracked from the 118 magazine when a buddy asked me to fix a leaky Crosman 454 semi-automatic BB pistol. This is a second variant due to the loop on the CO2 piercing screw at the bottom of the grip--which means it was made right around 1980. The gun uses a 12 gram CO2 cartridge housed in the grip and it holds 16 BBs. The BBs are held linearly above the barrel. A spring loaded plunger pushes the BBs backward to the breech where one is loaded with each trigger pull. The trigger is essentially double-action only with a pull that ranges from about 5-1/2 to 6 pounds of weight.

He told me the CO2 was leaking from the end seal.

The right side grip is clipped to the 12g CO2 cartridge and pulls right off. The left grip is held by two screws.

Yep, he was right. The end seal is almost non-existent.

Removed the rear sight.

Four screws hold the frame together.

Screws removed, the right-side half lifts off.

If you want to remove the barrel, there's a small screw on the underside just behind the muzzle. It retains the front sight--which in turn holds and centers the muzzle.

Of course, the safety ball bearing fired across the room when I lifted that right half. Some things never change. I scrounged a tiny replacement 3/32" ball bearing. (Nick probably still sells
bags of tiny bearings for just such occasions.)

Detached the hammer and trigger springs.

Small set screw retains the barrel in the valve. It's a 3/32". Just unscrewed it a turn.
Removed the valve anchor bolt in the left side of the frame.

Pulled the trigger pivot pin, wiggled the valve around then lifted off the hammer. The entire trigger, linkage and hammer assembly comes out as one piece. It's straightforward.

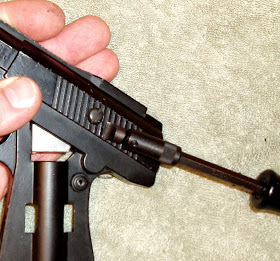
Slid out the smooth bore barrel. If you look at the breech end of the barrel carefully, there's a circlip in a groove that acts as a locater stop against the valve.
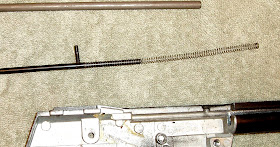
The BB follower is plastic. Look at that spring! That's exactly what I need for my Crosman 118 magazine. Think he'd even notice if the gun was only gravity fed?

Some valve pics. Rear. The silver protrusion is the valve stem that gets struck by the hammer.

Top. The screw holds a spring that pivots the BB shuttle (for lack of a better term).

Screw and spring removed. The shuttle slides right out. It picks up a BB from above and as the trigger is pulled, a transfer bar pivots the shuttle into alignment with the breech. It's a really simple, elegant design. Note: There are no seals on the side of the shuttle-- just an interference fit in the valve body.

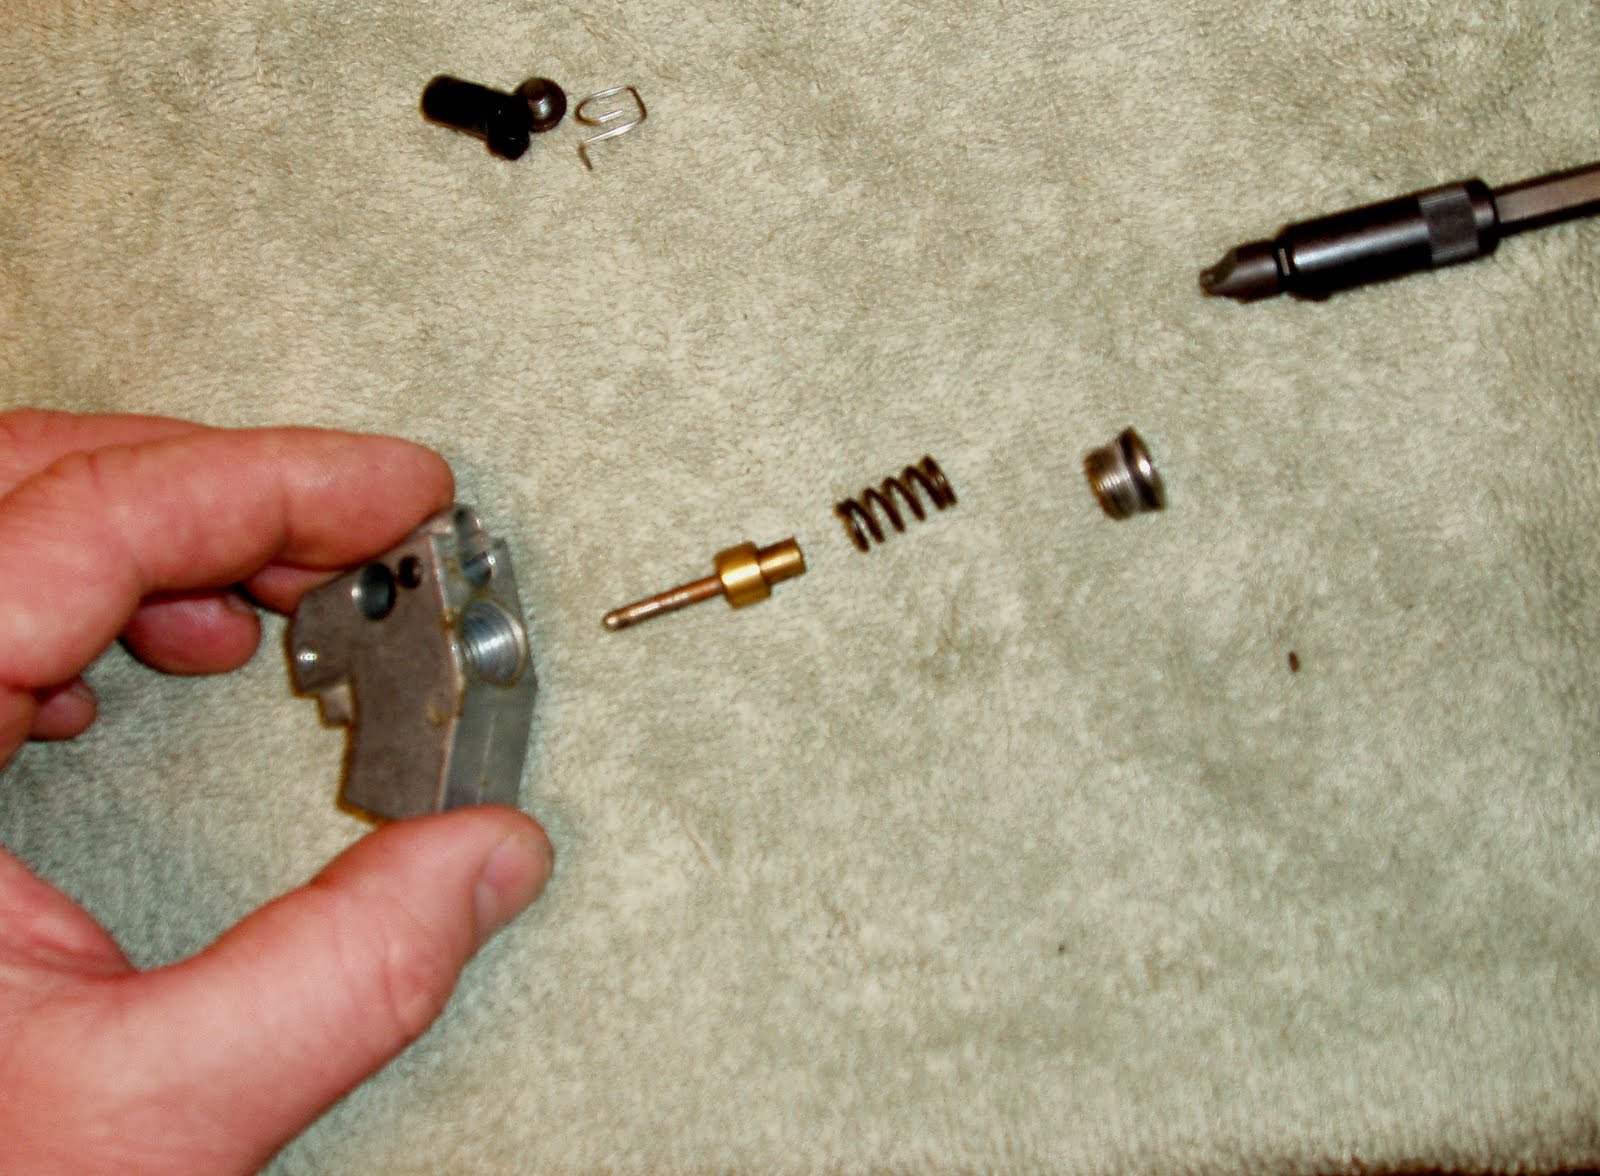
Removed the cap from the front of the valve.

Valve spring and stem pulled out.

Ah, here's that bad cartridge seal. Unscrewed the threaded retaining ring.

Used a dental pick to work the crumbling seal out.

Underneath is a standard 38T/C piercing pin and screen filter.

Here's what the crumbled pile used to look like. Crosman's part # for the seal is 38-128. It's still available and used today in the Crosman 357 pistol.

Reassembled: Screen, piercing pin, seal, retaining ring.

Replaced the cap o-ring with one that looked similar in nitrile. Didn't replace the stem seal. It actually looked pretty good and it operates with 900 psi on it--that really helps keep it closed.

Greased the shuttle's sides to help pivot smoothly and seal.

A couple views.

Oh, I lubed the valve stem seal with a little
Crosman Pellgun Oil. The rest of the reassembly was pretty uneventful. I did refinish four or five of the visible screw heads, removing old screwdriver marks and rebluing. The gun gassed right up and fired 60+ shots without any hiccups. I'll give it back to him and he can finish giving it a shake down.
If I ever find one of these (and for the right price) it would be relatively easy to turn down 8" of 1760 barrel and shoot this with 0.177 cal lead balls. I'd imagine that the accuracy might even be pretty decent but probably not the velocity.
 He told me the CO2 was leaking from the end seal.
 The right side grip is clipped to the 12g CO2 cartridge and pulls right off. The left grip is held by two screws.
 Yep, he was right. The end seal is almost non-existent.
 Removed the rear sight.
 Four screws hold the frame together.
 Screws removed, the right-side half lifts off.
 If you want to remove the barrel, there's a small screw on the underside just behind the muzzle. It retains the front sight--which in turn holds and centers the muzzle.
 Of course, the safety ball bearing fired across the room when I lifted that right half. Some things never change. I scrounged a tiny replacement 3/32" ball bearing. (Nick probably still sells bags of tiny bearings for just such occasions.)
 Detached the hammer and trigger springs.
 Small set screw retains the barrel in the valve. It's a 3/32". Just unscrewed it a turn.
 Removed the valve anchor bolt in the left side of the frame.
 Pulled the trigger pivot pin, wiggled the valve around then lifted off the hammer. The entire trigger, linkage and hammer assembly comes out as one piece. It's straightforward.
 Slid out the smooth bore barrel. If you look at the breech end of the barrel carefully, there's a circlip in a groove that acts as a locater stop against the valve.
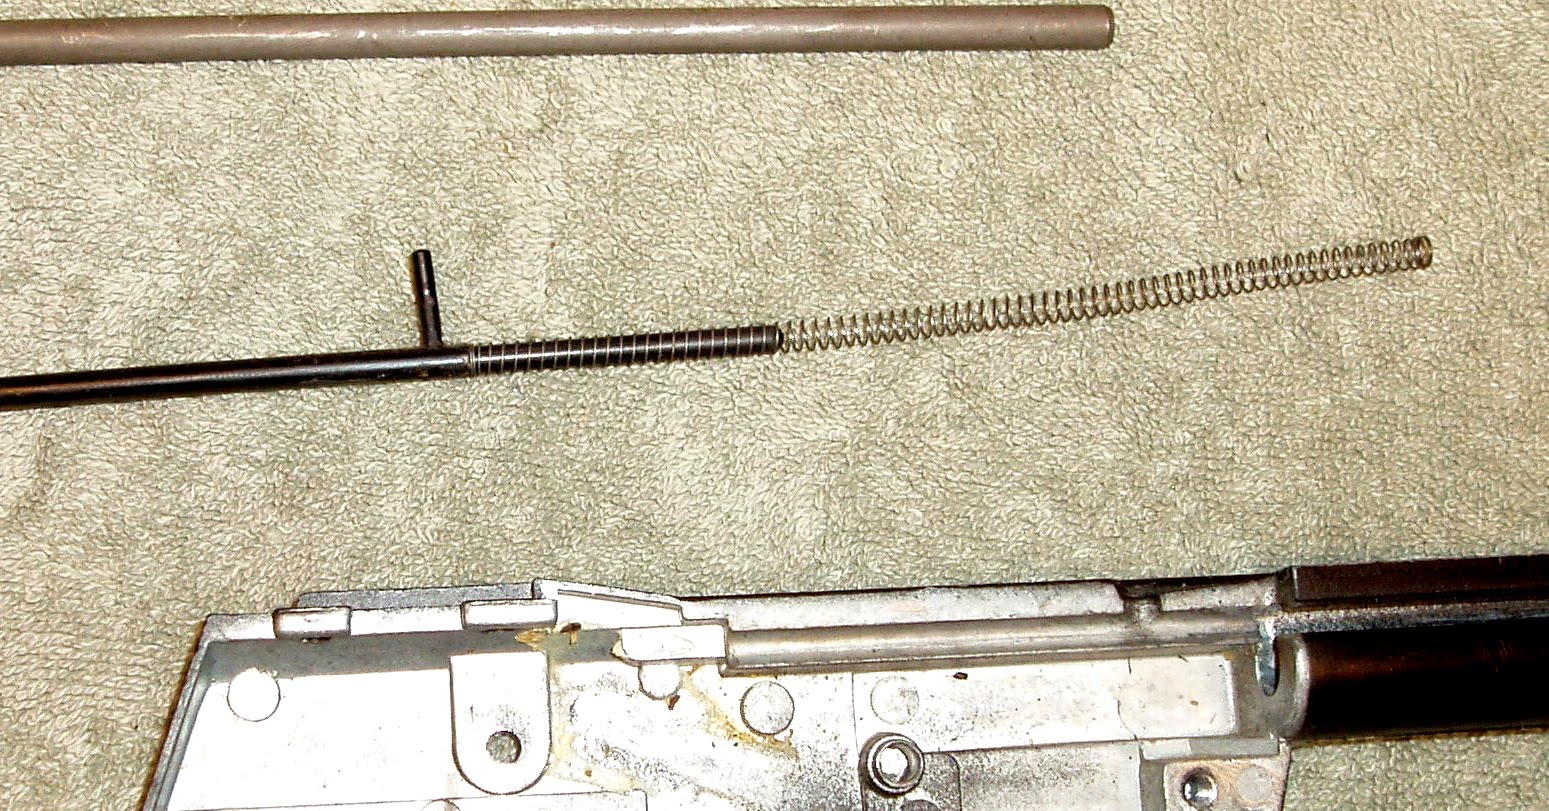 The BB follower is plastic. Look at that spring! That's exactly what I need for my Crosman 118 magazine. Think he'd even notice if the gun was only gravity fed?
 Some valve pics. Rear. The silver protrusion is the valve stem that gets struck by the hammer.
 Top. The screw holds a spring that pivots the BB shuttle (for lack of a better term).
 Screw and spring removed. The shuttle slides right out. It picks up a BB from above and as the trigger is pulled, a transfer bar pivots the shuttle into alignment with the breech. It's a really simple, elegant design. Note: There are no seals on the side of the shuttle-- just an interference fit in the valve body.
 Removed the cap from the front of the valve.
 Valve spring and stem pulled out.
 Ah, here's that bad cartridge seal. Unscrewed the threaded retaining ring.
 Used a dental pick to work the crumbling seal out.
 Underneath is a standard 38T/C piercing pin and screen filter.
 Here's what the crumbled pile used to look like. Crosman's part # for the seal is 38-128. It's still available and used today in the Crosman 357 pistol.
 Reassembled: Screen, piercing pin, seal, retaining ring.
 Replaced the cap o-ring with one that looked similar in nitrile. Didn't replace the stem seal. It actually looked pretty good and it operates with 900 psi on it--that really helps keep it closed.
 Greased the shuttle's sides to help pivot smoothly and seal.
 A couple views.
 Oh, I lubed the valve stem seal with a little Crosman Pellgun Oil. The rest of the reassembly was pretty uneventful. I did refinish four or five of the visible screw heads, removing old screwdriver marks and rebluing. The gun gassed right up and fired 60+ shots without any hiccups. I'll give it back to him and he can finish giving it a shake down.
If I ever find one of these (and for the right price) it would be relatively easy to turn down 8" of 1760 barrel and shoot this with 0.177 cal lead balls. I'd imagine that the accuracy might even be pretty decent but probably not the velocity.
Oh, I lubed the valve stem seal with a little Crosman Pellgun Oil. The rest of the reassembly was pretty uneventful. I did refinish four or five of the visible screw heads, removing old screwdriver marks and rebluing. The gun gassed right up and fired 60+ shots without any hiccups. I'll give it back to him and he can finish giving it a shake down.
If I ever find one of these (and for the right price) it would be relatively easy to turn down 8" of 1760 barrel and shoot this with 0.177 cal lead balls. I'd imagine that the accuracy might even be pretty decent but probably not the velocity.
Would McMaster Carr have that elusive spring?
ReplyDeleteMcMaster probably does have one and if I hadn't been in a hurry, I'd order one (or more likely 20). Part of what I enjoy most about the blog is learning different skills. I've never needed to make a spring before, though, I sort of have a vague understanding of the basics. So, this seemed as good a time as any. Besides, music wire is a cheap way to spend half an hour learning something new.
ReplyDeleteThank you for taking the time to show us the rebuild of your 454 and where to get the seal. I've had one for years but it has a gas leak at the cylinder end so I never used it. Now I'll get it working again!
ReplyDeleteDoug Campbell, Galt, California
Great blog,where can I order a few CO2 cylinder seals to get rid of the leaking problem... BillSholders@yahoo.com
ReplyDeleteBill,
ReplyDeleteorder the seals directly from Crosman.
Did mine with a standard plumbing washer from Ace hardware. The flat kind that go in a kitchen faucet. Works great.
ReplyDeleteA friend of mine just gave me one of these today. It's in really good shape but, has the same problem with the seal. I may fix it and give it too my son. I'm wondering what velocity these originally fired at.
ReplyDeleteSteve,
ReplyDeleteWith the Crosman copper-plated steel bb's, the gun can peak around 375 fps for a few shots on a brand new CO2 cartridge. Most shots, realistically, will be down in the low 300 fps range, especially when firing rapidly. Substituting lead bb's for steel will bring the fps down into the 260 fps range.
Funny you mention lead bbs, I fire them from my co2 200 exclusively and you're right, they are noticeably more accurate than the steel variety.
ReplyDeleteI did find a possible reason for the low fps in these 454s... Notice the loading pivot is cylindrical, while the breech is squared and the beginning of the barrel is faced off square as well. I haven't taken any measurements yet to determine whether it would block entry from the feed-tube, but I think its worth looking in to.
@ Steve Ignat
ReplyDeleteconcerning your idea of the face of the barrel to the loading pivot. I own a 454 and i'm alwasy trying to get more power from airguns. So i stripped my 454 and had a look at the mechanism. You are right, the barrel leaves a considerable gap at the top to the loading assembly! I faced off the barrel with a grinding wheel (8mm diameter, sorry for the metric sizes, i am german ;-)) to correspond with the diameter of the loading pivot and leave a relatively tight seal. Also there is to remove the little clasp, that holds the barrel to the valve assembly, to get the barrel deeper inside the valve. As expected, there are problems with feeding the BBs, so you have to grind off quite some material inside the feeding tube, to get the BBs further inside the valve and get them around the now further inside reaching barrel end to drop into the feeding barrel. Do this with a approx. 5mm dia. milling tool with a long shaft to reach the end of the feeding tube inside the valve assembly. As i had the gun in parts anyway, i shortened the valve spring by approx. 1mm, turned down the valve stem at the point where the gas moves to the upper part of the valve and into the barrel by half (just behind the valve seat), to allow better gas flow. The results are OK, but nothing to write home about. Velocity is (with steel BBs) around 480 ft/s, with lead BBs 420 (!). I expected more from a 7.5 inch barrel. True .177 will not feed reliably, .175 will. The precision with .177 is great, but if every third shot is missing a bullet it is of no use. Maybe a rifled barrel of .173 (like used in the German Haenel rifles) turned down to the "straw barrel" diameter of the 454 might be an option, but i have no time to do this work. Anyway, a nice project, i enjoyed a lot. Thanks for the idea!
forgot to say....
ReplyDeletethe gun with the new configuration (velocity wise) is shooting now 5 inches high with the sights all turned down. Not sure, if this is what i want :-)
an easy way to increase the velocity is to put a piece of wire on the hammer spring and twist it or if you want to lower the velocity use a flat blade screw driver to stretch between the coils just a very little bit then add the wire to tighten it and raise it up a little i can keep my crosman 1600 (same internals as the 454 and and uses the same seal as the 357 and possibly the gas block as well)at 300fps with swings in the area of about 10 to 15 fps depending on how fast your shooting and temperature and yes it does fatigue the spring but if your not going for the highest muzzle velocity you it will last you just fine
ReplyDeleteJust found this thread. Thanks for posting it. I'm going to use it to rebuild my 454 which I've had since I was a kid - assuming that I can still get the seal part.
ReplyDeleteHI,
ReplyDeleteI am having a hard time getting the retaining ring to come loose. Does anyone have any suggestions?
Heat and/or a penetrating oil.
ReplyDeleteThanks! I first tried oil -- to no avail -- and then heat. That did the trick. Now I just need to find some seals and I will be all set.
ReplyDeleteJust found this blog. Is it necessary to completely disassemble the whole gun in order to replace the seal around the puncture pin?
ReplyDeleteI just found your blog. Is it necessary to dissemble the whole gun in order to replace the seal around the CO2 puncture pin?
ReplyDeleteJust remove the retaining ring with a long wide bladed screwdriver.
ReplyDeleteFinger Tighten the retaining ring. The screwdriver works when needed to remove the ring, but don't use the screwdriver to torque it ...
ReplyDeleteany idea why my trigger return is weak when a CO2 cylinder is in the gun, but is good when there is no air?
ReplyDeleteDoes anyone want to purchase one? I have a this same crosman 454 in pretty good condition never used for over 30 years. Clearing out attic.
ReplyDeleteAce.eight@hotmail.com
How do I get the piercing screw out of a 1600 crosman pistol
ReplyDeleteHello, I had my Crosman 454 rebuilt by an airgun fixer upper and when I put a c02 cartridge in and screw it in to engage the gas it just leaks out. That was the problem before I sent it for repair. I don't know the history of this gun, I found it in the rafters in my uncles garage. The shop that rebuilt it said screw c02 in slowly and then once you hear the gas stop, and it should seal and not leak. I have not tried that yet. Any comments or suggestions would be appreciated.
ReplyDeleteDerrick, regarding the cartridge seal on the Crosman 454. I have searched everywhere (apparently only "almost") for the tool to remove the cartridge seal. Even a friend that is a machinist did not know of one, though he could make it.
ReplyDeleteI have tried the better auto parts stores, Harbor Freight and Northern Tool as well as Lowes and Home Depot and internet searches.
Suggestions?
Thank you
Joel
So many thanks to the poster who put this up...and great pics on it as well. Could not have felt confident doing the job without your help. Bought a seal kit on ebay for $13 and it works great now. I kept the ball bearing in the swap, and got it back in when I put it all together, but while checking and re-checking the safety switch it deformed the first coil on the spring a bit and popped out, so had to order a few more ($3 for 10 on ebay.) Not sure why the spring coil deformed....maybe I hit that screw too much on the install of the side plate and deformed the spring a bit? Will know more once the bearings get here tomorrow.
ReplyDeleteDo you have any specifics on springs, seal kits, etc to order from eBay? I lost my safety spring.. if you don't mind sending some pics of that assembly when you out it together that would be very helpful.
DeleteJust search on ebay for "crosman 454 seal kit." You'll find plenty. Mine had 5 pieces + oil: the valve, o ring, seal, screen, piercing pin washer. A few don't have the valve but I swapped mine out. Some have the valve stem pre-cut to fit your gun which helps.
ReplyDeleteAs far as the spring, the original poster who put this how-to here says he lost his spring as well, and used one from a lighter as a backup. You might find one on ebay as well if someone is parting out one of these for parts. Good luck.
As far as how it goes back together, its easy. See that small hole behind the sliding safety switch? Your spring goes in that hole, vertically. The 3/32" ball bearing sits on top. Use some white grease if you have some to hold it there while you place the safety switch on top of it. Hold all of THAT down and drop the other half of the handle on top and screw it all back together.
Thank you so much, I really wish I world have read this post before I pulled mine apart in my mess of a garage and lost the parts!! You guys are AWESOME
ReplyDeletePut mine all back together, new CO2 cartridge, new BBs and....it would fire CO2 but not BBs. In fact, the BBs didn't travel at all. Any ideas what would keep them from advancing and being shot? The black tube with the spring on it that keeps pressure on them seems to work just fine. I've torn it down again to recheck everything and it looks OK....what am I missing? That's two CO2 cartridges now I've pierced and tossed without moving any BBs thru it!
ReplyDeleteI think I have it fixed.
ReplyDeleteI backed off the cap head set screw that holds the barrel half a turn. I think I had it too tight, not letting the BBs into the barrel. I could get a shot off occasionally, but I'm guessing a BB would get stuck, and only exit the barrel once I put 10-12 trigger pulls to it, which to me means that once I put enough gas behind it, it would squeeze past. That barrel is *technically* metal, but it's compressible. Also, I had trouble with the trigger not coming back to starting position regularly. After each shot I had to really play with it in order to get it to drop again. A little grease on the trigger metal arm helped with that too.
I just put 30-40 BBs into the target box in the garage rapidly and it worked. Will run a full cartridge thru it and see how it holds up. Thanks for all the tips, people!
I can't seem to get the 'transfer bar' (quoting) aligned right with the 'shuttle'. The bar has a hole at the end (away from the trigger) but the shuttle small plastic nub is too big to go in the hole. What am I doing wrong. Thanks in advance for the help.
ReplyDeleteSorry. Its been almost 10 years since I've had one of these apart. Take a look at Crosman's EVP schematic and see if that helps.
ReplyDeleteThis comment has been removed by the author.
ReplyDeleteThanks, Derrick38, but I have that schematic. I've ordered a new 'shuttle' or loader and I will see if that helps.
ReplyDeleteThanks for this great post with commentary and pictures. Also all the other good comments including 1.) use of heat to help remove the retaining ring 2.) use of white grease to hold ball bearing in place while putting the right side back on. Bought seal kit on Ebay for $15 and it worked perfectly.
ReplyDeleteI too have enjoyed this post. However I need a little more help. What should I do or use to replace a cracked and broken retaining ring? I have collected several not so cheap air pistols over the years. My son took them out and over screwed three of them. He heard air coming out so he just kept tightening then till the metal retainer snapped. Is this something I could find at Ace hardware?
ReplyDeleteMany thanks for this feature! Relied heavily on your photos and step-by-step to replace the gas seal. The other parts looked & felt OK, so I went with them, suitably cleaned & lubed. I did find I had a problem keeping the link arm between the trigger and the BB shuttle from disengaging when replacing the valve body/trigger & hammer assembly in the receiver. My solution to the problem was to engage the link arm & shuttle, then tie a piece of dental floss around the valve body to hold the arm & shuttle together until I had everything seated back in place, then cut & remove the floss. Shooting trials proved out well, and a good gun is now working again. Thanks!!
ReplyDeleteI have a Crosman 454 that does not seal the CO 2 cartage. Well sell for $10 + postage
ReplyDeleteJim Piche 813-503-3926
pichejr@me.com
Thanks for posting these photos! I just put new seals on two of these pistols. I took one of them apart all the way because the trigger was sticking. Your photos gave me the courage to proceed. I found the seal washer for under $2 at Precision Pellet at www.airgunshop.net, 717-3821481 in New Park, PA Shipping was $6. When I was reassembling the second gun, I referred to your photos to figure out how to attach the small spring. That was very helpful.
ReplyDeleteThe previous poster suggested using dental floss to hold the link arm and shuttle. I used a piece of blue painter's tape that was easy enough to pull off after getting the piece seated on the post. The idea of somehow holding the link arm to the housing was very helpful! Thanks for that.
One pistol was already sold on eBay, the other one is going up later today. First one sold for $47 plus shipping.
Thank you for posting this. It helped me to have the confidence to rebuild a 454 I found that very much needed this overhaul.
ReplyDeleteDoes anyone want to purchase one? I have a this same crosman 454 in pretty good condition never used for over 30 years. Clearing out attic.
ReplyDeleteAce.eight@hotmail.com
Looking at the pictures of the 454 rebuild I noticed the barrel has a circlip in a machined groove.
ReplyDeleteParts drawings for the 454 show it as PN # 577-080.
The 454 that I own does not have the circlip or the machined groove on the barrel.
Was it discontinued as part of the manufacture?
Could I have an early manufactured model that preceded its use?
Thanks
Where did you get the tool to remove the threaded retaining ring?
ReplyDeleteFound a 2 male pin "spanner socket" in my Dad's old tools.
ReplyDeleteIt was close enough to the right size to use but it could have been a touch larger/wider.
https://www.jgairguns.biz/tools-c-739/crst3811-valve-nut-wrench-p-14706.html
ReplyDeleteGood find, Thanks.
ReplyDeleteJG site says SOLD OUT but who knows what an email to their CONTACT US page could do?!?
ReplyDeleteI searched all over eBay and other sites to no avail.
It shouldn't be too hard to fabricate :-?
Good luck
I found a piece of metal that fits almost perfectly. Turns out it wasn't in as tight as i thought it would be.
ReplyDeleteThanks for the help.
On a side note, does anyone know the size of the e clip that hold the rear sight adjustment screw in place. It's called an elevator ring part# 577-045 ? Im measuring 1.5mm?
https://www.jgairguns.biz/454-c-78_89_161/crs577045-elevator-ring-p-10599.html
ReplyDeleteUnknown, you can ask them or just order one if you need it. ;-)
Craig has a question:
ReplyDeleteHave acquired my Dad's old 454. Probably needs a new seal. Worked on the CO2 Capsule screw to rebuild it. CO2 Capsule now punctures, but 5 to 8 ft per shot. New Seal?
Also, trigger won't reset after each shot. No missing parts. Must manually reset. Please help?
Thanks,
Craig
Are you sure the trigger return spring is there? It's about an 1/8" in diameter and runs from the trigger linkage to a stationary pin in the front of the grip frame.
DeleteI need someone to replace the leaking CO2 seal. Help@
ReplyDelete