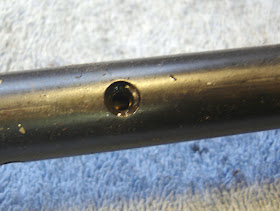
The transfer port seal was a bit rough.
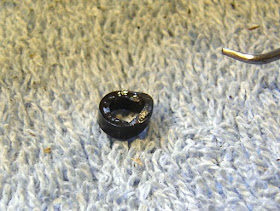
So it needed to be replaced. I had one on hand.
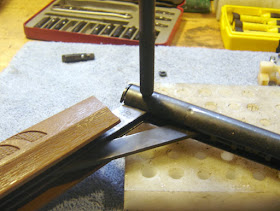
I punched out the pump pivot roll pin.
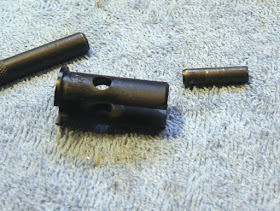
The plug and pin.

The piston assembly. It's basically a 760/1377 piston with an extension.
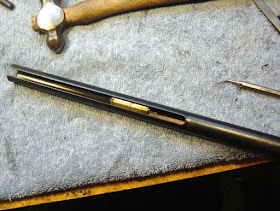
I pushed the valve out with a dowel.
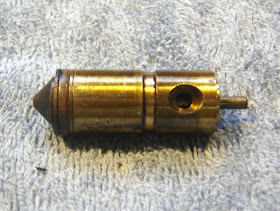
The valve.
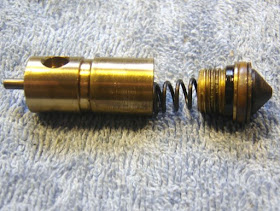
Unscrewed.

The inlet and exhaust valves were good but the o-rings needed to be replaced.
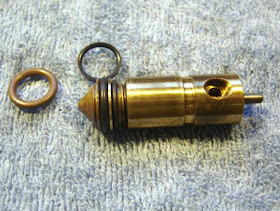
So I replaced them and screwed it back together.
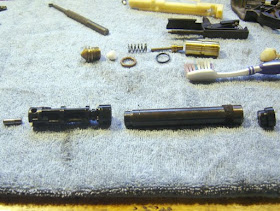
I replaced the pump cup as well. See how the extension snaps into the piston where normally the seal snaps in.
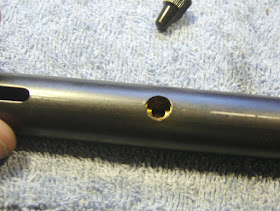
I reinserted the valve and lined up the transfer port.
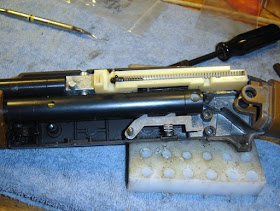
You need three hands and a helper monkey to get it all back together.
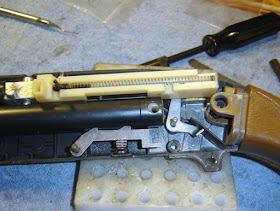
Notice the position of the cocking lever, and you have to have the BB follower pointing upwards to align with the slot it travels in. Then you sort of massage the whole thing back together. It take a couple of tries to get all the pins and such back in the holes. I'd love the see how Crosman assembles the things. I tested it and at 10 pumps I was getting 680 fps with Crosman Premier Lights (7.9gr.).
I rebuilt my 766 which for the most part appears identical to the 2100. I also was getting about 680fps but with RWS Super Domes. I was dissapointed because specs are about 725fps with 8.3 grain pellets. I had read several entries on other sites which seemed to confirm this expectation. I wonder what would cause the difference in performance?
ReplyDeleteRegards,
Fred S.
All the sites I've checked say "up to" 725 fps, which to my mind means that real world will be less.
ReplyDeleteWhere can you get replacement parts such as the piston?
ReplyDeleteDownload the manual:
ReplyDeletehttp://www.crosman.com/airguns/service/manuals
Then call Crosman and order the parts:
http://www.crosman.com/airguns/service/contact
Thanks to your blog I rebuilt my 2100. It works fine but the question I have is how did you measure the pellet's velocity? Thanks again.
ReplyDeleteByron,
ReplyDeleteYou need one of these:
http://www.shootingchrony.com/
Nick
When you are doing the final assembly I used a clamp to hold the bottom half of the housing against the barrels while I fit all the little pieces into place. I then put a drill bit, smooth shaft down into the hole in the bottom housing to hold the little plastic piece in the end of the barrel. I also looped a twist tie from a bread wrapper over the back end of the trigger thingee (766?025) to depress the spring. I then removed the clamp while having the monkeys support the gun and pull on the bread tie and fed the top half of the housing over the drill bit and into place. I wiggled out the bread tie, and lifted out the drill bit and screwed it all together.
ReplyDeleteThis is a f***** good article, you are a saviour - I am reassembling my trusted 2100 I had so much fun with in deep Russia, and to find what is needed and how to do it was a nightmare... you wouldn't think of carrying it abroad for a repair on a plane, so - THANK you SO MUCH!
ReplyDeleteAndrey
Fantastic article, saved me untold hours of suffering in cleaning out my own crosman 2100 this afternoon. Honestly, I have no idea how they would assemble this things without three people.
ReplyDeleteGreat documentation and photos. Thanks for all of your efforts anad for helping the rest of us C2100 owners out.
ReplyDeleteQuestion: My C2100 barrel has a bit of side to side movement. Any way to tighten this up? Otherwise, it shoots fine.
Thank,
KuskokwimAK
Possibly add some bushings to the barrel/tube interface?
ReplyDeleteHey i have a croman 2100 classic.The gun is close to 30 if not 30 year old. When i pump it the air dosent go in it hisses like its leaking.I also need the stock.But i was wondering what is causing this problem,could someone please get back to me asap... cj_whiffen2@hotmail.com
ReplyDeleteThis is a very helpful post! Currently I have taken the gun a part and am trying to get the air valve unscrewed. Is there a trick to this? It is brass and very soft I don't want to damage it.
ReplyDeleteThanks,
Brian
It's best to grip one half in some soft jaws in the vise or better in a three jaw lathe chuck.
ReplyDeleteNick
Thanks for the great photos, Nick.
ReplyDeleteI am overhauling my Dad's old 2100. It doesn't get the pellet to the target. Sometimes it doesn't get it out of the gun.
I'll see if I can add something to Nick's work to benefit any shiftless amateurs like me.
The online parts diagram for the 2100 is kind of crummy and doesn't include names of the parts. You can use the much-better diagram for the 2100B to get a clear picture with part names so you can make sense of how things work. But they are not the same gun. There is a video on ebay that explains how the valve works.
Disassembly was easy. I expected to see springs flying when I opened the receiver, but none did. I took pictures as I went so I could retrace my steps.
I found a deformed pellet stuck in the BB feed mechanism. Nobody has ever used BBs in the gun, so nobody noticed. I don't think that the stuck pellet could have caused the low-power condition.
To drive out the roll pin, I used the butt end of a 3/16" drill bit instead of a punch. I drilled into a block of wood and left the point of the bit in the block, then struck the block with a big hammer.
When driving out the roll pin, I set the pump tube on top of the jaws of a vise. I did some harm to the appearance of the tube that way. So be careful.
I had only a 3/8" dowel on hand to drive out the valve assembly, and I was afraid of bending the valve stem. So I first dropped a couple nuts with 1/2" flats into the tube so that they were stacked and the valve stem passed through them and was protected by them. If you are installing a new valve assembly, I guess that that doesn't matter.
The edges of the holes that the roll pin goes through were kind of rough, and I thought they might harm the O-ring upon insertion of the valve assembly, so I applied a dowel wrapped in sandpaper to the edges of the holes inside the tube. Then I swabbed the tube a few times with clean oily paper towels.
I tried not to touch anything inside without good reason, and I don't expect reassembly to be hard despite what people say ... famous last words?
I called Crosman at 1-800-724-7486 and ordered 760-140 pump cup @1.15, 130-036 breech gasket @1.15, and 2200K021 valve assembly @5.67, $4 shipping, $11.97 total, on credit card, to be delivered in 7-10 days. The people on the phone were very efficient (no menus, no waiting), patient, and helpful. So that was very refreshing. I found a similar bundle on ebay for $21.
Some of the part numbers have been updated since the 2100 diagram was made. Crosman's people on the phone seem to know about that.
Probably I could have done a good overhaul by replacing only the pump cup, the breech gasket, and the 130-034 inner O-ring, all of which seemed at least a little dried out. The inner O-ring looked pretty bad, and I expect that that was the culprit. The outer O-ring 2200A035 still looked pretty good. So maybe somebody could do a good overhaul for under $8.
I have to wait for delivery of the parts in order to say whether this overhaul is going to be a success.
Here is a followup to my previous lengthy post. I found the parts in my mailbox about a week after ordering from Crosman. I replaced the parts, and the gun is working fine---as good as new, I guess. Here are some more comments and details.
ReplyDeleteComparing the 2100 and 2100B diagrams, I don't see any difference other than part numbers. I don't see any differences in the design. The date mark on the inside of my (2100) receiver showed that my gun was made in 1994, and I didn't notice any differences from either diagram.
http://www.youtube.comwatch?v=uIIG-aa3VrM&feature=related explains how the valve works.
I disassembled the gun as it lay on its right side, with the left half of the receiver up. After
taking out the three screws, I gently pulled and coaxed to get the left half away from the right
half without causing chaos. The safety and the trigger and its dowel pin and torsion spring
stayed in place nicely in the left half, and everything else lay in place precariously in the right half. Eventually I took everything apart, but I was glad I was gentle at first so I could see how everything fit together.
I said that no springs went flying when I opened the receiver. But the BB detent spring 766A020 may well go flying during disassembly or during your assembly attempts. One of Nick's photos shows the recess or cutout where the spring pushes against the inside of the top of the right half of the receiver. But the photo may be a little misleading because it doesn't show the spring actually IN the recess. There is a symmetric recess in the receiver's left half. Anyway, upon assembly, the BB detent together with its spring fit all at once in the recesses of four parts: left and right receiver, barrel support, and magazine.
Nick doesn't mention the spring washer 766-079. It goes on the interlock dowel pin 766-044 and is very easy to overlook, so much so that I can't tell whether it appears in Nick's last photo above.
I mentioned last time that I dropped a couple nuts down the pump tube to protect the valve stem when driving the valve assembly out using a dowel. It is probably better to use a 1/4" drive socket for that, since the nuts might scratch the inside of the pump tube.
The replacement valve assembly is made of aluminum, whereas the old one was made of brass. I probably could have just done as Nick did, and replace the O-rings. But when you remove the old O-ring, you could scratch the surface that the O-ring is supposed to seal. So either be very careful, maybe by removing the old O-ring with a toothpick, or just buy a new valve assembly for $5.67. I don't know whether there are wear issues for the valve assembly (besides O-rings).
The hardest part of the repair was reinstalling the roll pin. I had never dealt with a roll pin before. I think I compressed it with a small vise-grips while hammering it in with the blunt end of a drill bit, the other end of the bit being sunk in a block of wood. There must be a better way of installing a roll pin, but I have not looked into it.
So it was basically an enjoyable and successful repair, and nobody with passable general repair skill should be afraid to buy the parts and try it.
Thanks again, Nick, for the nice photos.
P.S. The new pump cup was way more flexible than the old one. You should definitely replace the pump cup for $1.15 when you have it apart.
ReplyDeleteThanks for the followup! I'm not sure about the spring washer in my gun - but the rifle works so I'm not going to disassemble to check!
ReplyDeleteNick
yer welcome, Nick.
ReplyDeleteMy youtube link was mangled. You can just go to youtube and search for uIIG-aa3VrM or "Crosman 1377 piston and valve mods".
Hello,
ReplyDeleteI have similar gun, remington airmaster 77, and I have problems.
I think its valve.
I disassembled gun, but can not unscrew valve.
How you did it?
Thanks you.
gedi, I usually either chuck it up the the lathe and use a spanner or strap wrench on the other half, or I hold it in a vise with a vee block and use a strap wrench.
ReplyDeleteDo you know the part number for the transfer port seal?
ReplyDeletehttp://www.crosman.com/cs/manuals/crosman-rifles
ReplyDeletehas the exploded diagrams with part#s.
i have a crosman 766 and the air valve is attached to the metal receiver and has no hole on the top any information would help
ReplyDeleteSealing Valve Threads
ReplyDeleteMany thanks for a well documented breakdown of a Crosman 2100 Classic air rifle.
Ordered well-priced replacement parts from JG Airguns,LLC.
After unscrewing the brass valve assembly to replace the guts I noticed a clear substance flaking off the threads. Thinking it made sense to seal this critical area I resealed the threads with Permatex High Temperature Thread Sealant (PX#59214).
Rifle holds a charge well now without the blowout (Pffft!) I was experiencing before the rebuild. Thanks again! -and for all y'alls helpful comments.
locksmith513, It sounds like you have the phase 1 build of the 766 where the bb magazine, receiver and valve body are a single part. The valve body exhaust directly into the breech and doesn't have the tranfer port that the 766 phase 2 or later builds have. More information on this can be found at: https://support.crosman.com/hc/en-us/articles/203543310-766-Owner-s-Manual-EVP-1977-1981-
ReplyDeletei need crossman 2100 classic valve or rebuild kit( in which some kinda warshall caller O ring and pump cup) where i will find it ? second question 2100 classic and pumpmaster 766, 760 . O ring , pump cup and valve are same?
ReplyDeletei need crossman 2100 classic valve or rebuild kit( in which some kinda warshall caller O ring and pump cup) where i will find it ? second question 2100 classic and pumpmaster 766, 760 . O ring , pump cup and valve are same?
ReplyDeleteContact Crosman, they will have parts.If they don't then https://www.bakerairguns.com/
ReplyDelete