Got waylaid on a couple small projects for co-worker Rich (aka "Gigantor"). When your 6'5", 240 pound co-worker asks for something, you don't say no.
He's a paintball fiend and is one of the top players Ohio. He just recently purchased some custom paintball guns that he wanted slightly modified.
Forgive me if I butcher the terms and items. Not my field.
These are auto-cocker bolts. The top is a custom delrin bolt from CCM. He was getting air blow-by and wanted to add o-rings like the aluminum bolt on the bottom.
Chucked it into the 3-jaw,
and using a small parting tool, cut o-ring grooves on either side of the port.
Here's one cut. It's 0.072" wide. The bottom of the groove is 0.555" in diameter.
A couple pics from another co-worker, Doug. He's the guy with the camera always at the ready and he can shoot like a pro--if you pay him.
The second small job involved another used paintball gun for Rich. In a fit of stupidity I didn't take pics of the work until the end. In my defense, I was trying to just get it out of the way to work on the HW 35EB.
The end of the bolt had a small lip to grasp when cycling the gun manually--in case there was a broken ball in the gun. This gun shoots about 30 balls per second and Rich burns through about $65+ in paint per HOUR of game play. (He will seriously jack you up.) I get a sinking feeling in my stomach every time he mentions taking me along to a paintball match. I've no desire to be shot 45 times in under 2 seconds.
Anyway, the end of the bolt was covered in plier marks. I chucked the bolt and took off the plier-damaged lip. Then, I turned the domed end into a cone and faced off the very end. The flat end was then spotted, drilled, and tapped to M5 x .8mm.
Countersunk a knurled stainless steel washer and attached it with a stainless steel flat head bolt. Added an aluminum washer in between the knurled washer and the bolt to allow some stand-off to make it easier to grab. Polished all the aluminum. Gigantor is happy as can be and when Gigantor is happy, everybody is happy.
Friday, January 29, 2010
Monday, January 25, 2010
A NOS Weihrauch 35 E Gets an Overhaul Part 3
Almost ready to reassemble the HW 35 E . Just a few things to deburr and polish first.
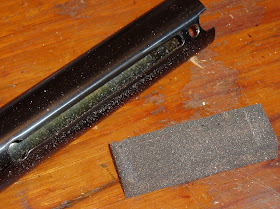
The cocking slot on the bottom of the compression tube always has some really sharp edges.
A small file, a diamond hone, sandpaper whatever. I used a deburring tool this time. Be careful, the edges of the slot or the tool itself can open you up like a zipper.
I hit both the inside and the outside edges. This makes the gun smoother to cock and reduces the chance that the piston seal will be damaged upon reassembly.
Finished with a rubberized abrasive block. It's called a "Rust Eraser" or something like that. Cleaned the tube thoroughly inside and out after this step.
Polished the end of the barrel latch,
and the end of the cocking lever.
Then cleaned the barrel with the JB Non-Embedding Bore Cleaner.
Some moly grease on the end of a plastic dowel
And gave the compression tube a very thin coat.
Also slathered the piston--inside and out. Didn't lube the front of the seal. I wiped this down to a thinner layer before sliding the piston into the compression tube.
Like so.
Lubed the barrel latch spring in the breech block.
Pushed the spring forward with an M5 allen wrench. Once the spring was far enough forward to clear the small post on the back of the latch, it fell right into place and the spring held it fast.
Installed the barrel pivot washers using the moly grease to hold them in place,
then attached the cocking lever to the piston and used a dental pick to line up the pivot washers. Installed the pivot bolt, washers and nut.
Coated the end of the cap with moly. The spring guide will bear against it and it should be free to rotate.
Very thin coat of moly on 100% of the spring and guide. Chucked it into the spring compressor and reinstalled the end cap.
Cock the trigger.
Install the safety and spring.
Insert the trigger unit, line up the holes and press the pins home. Pull the trigger--CLICK!--or the gun won't cock and you may think the spring is too long. Not that I've ever done anything like that. Never. Not even twice.
Bought this Air Arms aperture sight last week from West Virginia airgunner Scott T. He lives near some of my favorite backpacking spots in the 900,000 acre Monongahela. One of the most beautiful places I've ever hiked. Thanks Scott.
Fired about 40 shots through and set up the chrony. The gun was clocking in the 640 fps range with .177 cal RWS Hobby pellets. A bit too low even for me. The shot cycle was smooth and short with none of the earlier vibration and buzzy noise. So the first replacement spring is a bust due to the low power. It did shoot rather nicely though.
Stock removed and pulled the trigger and safety--again.
Only need to remove the end cap, spring and guide.
Turned the guide down about 0.013" to fit inside the thicker wire diameter mainspring from the parts box. The guide ended up at 0.630" diameter.
Reassembled the gun and again fired about 40 shots before checking the velocity. The rifle was noticeably faster just from the sound. The chrony confirmed what my ear told me. About 750 fps with the heavier spring. This spring is pretty close to the factory spring. Really just a bit larger in diameter. I'll check it again tomorrow and see how it does after sitting overnight.