I've got a Crosman 2250 that's morphed into a .177 cal pistol. I guess that makes it a 1750 of sorts. I wanted this gun to primarily be a low powered paper puncher--but I wanted to also easily have the option of full power for metal silhouettes. A quick and dirty hammer spring adjuster was the obvious answer.
Removed the rear grip frame and rear breech bolts. The end cap and hammer spring pop right out.
Chucked the end cap into the 3-jaw on the Taig lathe and spotted with a center drill.
I've got more metric blots lying around than SAE, so I though drilled with a #8 (0.1990") bit...
...and tapped the hole M6 x 1.0mm
Chucked an M6 socket head bolt...
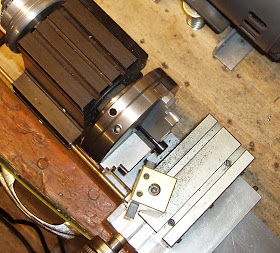
...and turned the head down to fit inside the end of the hammer spring.
Like so.
Now I need an unobtrusive adjuster handle. A small M6 aluminum nut will do the trick.
I center punched a dimple into one of the flats and drilled through with a #43 (0.0890") bit.
Not shown: Tapped the hole with a 4-40 tap.
(don't forget to use cutting fluid when tapping threads)
Set screw installed in the nut. The M6 adjuster bolt is too long.
Eyeballed, guessed, and crossed my fingers for luck.
Pretty straightforward.
Spring was shortened by about 3 coils to make up for the length of the base on the M6 bolt.
The hammer spring isn't stock. Something I found in a box of springs that looked promising.
Snugged down the set screw then tightened the adjuster all the way in. Mounted it in the lathe and faced down the end of the nut and M6 bolt. Blued the end of the steel M6 bolt with my old standby, Brownell's 44/40.
Adjuster at about mid range.
Wanted enough speed to punch clean scoring holes in those heavy card stock Gamo targets. They seem to need about 385--400 fps to cut easy to score holes. Lower power will also increase shot count and decrease sound--good things for indoor use. With the adjuster full out, Crosman .177 cal wadcutters were clocking right around 435 fps. Turned fully in, the same pellet was averaging just over 550 fps.
Just a bit more speed than I truly need, but it's more than close enough to be in the ballpark. A slightly softer spring could be substituted if further refinement was necessary. I suppose it's also now possible to play with velocity and fine tune for a given pellet.
Friday, July 24, 2009
Tuesday, July 21, 2009
Crosman 147 BP Stock Refinish Part 3 Final
Back to the Crosman 147 BP.
I allowed plenty of drying time for the Rust-Oleum on the metal. I gave it the better part of a week before really handling anything. Overkill, but other things came up as they will.
Since I was doing a quick and dirty job of this one, I used some Mother's Mag & Aluminum Polish. Applied a very small amount on a rag and buffed out the finish on the barrel and the compression tube.
It didn't remove much. The epoxy paint held up beautifully.
Need to reinstall the roll pins to attach the pump arm to the lever.
Found a couple transfer punches in the correct diameter to use as guides.
Test fit.
One punch in place.
The second. A roll pin is held against the end of the guide then pushed through. The guide pin then backs out as the roll pin is advanced, leaving the holes lined up as it exits.
Then a few taps with another punch sets the roll pin. Quit when it looks centered.
Lather, rinse and repeat.
Pinned.
The 147 BP's internals were reassembled. Check here for instructions.
Interesting how the grain is continued all the way through the stock. Of course, that's the way to do it. I like the rounded forend.
A Weihrauch buttpad on an old Crosman. Now you know why I don't show my face around the vintage forums much. "Heathen!"
The grain contrast is quite striking.
Another recessed stock mounting bolt. This one came first.
Left the sliding breech cover blued. Actually, I think it was probably re-blued months ago.
Looking back, this looks more like a restoration with a better butt pad. I'm glad the grain took the color so well. The filled grain alone was reason enough to tackle the refinish. Since the gun stock no longer looks like the wood is from an old orange crate, it's much more likely to get used.
Ever wonder if Crosman knew back in the 1950's and 60's that they were making airguns that we'd still find so desirable 50 years later?